

MAGic Screen Magnification Software
| MAGic is a magnification application developed by Freedom Scientific |
| Also referred to as a “Large Print Program” |
| MAGic also has screen reader functionality |
Time to Launch MAGic
| You can launch MAGic like any other program on your computer. |
| You can also use the keyboard combination Ctrl + Alt + M to launch MAGic. |
| You can also set-up MAGic to start automatically when your computer is turned on. Just open the MAGic Main Menu by clicking the MAGic symbol in the top left corner of the MAGic user interface. Select File from the dropdown menu and then select Preferences from the File sub-menu. This will open the Preferences Dialog window, select the topmost item, the Automatically start MAGic button. This will open a Start MAGic options dialog. Here you can choose to have MAGic start automatically in the logon screen, when Windows start after a specific user logs on, or just come on anytime Windows is started. |
The MAGic Key
| As we magnify our screen, we start seeing smaller portion of our screen larger. At 2x magnification, a MAGic user is only seeing 1/2 of the computer screen at any given position. This makes using our computers a little more difficult, especially navigating toolbars and menus. For this reason, users of magnification software depend heavily on keyboard shortcuts as they are more efficient than navigating a visual interface. |
| While there are keyboard shortcuts for Windows and the majority of the programs that run in Windows, MAGic has its own set of keyboard shortcuts. |
| MAGic shortcuts typically involve some combination of keys, modifier keys (Shift, Ctrl, and Alt, and the MAGic Key. |
| The MAGic Key is used in the majority of MAGic keyboard shortcuts. By default, the MAGic Key is set to Caps Lock. However, users can change what key is their MAGic key. |
| To change your MAGic key, open the MAGic Main Menu by clicking the Magic symbol in the top left corner of the MAGic user interface. This will open a dropdown menu where you can choose Tools to open the Tools sub-menu. In this menu, choose Keyboard Manager. This will open the Keyboard Manager Dialog. In the lower left corner of this window, you’ll see a button that reads “MAGic Key”. Click this button to open the MAGic Key dialog. In this window, choose which key you’d like to use from Caps Lock, Extended Insert, Num Pad Insert, Either Insert, or Scroll Lock. |
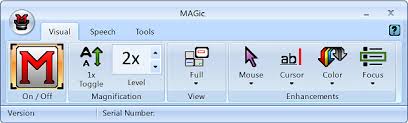
MAGic User Interface: Visual
| The MAGic User Interface (UI) (the window that opens when we launch the MAGic program) is rectangular toolbar organized into three tabs: Visual, Speech, and Tools. In this lesson, we’re going to focus on the Visual tab which will let us zoom in and out, change our window type, add color enhancements, and more. |
|
|
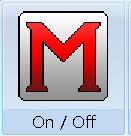
On / Off
| Using MAGic, we’ll make changes to how our computer screen appears. We will use the program to zoom in, change color schemes, and change the appearance of our mouse pointer, text cursor, and screen focus. |
| There will be times when you need to turn off your magnification and enhancements. For example, you might be sharing your computer with someone who doesn’t use MAGic. To quickly turn MAGic off, you can simply click the leftmost item on the MAGic UI. To turn your magnification and enhancements back on, simply click the On / Off button again. |
|
|
| Use the keyboard combination MAGic Key + Delete to turn MAGic On and Off. |
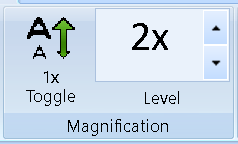
Magnification
| The Magnification section of the Visual tab is where we’ll use MAGic to zoom in and out. |
|
|
| The 1x Toggle button is a quick way to enable and disable our magnification. There will be many instances when we need to quickly zoom out to navigate the desktop or understand the layout of an application or document. The 1x Toggle button will change our level of zoom to 1x (no magnification). Press the button again and you’ll be returned to the level of magnification you had previously been working with. |
| The keyboard shortcut to toggle 1x Magnification is MAGic Key + Shift + Delete |
| To the right of the 1x Toggle button, you’ll find your current level of magnification. Use the up and down errors to increase and decrease magnification. |
| You can also increase magnification with the keyboard shortcuts MAGic Key + Num Pad Plus and decrease magnification with MAGic Key + Num Pad Minus. |
View
| The view section of the MAGic Visual tab allows user to choose their magnified screen layout. | |
|
|
|
| Full View | Full view means that the entire screen is magnified using the magnification set by the Default Magnification Level option. Full view is the default1. |
| Split View | Split view divides the screen into two halves, one magnified, one unmagnified 1. |
| Overlay | Overlay view opens a magnified rectangular window positioned in the screen corner. As you move the mouse, that area of the screen appears in the magnified window 1. |
| Lens | Lens view opens a magnified rectangular window that follows mouse movement 1. |
| Dynamic Lens | Dynamic Lens view functions like Lens View except it follows keyboard commands instead of mouse movement 1. |
| MAGic supports users with multiple monitors. If you have more than one monitor, simply connect it to your system and configure settings by opening the View dropdown menu and selecting Multi-Monitor. | |

Enhancements
| The enhancements section lets users make several changes to the appearance of their computer. Mouse enhancements will change the appearance of the mouse pointer, cursor enhancements will change the appearance of the text cursor, color enhancements will change the colors of the overall screen, and focus enhancements will give visual cues to help track the computer’s focus. |
|
|
| The enhancements section uses a feature called “Split Buttons”. Visually, each enhancement appears as a rectangular button with an icon and a name. For example, the Mouse split button has the image of a mouse pointer over the word “Mouse”. The button is divided into two horizontally. Clicking the top half of the button will toggle the feature on and off. Clicking the bottom half of the button will open a drop-down menu for settings. When a feature is enabled, the background of the split button will change from the light blue of the MAGic UI to orange. |

Mouse Enhancements
| Using mouse enhancements, we can change the appearance of the mouse pointer to make is more visible and easier to locate. |
 |
| Customize the pointer by changing the body color, border color, size, and transparency. |
| Users can choose different mouse settings for working with magnified and unmagnified screen. |
| Add a mouse enhancement to help you locate the pointer. Mouse enhancement styles include crosshairs, ovals, boxes, and scopes. Choose the color, transparency, thickness, length, and height of your mouse enhancement. Further, you can choose when the enhancement will display – only when the mouse is moving, only when the mouse is stationary, only when the MAGic key is pressed, or always. |
| You can use the keyboard shortcut MAGic Key + F4 to toggle mouse enhancements on and off. |
Cursor Enhancements
| Using cursor enhancement, augment the appearance of the cursor to make it more visible and easier to track |
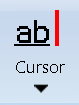 |
| Change the color of the text cursor. Note – if you want to change the thickness or the blink rate of the text cursor, you’ll need to make that change in your Windows settings. |
| Add a cursor enhancement to help find the exact location of the cursor. Choose from enhancement styles including oval, triangle, box, and line. Customize the color, transparency, thickness, length, and height of the cursor enhancement. Further, you can choose when the enhancement will display – only when the cursor is moving, only when the cursor is stationary, only when the MAGic key is pressed, or always. |
| You can use the keyboard shortcut MAGic Key + F8 to toggle cursor enhancements on and off. |
Color Enhancements
| With color enhancements, change the overall appearance of the screen. This mode is similar to false color modes that are available in CCTVs and electronic hand-held magnifiers. | |
 |
|
| Below you’ll see the various color enhancements and settings available in MAGic. Keep in mind that these settings and modes are not mutually exclusive, it is possible to have multiple modes and custom settings running together. | |
| Invert Brightness | Select this check box if you want MAGic to invert the brightness of colors on your display. Dark colors will appear lighter, while light colors will appear darker. For example, if you select this check box, black text becomes white text and dark blue becomes light blue1. |
| Invert Colors | Select this check box to reverse the colors that are displayed on your screen1. |
| Invert Black and White | If you select this check box, MAGic replaces the color black with white and the color white with black1. |
| Monochrome and Tint | The Monochrome and Tint area allows you to tint your screen with a color or make the screen monochrome (black-and-white, yellow-and-white and so on). MAGic only applies these settings if you select the Enable Monochrome and Tint check box1. |
| Color Switching | The Color Switching area allows you to define rules that switch certain colors on your screen with colors of your choice. MAGic only applies these color switching rules if you select the Enable Color Switching check box1. |
| Brightness & Contrast | Use the Brightness slider to adjust the brightness of your screen. Brightness determines how light or dark colors appear. Move the slider down to reduce the brightness, move it up to increase the brightness. Use the Contrast slider to adjust the contrast of you screen. Contrast determines the difference between lighter and darker areas. Move the slider down to reduce the contrast, move it up to increase the contrast1. |
| Level & Blend | Use the Level slider to adjust the luminescence, or brightness, of the tinting. Move the slider to the left to make the color appear darker, move it to the right to make the color appear brighter. Use the Blend slider to control the intensity of the tinting. Move the slider to the left for strong tinting. At stronger levels, the tinting affects the color of almost everything on the screen. Move the slider to the right for a lower level of tinting. At the lowest levels, the tinting only slightly alters the colors on your screen1. |
| You can use the keyboard shortcut MAGic Key + F12 to toggle color enhancements on and off. | |
Focus Enhancements
| Turn on the focus enhancement to track what item on the computer has focus. |
 |
| Customize the color, transparency, thickness, and spacing on your focus enhancement. |
| You can use the keyboard shortcut MAGic Key + F to toggle focus enhancements on and off. |
Keyboard Shortcuts
Terms
| Term | Definition |
| Closed-circuit Televisions (CCTVs) | CCTVs are TV systems in which the signal is not publicly distributed. In the low-vision world, CCTVs are used as magnification terminals where printed pages are put under a magnifier and viewed on a monitor. |
| Electronic Hand-held Magnifiers | Electronic hand-held magnifiers are portable magnifiers which utilize digital cameras to magnify texts and objects. |
| Focus | You can think of focus as whatever you’ve clicked onto. On your desktop, if you single left-click on an icon, that icon now has focus. Similarly, if you’re in a web browser and you click on the address bar, the address bar has focus. A more technical definition is that focus is the item that is actionable. |
| Large Print Program | Magnification software is sometimes called “Large Print Programs” because in a command-line interface (like MS-DOS), they simply enlarged the print rather than magnified the screen. |
| MAGic Key | The MAGic Key is the main modification key for hotkeys in MAGic. While the default MAGic key is Caps Lock, users can choose which key the MAGic key is. |
| Mouse Pointer | a graphical image on the computer monitor or other display device. The pointer echoes movements of the pointing device, commonly a mouse, touchpad, or stylus pen, signals the point where actions of the user take place2. |
| Screen Reader | Screen readers are software applications that will attempt to identify, interpret, and read the information being presented on the computer’s screen. You might have heard of screen reading programs such as JAWS, NVDA, Window-Eyes, and Dolphin. |
| Split Buttons | The Split Button is a composite control with which the user can select a default value bound to a primary button, or select from a list of mutually exclusive values displayed in a drop-down list bound to a secondary button.3 |
| Text Cursor | The cursor refers to the insertion point in text. Say you open up a Microsoft Word document, you click into the document and you’ll see a cursor appear. With standard settings, the cursor is typically simply a blinking horizontal line. |
| User Interface | The interface features through which users interact with the hardware and software of computers and other electronic devices4. Usually abbreviated to “UI” but sometimes abbreviated to “GUI” for graphical user interface. |
Resources
| Below you’ll find more information on learning how to use MAGic. | |
| MAGic Screen Magnification Software with Speech User’s Guide | Complete guide to using MAGic. |
| MAGic Screen Magnification Software with Speech Quick Start Guide | Abbreviated guide to using MAGic |
| MAGic Keystroke Cards | A document with flash cards that match up MAGic keyboard shortcuts with their functionality. |
Works Cited
| 1. Freedom Scientific, Inc. (2016). Magic screen magnification software with speech user’s guide. Retrieved from http://www.freedomscientific.com/content/documents/manuals/MAGic/MAGic-Users-Guide.pdf |
| 2. Wikimedia Foundation, Inc. (2015, December 25). Pointer (graphical user interfaces). Retrieved from Wikipedia website: https://en.wikipedia.org/wiki/Pointer_(graphical_user_interfaces) |
| 3. Microsoft. (n.d.). Split button. Retrieved from Microsoft Developer Resources website: https://msdn.microsoft.com/en-us/library/windows/desktop/dd940505(v=vs.85).aspx |
| 4. user interface. (n.d.). Dictionary.com Unabridged. Retrieved April 29, 2016 from Dictionary.com website http://www.dictionary.com/browse/user-interface |
