
Using the Reader Functionality in MAGic
| While MAGic is primarily a magnification program, it does include some screen reader functionality. Screen readers are software applications that will attempt to identify, interpret, and read the information being presented on the computer’s screen. You might have heard of screen reading programs such as JAWS, NVDA, Window-Eyes, and Dolphin. |
| Using the reading functionality in MAGic, you can have the text on the screen read to you by a synthesized voice. Some examples of synthesized voices you might be familiar with include Apple’s Siri, Microsoft’s Cortana, Amazon’s Alexa, or possible good ol’ Microsoft Sam (the default text-to-speech voice from Windows 2000 and XP). |
The MAGic Speech Tab
| The MAGic Speech Tab can be found between the Visual and Tools tabs on the MAGic User Interface |
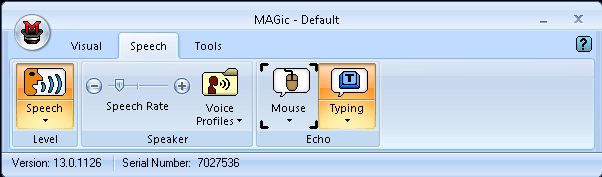 |
| The Speech tab has three sections: Level, Speaker, and Echo. |
Level
| The Level section includes only the Speech Split Button. With the top half of this split button, users can toggle between Full Speech and Speech on Demand. | |
 |
|
| Full Speech | Speech is on all the time |
| Speech on Demand | Limited speech mode where MAGic will only speak from designated unit commands (reading commands via the keyboard), typing echo, and mouse echo. |
| Keyboard shortcut to toggle between Full Speech and Speech on Demand | MAGic Key + F3 |
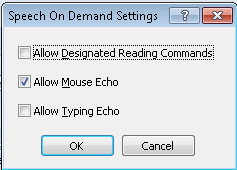
| Clicking the bottom half of the Speech Split Button will open the Speech dropdown menu. With this menu, users can open the Speech on Demand Settings menu. | |
 |
|
| Here you can enable or disable what will be read using Speech on Demand mode. “Designated reading commands are commands that you might press when you want to hear more information. For example, say word, say line, next word, prior word, spell word, and so on. Most of the time you won’t hear or need to hear this sort of thing, but when you need to, simply press the appropriate keystroke to get more information”1. Mouse echo will speak the parts of the screen below the mouse pointer. Typing echo will speak characters and words typed on the keyboard. | |
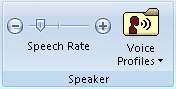
Speaker
| The Speaker section includes the Speech Rate Slider and the Voice Profiles Button. | |
 |
|
| An important part of working with a screen reader is setting the speech rate. In some instances, you’ll need the speaker to slow down. In other instances, you’ll want to speed up. This is especially important work working in a document as you will alter the speech rate depending on what you’re doing. For example, you might want the speaker to speed up when you’re having it read back a section you just finished writing. | |
| Users can adjust the Speech Rate Slider to permanently increase or decrease the speaking rate of the speaker. | |
| MAGic gives users two ways to change the speech rate: temporarily or permanently. Temporary changes are great for the purpose of editing, reviewing, or skim reading. Temporary changes are only retained while the program where the change took place remains active. In other words, if you do a temporary change in Microsoft Word and then switch to Internet Explorer and back, you’ll find your speech rate has been reset to your permanent setting. | |
| Keyboard shortcut to temporarily increase speech rate | Alt + Ctrl + Page Up |
| Keyboard shortcut to temporarily decrease speech rate | Alt + Ctrl + Page Down |
| Keyboard shortcut to permanently increase speech rate | Windows + Alt + Ctrl + Page Up |
| Keyboard shortcut to permanently decrease speech rate | Windows + Alt + Ctrl + Page Down |
| The Voice Profiles Button opens the Voice Profiles Dropdown Menu. In this menu, users can change their default synthesizer voice or open the Voice Adjustment Menu. | |
 |
|
| In the Voice Adjustment Menu users can choose their speech profile, synthesizer, and synthesizer language. Further, users can also use this menu to create custom voices for different contexts; adjust the pitch, rate, and volume; and choose what level of punctuation should be spoken. | |
Echo
| The Echo Mouse Split Button and the Typing Split Button. This section of the interface allows user to change echo settings. “Echo” refers to the reader speaking the input the program is receiving from the user via the keyboard (typing characters and words) and the mouse (what is clicked on or hovered over). | |
 |
|
| Users can click the top half of the Mouse Split Button to enable or disable the mouse echo. | |
| The keyboard shortcut to toggle between mouse echo word, mouse echo line, and mouse echo off | MAGic Key + M |
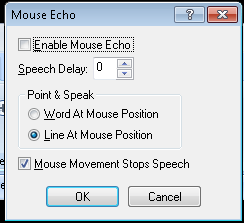
| Users can click the bottom half of the split button to open the Mouse Dropdown Menu. Here users can turn on echo words or echo lines. Also in this menu is the option for Mouse Stops Speech. When enabled, this will silence the current speech when the mouse pointer is moved. Lastly, you can use this dropdown to open the Mouse Echo Menu. | |
 |
|
| The Mouse Echo Menu can be used to enable or disable mouse echo. As well, users can choose the speech delay for mouse echo. This is the amount of time need users will need to hover over an item before MAGic will speak it. Users can also choose to echo words or lines in this menu. Finally, this menu includes settings to enable or disable Mouse Movement Stops Speech. | |
| Users can click the top half of the Typing Split Button to enable or disable typing echo. | |
| Keyboard shortcut to toggle through typing echo options – characters, words, both characters and words, and none. | Insert + 2 |
| Users can click the bottom half of the split button to open the Typing Dropdown Menu. Here users can choose to enable Character echo, Word echo, or Character and Word echo. You can also open the Typing Echo Menu. | |
 |
|
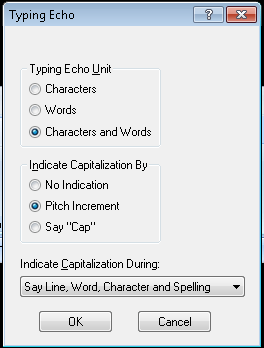
| With this menu, users can enable or disable typing echo and choose their echo mode: Characters, Words, Both Characters and Words, and None. Further, users can choose how MAGic indicates capitalization: No Indication, Pitch Increment, or Say “Cap”. If the Pitch Increment is selected, users can customize when MAGic indicates capitalization: Say Character and Spelling, Say Word, Character and Spelling, or Say Line, Character and Spelling | |
Reading
Read Characters |
|
| Read Previous Character | Numpad 4 (left arrow) |
| Read Current Character | Numpad 5 |
| Read Next Character | Numpad 6 (right arrow) |
Read Words |
|
| Read Previous Word | Insert + Numpad 4 (left arrow) |
| Read Current Word | Insert + Numpad 5 |
| Read Next Word | Insert + Numpad 6 (right arrow) |
Read Lines |
|
| Read Previous Line | Numpad 8 (up arrow) |
| Read Current Line | Insert + Numpad 8 |
| Read Next Line | Numpad 2 (down arrow) |
Read Sentences |
|
| Read Previous Sentence | Alt + Numpad 8 (up arrow) |
| Read Current Sentence | Alt + Numpad 5 |
| Read Next Sentence | Alt + Numpad 2 (down arrow) |
Read Paragraphs |
|
| Read Previous Paragraph | Ctrl + Numpad 8 (up arrow) |
| Read Current Paragraph | Ctrl + Numpad 5 |
| Read Next Paragraph | Ctrl + Numpad 2 (down arrow) |
Read To End |
|
| Read from cursor to end of document | Insert + Numpad 2 (down arrow) |
