ZoomText 10 is a magnification application developed by AI Squared
Also referred to as a “Large Print Program”
ZoomText also has screen reader functionality
ZoomText is available for Windows and Mac
ZoomText Walkthrough: Magnification
Magnification
Magnifies the screen from 1x to 60x
There are several ways to change the level of magnification when using ZoomText: up and down buttons on the user interface, hotkeys, mouse roller, the Magnifier dropdown menu, and the Zoom Windows menu in the Magnification tab
Window Type
Full
The entire screen is magnified at the same level
ZoomText with Window Type set to Full
Overlay
A magnification window approximately one forth the size of the entire screen sits on top of the screen.
ZoomText with Window Type set to Overlay
Lens
A magnification window that follows the cursor.
ZoomText with Window Type set to Lense
Line
A line of magnification that stretches horizontally across the screen.
ZoomText with Window Type set to Line
Docked
The screen is split into two vertical sections, one with no magnification and the other with magnification.
ZoomText with Window Type set to Docked
Color Enhancements
Color enhancements change the colors you see on screen. Use this feature to change background and font colors. These changes will also be applied to everything on screen, including images and video.
ZoomText allows users to choose from preset color enhancement schemes or create custom schemes. The preset schemes include:
Invert Brightness
Reverse Video
Yellow on Black
Blue Dye
Black & White
White & Black
Users also have the option of creating their own color enhancement scheme. Going to Color Enhancements and then Settings will open the Enhancements window in the Color tab. Under Color Enhancement select Custom and the Custom Settings portion of the menu will become editable.
Users can change effects, including brightness and color inversion) and adjust brightness and contrast. Users can also choose how the color enhancements are applied to the screen – they can choose to apply onto to the zoom window, only to the background, or have the enhancements applied to all parts of the screen.
Pointer Enhancements
What is the pointer? The pointer is the what most people think of as the mouse. It is the “mouse pointer”.
The pointer is typically an arrow but will take on different shapes depending on what the context it is in. For example, you might see your cursor turn into a hand icon or an I-beam.
ZoomText has several preset schemes for the pointer for users to choose from. Users can also create their own pointer enhancement scheme by selecting Pointer and then selecting Settings from the drop down menu. This will launch the Enhancements menu in the Pointer tab. Under Pointer Enhancements, selecting Custom will enable the Custom Settings section of the tab.
Users can choose to enable or disable ZoomText smooth pointers. This feature prevents pointers from starting to look pixelated as magnification is increased. Users can also choose the size of their mouse pointer, from standard to extra large. The color of the pointer can also be customized here.
Users can also choose to enable a pointer locator in this section. Pointer locators help users locate the pointer on the screen by adding a circle or crosshairs. Users can customize the locator’s thickness, color, and transparency. Users can also control when the locator is displayed. Options including: always, when pointer is stationary, when pointer is moving, or when modifier key (Shift, Alt, Ctrl, or Win) is pressed.
Cursor Enhancements
What is the cursor? The cursor refers to the insertion point in text. Say you open up a Microsoft Word document, you click into the document and you’ll see a cursor appear. With standard settings, the cursor is typically simply a blinking horizontal line.
ZoomText has several preset schemes for the cursor for users to choose from. Users can also create their own cursor enhancement scheme by selecting Cursor and then selecting Settings from the drop down menu. This will launch the Enhancements menu in the Cursor tab. Under Cursor Enhancements, selecting Custom will enable the Custom Settings section of the tab.
Under custom settings, users can select the type of cursor locator of wedges, circle, or frame. They can also choose the size, color, and transparency of the cursor locator. Users can also control when the locator is displayed. Options including: always, when cursor is stationary, when cursor is moving, or when modifier key (Shift, Alt, Ctrl, or Win) is pressed.
Focus Enhancements
What is focus? You can think of focus as whatever you’ve clicked onto. On your desktop, if you single right-click on an icon, that icon now has focus. Similarly, if you’re in a web browser and you click on the address bar, the address bar has focus.
ZoomText has several preset schemes for the focus for users to choose from. Users can also create their own focus enhancement scheme by selecting Focus and then selecting Settings from the drop down menu. This will launch the Enhancements menu in the Focus tab. Under Focus Enhancements, selecting Custom will enable the Custom Settings section of the tab.
Under custom settings, users can select the type of focus locator from block, underline, or frame. They can also choose the thickness, margin, color, and transparency of the focus locator. Users can also control when the locator is displayed. Options including: continuously, briefly, or when modifier key (Shift or Ctrl) is pressed.
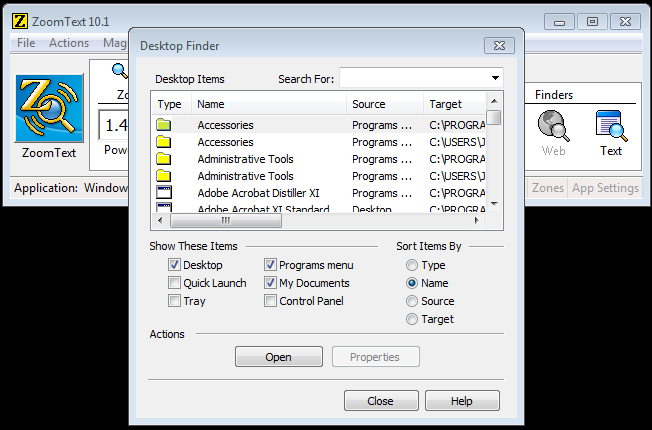
Finder Tools
ZoomText has 3 different built-in search tools which work in different contexts. These tools can be used to search the computer, documents, and webpages.
Desktop Finder
Use the Desktop Finder to search for files and applications on your computer.
Limit or extend your search to Desktop, Start Menu(Quick Launch), Notification Area(Tray), Programs menu, My Documents, and Control Panel.
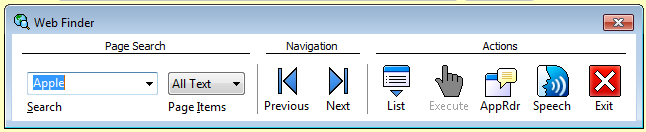
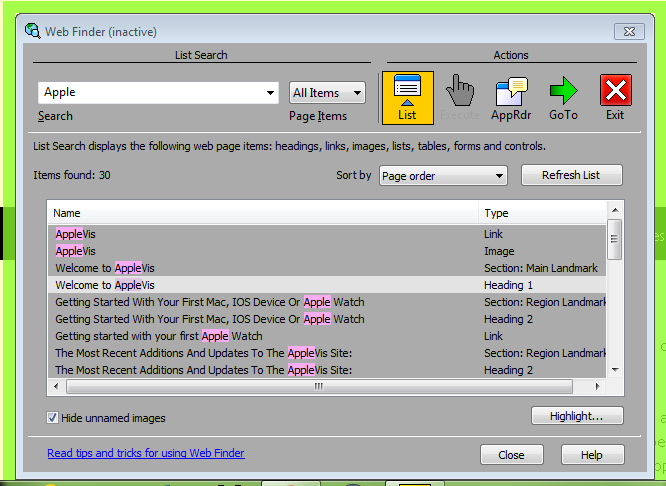
Web Finder
Use the Web Finder to search for terms on a webpage.
Move through the instances of your search term by using the Previous and Next navigation buttons or by seeing a list of all instances on the page by pressing the List button.
Use the Execute button to follow links or activate buttons.
The AppRdr button will start the AppReader from the current Web Finder position.
Use the Speech button to turn on or off navigation speech output. This setting is independent of the normal speech settings.
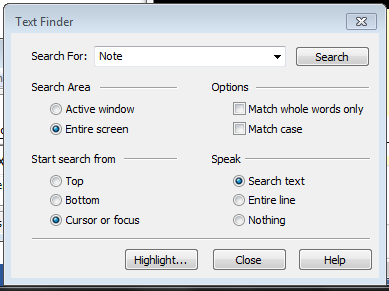
Text Finder
Use the Text Finder to search for terms in applications.
Use the Search Area settings to search either the active window or the entire screen.
Use the settings under Options to match either parts of words or whole words only and whether or not search terms need to match case exactly. For example, if you search for the word “hat” do you want to see instances of “Hat” (first letter capitalized) and “HAT” (all letters capitalized)?
Use the Start search from settings to choose where the search begins.
Speak settings allow you to choose how much of the underlying application text ZoomText will read.
Keyboard Shortcuts
ZoomText Shortcuts
Disable ZoomText
Alt + Delete
Enable Zoomtext
Alt + Insert
Increase magnification
Alt + Numpad Plus
Decrease magnification
Alt + Numpad Minus
Turn off and on speech
Alt + Shift + S
Increase speech rate
Ctrl + Numpad Plus
Decrease speech rate
Ctrl + Numpad Minus
Turn on and off color enhancements
Ctrl + Shift + C
Turn on and off mouse echo
Alt + Shift + M
Say current time
Alt + Ctrl + I
Launch Desktop Finder
Ctrl + Shift + D
Launch Web Finder
Ctrl + Shift + W
Launch Text Finder
Ctrl + Shift + T
Windows Shortcuts
Opens the Quick Launch Toolbar with focus on the Windows Search bar
Windows Button (Win)
Minimize all open applications. You can press the key combination to restore the minimized applications.
Win + D
Put focus on the Windows Taskbar. Pressing the key combination again will allow you to cycle focus between open and pinned applications.
Win + T
When focus is on the desktop, pressing this key combination will cycle focus between the Start Menu, Desktop, Taskbar, and Notification Area.
Shift + Tab
Move between open applications. Hold Alt and move through applications by pressing tab or the arrow keys.
Alt + Tab
Type Windows-Left Arrow and the active application will shift to fill
the left half of the screen. Windows-Right sends it to the right, Windows-Down places it in the middle of the screen, and Windows-Up maximizes. It’s a really handy option when you want multiple application windows neatly arranged.
Win + Arrow Keys
Exits the current application.
Alt + F4
Opens up a search within the active application.
Ctrl + F
Selects all text in the current application.
Ctrl + A
Cuts the highlighted content and puts it on the clipboard.
Ctrl + X
Copies the highlighted content and puts it on the clipboard.
VoiceOver is a Screen Reader. Screen readers are software applications that will attempt to identify, interpret, and read the information being presented on the computer’s screen.
VoiceOver is built in to iOS devices including iPad, iPhone, iPod, and OS X machines including the desktop and laptop computers made by Apple. OS X is Apple’s operating system for desktops and laptops. iOS was built off of and is closely related to OS X, but they are not one and the same.
OS X VoiceOver and iOS VoiceOver are not the same either. OSX VoiceOver operates off of keyboard input like other screen readers such as JAWS, NVDA, Window-Eyes, and Dolphin. iOS VoiceOver operates off of touch screen gestures similar to other mobile device screen readers such as Android Talkback and Windows Narrator.
What is a Gesture?
A gesture is the way in which you touch the touch screen display of your iPad to perform actions like opening apps, having text read, and moving through items.
Different gestures require different types of touches and different amounts of fingers.
Gestures require anywhere from one to four fingers.
Some gestures are performed by dragging your finger along the screen, tapping your finger on the screen, or some combination, repetition, or sequence of both .
Turning VoiceOver On and Off
There are three different ways for users to turn on and off VoiceOver. If you are connected to WiFi, the easiest way is to use Siri. Users can always navigate through settings to turn VoiceOver on and off. There is also a great feature that can be set up called the Accessibility Shortcut which will be the easiest way to turn VoiceOver on and off.
Siri
Siri is built in to iOS and lets users speak into their device to do a variety of things like checking email, doing simple web searches, checking the time, and more.
You may have heard of Siri before, but did you know Siri stands for Speech Interpretation and Recognition Interface?
To activate Siri, simply press and hold the home button for about 2 seconds. When Siri is ready for you to speak you’ll hear a tone.
To have Siri turn on VoiceOver, activate Siri and say, “Turn on VoiceOver.” Siri will take a moment and then say, “OK, I turned on VoiceOver.”
To have Siri turn off VoiceOver, activate Siri and say, “Turn off VoiceOver.” Siri will take a moment and then say, “OK, I turned off VoiceOver.”
Settings
Navigating through settings is the most difficult way to turn VoiceOver on and off. However, if you are not connected to WiFi and you don’t have your accessibility button setup for VoiceOver, you may need to do this. For users who cannot see the screen, you will likely need sighted assistance to turn on VoiceOver for the first time.
Settings appears as an application icon, just like any other app on the iPad. In Settings, go to General. Within General, go to Accessibility. In Accessibility, beneath the Vision heading, go to VoiceOver. In VoiceOver, the first item should be a button called VoiceOver. Pressing the button will turn VoiceOver on, and, if you do this correctly, you will hear VoiceOver state, “VoiceOver on”.
To turn off VoiceOver in settings, touch the VoiceOver button once again. You’ll hear VoiceOver say, “VoiceOver on. Double tap to toggle setting.” With a single finger, tap the screen twice in quick succession. Doing so successfully should result in VoiceOver stating, “VoiceOver off”.
Accessibility Shortcut
The easiest way to turn on and off VoiceOver is to use the accessibility shortcut. This allows users to triple tap the home button to turn VoiceOver on and off. Using this feature does not require Wifi and is generally quicker than using Siri once you get the hang of it.
The accessibility shortcut requires some setup and generally does not come enabled on most iPads. What accessibility features the shortcut controls is customizable.
To setup the accessibility shortcut to work with VoiceOver, go to Settings, select General, then select Accessibility. The last item in the Accessibility section is the Accessibility Shortcut, select it. In this section, you’ll see text that says, “Triple-click the home button for:” followed by this list of items: VoiceOver, Invert Colors, Grayscale, Zoom, Switch Control, AssistiveTouch. Select VoiceOver. Note that if any other items on this list are selected, the functionality of the accessibility shortcut will be different. For now, I recommend only having VoiceOver selected.
Now that your Accessibility Shortcut is setup, click the home button 3 times in quick succession and you’ll hear “VoiceOver on.” Do the triple press again, and you’ll hear, “VoiceOver off.”
Triple clicking the home button is a skill. Starting out, you might accidentally go to the home screen (single press), start Siri (single press and hold), or start the app switcher (double press). Keep working at it, you’ll get better.
The iOS Home Screen
Before we start using VoiceOver, we need to understand the environment we’re going to be working in. The main interface of iOS is referred to as the Home Screen. When you do a single press of the home button, this is where you’ll land. This part of the interface will give us information about our system and access to our apps.
The home screen is organized into three distinct sections. The status bar, apps, and the dock.
The Status Bar
Along the very top of the home screen, users will find a variety of status icons. What appears here depends on your device, but typically users will find information on their phone signal strength, service carrier, WiFi or mobile data connection, the time, battery power, and more. The status bar is the smallest part of the home screen and will not change as you switch app pages (see below).
Apps
The majority of the home screen is a grid of app icons. On earlier iPhones (4 and earlier), this was a 4 by 4 grid. With the iPhone 5, this became a 4 by 5 grid. With the iPhone 6, this is now a 4 by 6 grid.
As you apps, they will fill up this app grid starting from the left and moving right and from the top and moving down. Users can customize the order of their apps. However, the apps cannot have space between them. This means that users can have 3 apps in the top row and one app in the second row. Blank app spaces will automatically be filled by apps.
You can multiple pages of apps.
The Dock
At the bottom of the home screen, there is a space for four apps. This is called the dock. Like the status bar, the dock doesn’t change as you switch app pages. This is a space can be filled by any apps the user chooses but generally should be reserved for your most highly used apps.
Starting VoiceOver Tips
An important and sometimes difficult concept for using VoiceOver is to listen. It sounds easy enough but can prove more difficult when exercising it in action. Listening as VoiceOver speaks is critical. VoiceOver will explain the context your in and will often give you directions about what gestures are relevant. So, taking a deep breath and being patient, it extremely important. If I do a gesture while VoiceOver is speaking, VoiceOver will stop speaking about the last active item and move to the new item. This means that if we rush around, we’ll miss what could be critical information.
Don’t get discouraged. This technology (like most technologies) is not perfect. Occasionally you will perform a gesture that VoiceOver will interpret as a completely different gesture. Sometimes your iOS might slow down and VoiceOver might start going slow. Sometimes you will be completely baffled. It’s all part of the process.
Starting Gestures
Single Finger Tap
This gesture selects an item. What does that mean? Well, it moves the iOS focus to that item. Visually the item becomes outlined. However, having focus means that we can perform an action on that item. For example, to open an app in VoiceOver, you’ll first need to select it and bring the iOS focus to it.
Single Finger Drag
The problem with the single finger tap is that it requires you to tap on something. For users who can’t see the screen, being able to find and tap the correct area of the screen is much more difficult. Instead, users can do a single finger drag. This will move the focus around the screen as you drag your finger. Whatever item was last announced by VoiceOver is the item that has focus. This gesture is extremely useful for finding apps, moving through controls, and using the on screen keyboard.
Single Finger Flick Left and Right
Another important gesture for moving the focus around is the single finger flick. If you’re a Windows user, you can think of the single finger flick as being analogous to the Tab key. The flick will move you forwards and backwards through available items. If your focus is on the app in your home screen that is in the top left grid space, a single finger tap will move you to the next app in the top row. Continue to perform this gesture, and you’ll eventually move through all the apps on the first page of your home screen.
Single Finger Double Tap
The single finger double tap is how you activate an item. This gesture is critical. You will use it to open apps, submit forms, toggle settings, and more. As you can tell from that list, exactly what this gesture will do varies depending on the active item. If the active item in an app, it will launch the app. If the active item is a hyperlink, it will send you to that page. If the active item is text, it won’t do anything!
The Home Button
Triple TapActivate the accessibility button
The home button is another critical concept for iOS. The number and nature of clicks to the home button will change what the button does.
Single Tap
Pressing the home button once will bring you to your home screen.
Single Tap and Hold
Activate Siri
Double Tap
Open the App Switcher
Follow-up Exercise
1. Wake up and unlock your iDevice. Press your home button and use the single finger swipe to move through all the apps on your first app page. What happens when you move to the right of your last app? If you have multiple pages, how can you move between pages? Move to the next page and continue to take inventory of your apps.
2. Use the single finger drag to make your status bar the active item. Then use the single finger swipe to go through all the items. What happens when you move to the right of the last item on the bar?
3. Use VoiceOver to cycle through the Apps on your dock.
4. Find the Settings app and open it using VoiceOver.
5. In the Settings app, try dragging your finger around. What happened? Now, try single finger flicking to the right. What happened? Which gestures works better for moving through the options in Settings?
6. We’re going to use VoiceOver to navigate through Settings to turn VoiceOver off. We’ll then turn it back on using our accessibility button. In Settings, go to General. In the General menu, go to Accessibility. In the Accessibility menu, go to VoiceOver. In the VoiceOver menu, toggle the setting for VoiceOver to off. How did that go? What was hard? What would have helped? Now that VoiceOver is off, use the accessibility button to turn it back on.
The iPad is a tablet made by Apple. It is a mobile computing device that lets people access email, the internet, and more on the go or from the comfort of their own couch.
The iPad is a touchscreen device which means that users control it by touching different parts of the screen using various gestures. Note that these devices require bare fingers or specialized gloves.
There are various versions of the iPad. The first iPad was released in 2010 and was followed by the iPad 2 in 2011, iPad 3 in 2012, iPad 4 in 2012, iPad mini in 2012, iPad mini 2 in 2013, iPad mini 3 in 2014, iPad mini 4 in 2015, iPad Air in 2013, iPad Air 2 in 2014, and the iPad Pro in 2015. With each generation, the iPad has generally gotten faster, lighter, and has had a larger display. The iPad mini is a smaller version of the iPad. The iPad Air is thinner and lighter than the original iPad models and offers a larger display. The iPad Pro has the largest display of any iPad to date.
All iPads run iOS which is the mobile operating system developed by Apple. iOS is also the operating system for iPhone and iPod. iOS is now on its ninth iteration with iOS 9.
Various Versions of the iPad
Tour of the iPad Controls
Shape and Size
The iPad is a rectangle. The back is slightly rounded and the front screen is flat and slick1.
The Home Button
On the front screen, the home button is a small, circular depression users will find along the front edge of the screen. The Home Button might be the most important control on the iPad as it helps users navigate the iPad, activate VoiceOver mode, use Siri, and more.
To find the Home Button, users may simply trace a thumb along the edge of the iPad screen. They’ll find the Home Button in the middle of the edge on one of the shorter sides.
Use the Home Button to navigate back to the home screen of the iPad, wake up the iPad, activate Siri, switch between apps, and turn on accessibility modes like VoiceOver and Zoom.
iPad Home Button
Sleep and Wake Button
The Sleep and Wake Button is located along the outside edge of the iPad on the side opposite of the Home Button. The button is small, rectangular and near the corner.
If a user holds the iPad with two hands in horizontal orientation with their right thumb resting on the home button, they will discover the Sleep and Wake Button along the left edge near the top left corner.
The Sleep and Wake Button will put the iPad into sleep mode which dims the screen and uses less energy. When the iPad is asleep, the button will also wake the iPad. Holding the Sleep and Wake Button down will turn the iPad on or off.
Sleep and Wake Button on the iPad
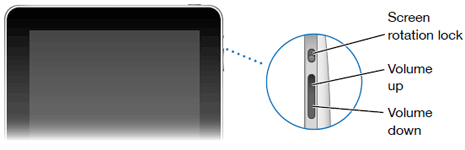
Volume Buttons
The volume buttons let you adjust the volume level of the iPad. These two small, rectangular buttons are found side by side along the outside edge of the iPad.
If a user is holding the iPad with two hands in horizontal orientation with their right thumb on the Home Button, they will find the volume buttons along the outside edge of the iPad along the top of the screen, near the upper left corner. The leftmost volume button increases the volume, and the rightmost volume bottom decreases the volume.
Volume Buttons on the iPad
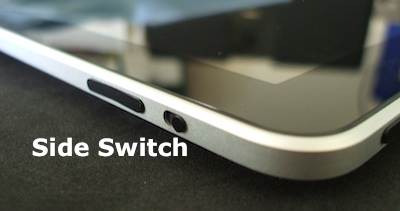
Side Switch Button
This control is no longer present on the most recent iterations of the iPad. On older versions of the iPad, it is sometimes referred to as the Mute and Screen Rotation Switch2.
Which iPads have Side Switch buttons? The iPad Air, iPad 3, iPad 4, iPad mini, iPad mini 2, and iPad mini 3. On these iPads, if the user is holding the iPad with two hands in horizontal orientation with their right thumb on the home button, the Side Switch is on the outside edge of the top side near the top left corner just to the left of the volume controls.
So what does the Side Switch do? The Side Switch is used for one of two purposes: to mute and unmute the iPad or to lock and unlock screen rotation. The newer iPads allow users to change these settings through the Control Center.
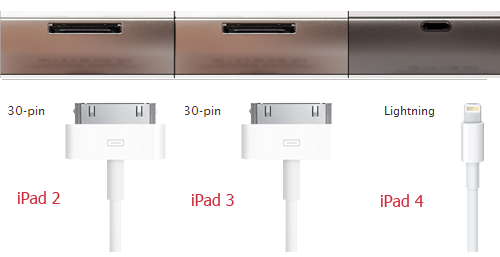
Dock Connector Port
The Dock Connector is how the iPad is charged and connector to other devices. The Dock Connector can be found on the outside edge of the iPad below the home button.
Different iPads have different connector types. Earlier iPads (iPad 1, iPad 2, iPad 3) have a 30-pin dock connection. This connection port is wider than the connection on newer models of iPad and is approximately 1 inch wide.
Newer iPads have the Apple Lightning Connector which is an 8-pin connection. This type of connection is present on the iPad 4, all versions of the iPad Mini, all versions of the iPad Air, and the iPad Pro. This connection is smaller and is approximately half an inch wide.
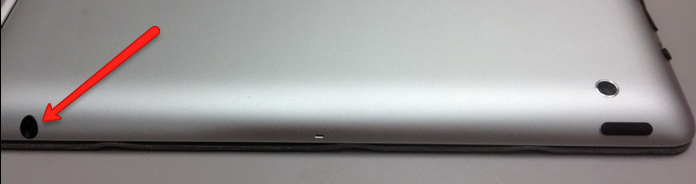
Headphone Jack
The Headphone port is for connecting headphones and other audio devices to the iPad. If a user is holding the iPad with two hands in horizontal orientation with their right thumb on the home button, the headphone port can be found on the outside left edge of the device near the lower left corner.
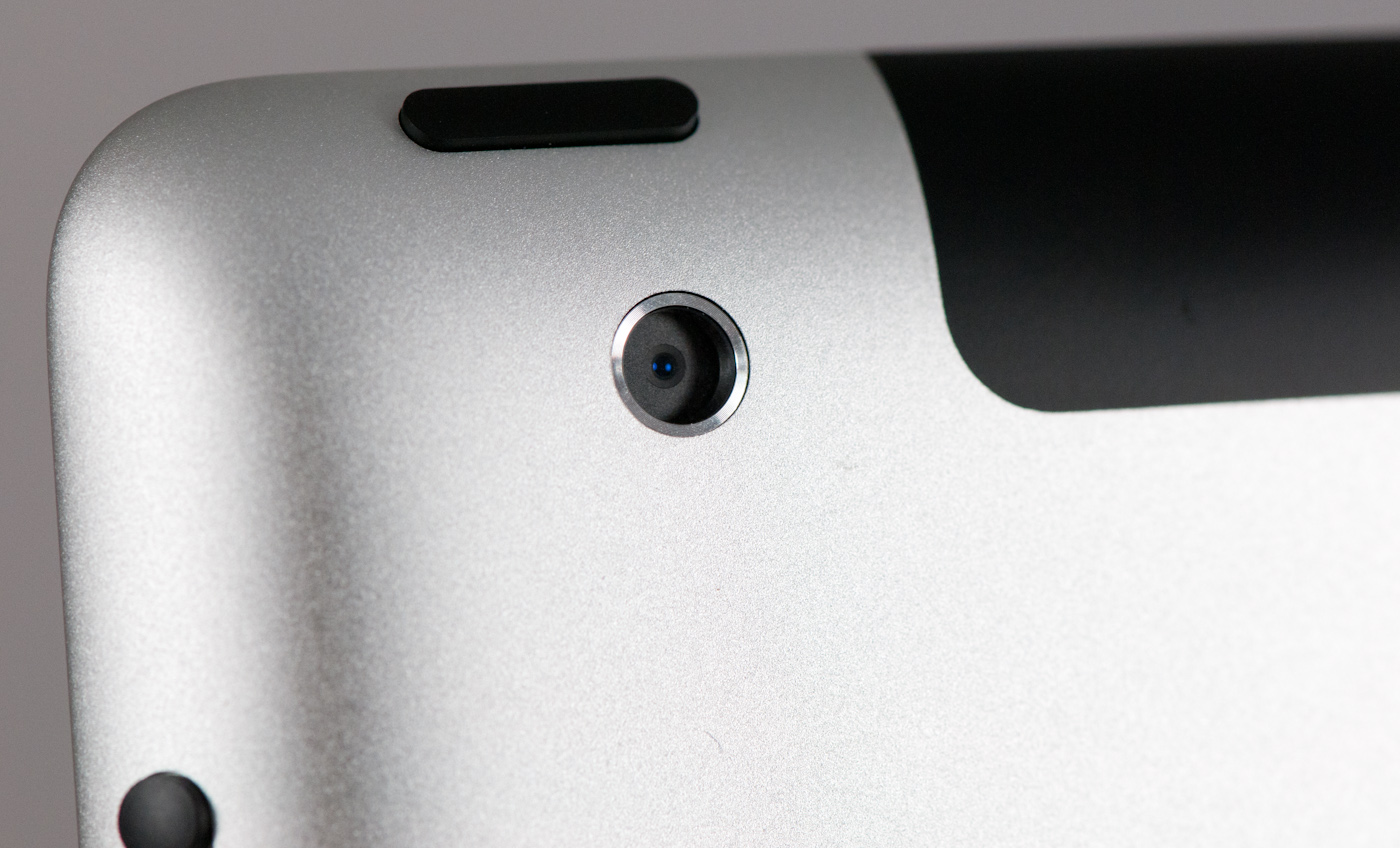
Rear Facing Camera
The Rear Facing Camera is the default camera for the device. It will be used in a range of applications from the iOS Camera app to OCR apps like the knfbReader to magnification apps like VisionAssist and more. The iPad 1 did not have a built-in camera. All later editions of the iPad come with the front and back cameras.
The Rear Facing Camera can be found on the backside of the iPad. If a user is holding the iPad with two hands in horizontal alignment with their right thumb on the home button, they will find the rear facing camera on the backside of the upper left corner. If a user has their left thumb on the sleep and wake button, they’ll find the rear facing camera by sliding their thumb along the backside of the iPad along the top edge. The camera is built into the iPad and cannot be physically distinguished1.
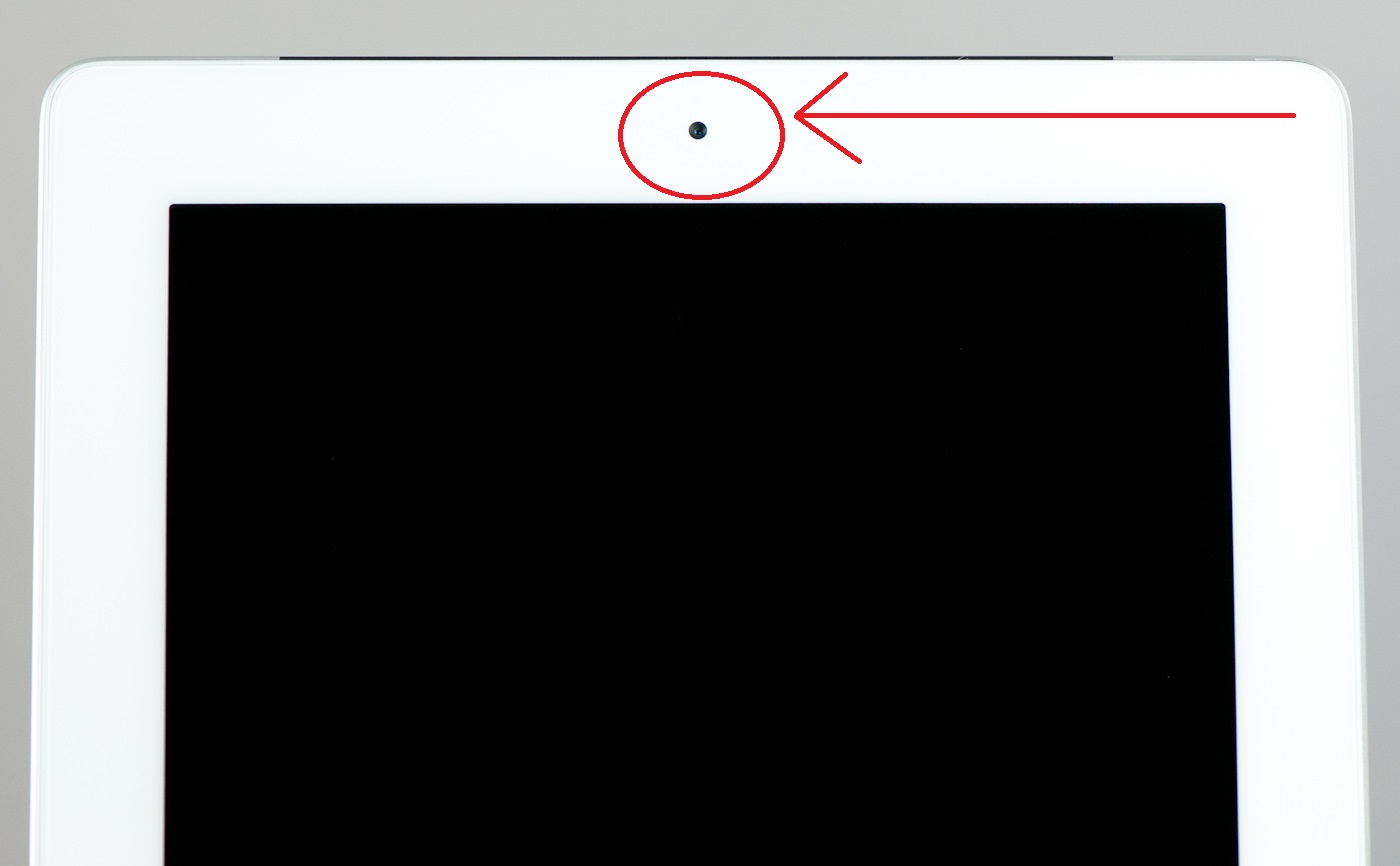
Front Facing Camera
The Front Facing Camera is utilized by several apps, most notably FaceTime. The front camera is small, circular and cannot be physically distinguished as it is built into the iPad1.
If a user is holding the iPad with two hands in horizontal orientation with their right thumb on the home button, they will find the front facing camera in the middle on front left side.
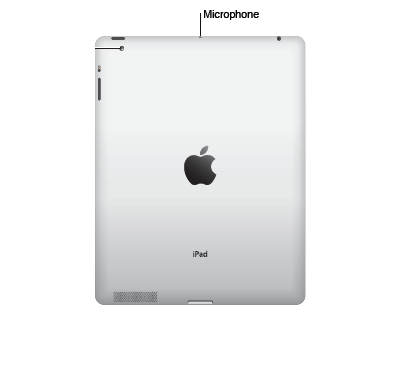
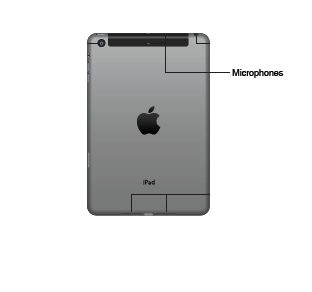
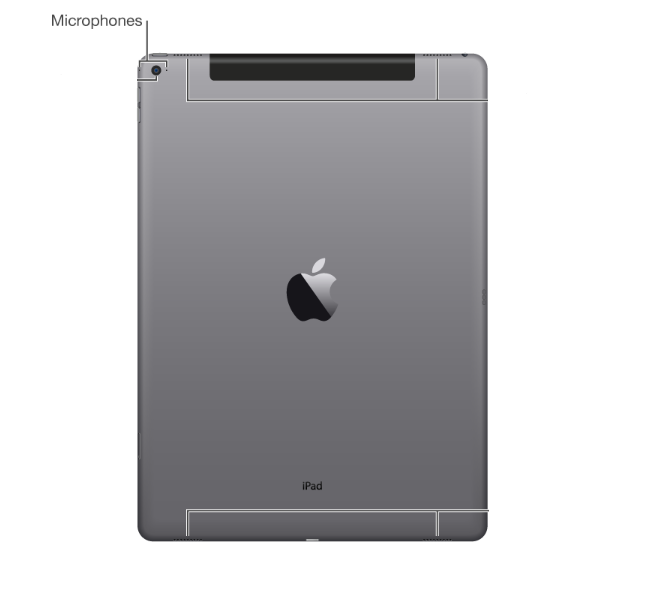
iPad Mics
The location and number of Mics on an iPad vary depending on the version of iPad. Mics are physically indistinguishable, but if the iPad is in a case, there is typically an opening for the mic.
iPad 1 and iPad 2 have a single mic. If a user is holding the iPad with two hands in horizontal orientation with their right thumb on the home button, they’ll find the mic in the middle of the outside edge on the left side.
iPad 3 and 4, iPad mini 1, iPad mini 2, iPad mini 3, and iPad Air have two mics. If a user is holding the iPad with two hands in horizontal orientation with their right thumb on the home button, they’ll find both mics in the middle the left side: one on the outside edge and one on the back.
iPad mini 4, iPad Air 2 and iPad Pro have two mics. If a user is holding the iPad with two hands in horizontal orientation with their right thumb on the home button, they’ll find one along the top edge, to the left of the volume controls. The other mic can be found just below the rear facing camera.
Turning On and Off the iPad
The first thing you’ll need to learn about your iPad is how to turn it on and off.
To turn on the iPad, press and hold the Sleep and Wake button for 3 seconds3.
To turn off the iPad, touch and hold the Sleep and Wake button for 4 seconds until the Power slider appears at top of screen3. For users not working in VoiceOver, simply touch and drag the red arrow to the right. For VoiceOver users, they’ll hear the system say, “Power off button, slide or double tap” and they can simply perform a one finger double tap to turn off the device.
Putting the iPad to Sleep
Putting the iPad to sleep is simple: users simply have to touch the Sleep and Wake button. To wake the iPad up, users can do the same thing. Note that, depending on settings, the passcode will need to input again or users can use Touch ID to unlock their iPad.
iPad Care and Cleaning
“The best way to clean the iPad is by using a dry, soft, lint-free cloth3.”
“There’s no need to scrub the screen very hard, as there is a protective coating on the screen’s surface3.”
Do not use glass cleaners! “According to the iPad user’s guide, you should not use “window cleaners, household cleaners, aerosol sprays, solvents, alcohol, ammonia or abrasives” to clean the screen. Instead, to wipe off any smudges, first, turn off the iPad — the dark screen makes smudges easier to see — and try using your luck with a microfiber cloth or even your sleeve3.”
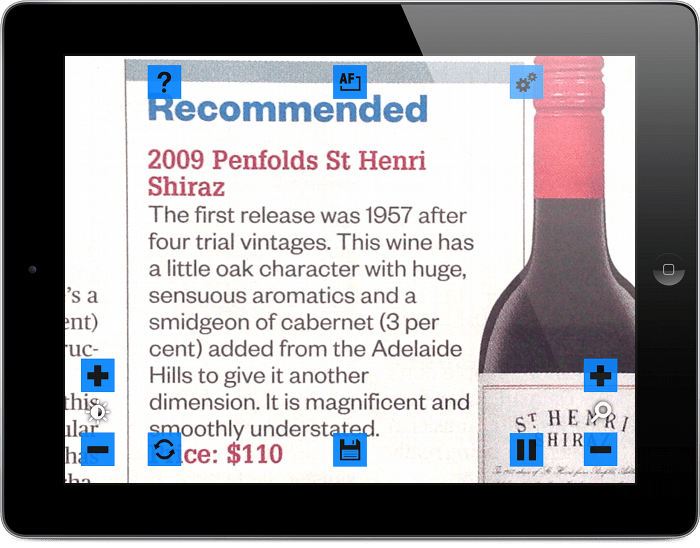
Using the VisionAssist app to magnify a printed page
Screen shot of VisionAssist Magnification
VisionAssist Walkthrough
Help Button
Opens a short document in a pop-up window that explains the various symbols users will encounter using VisionAssist.
Toggle AutoFocus Button
Switch between AutoFocus and Fixed Focus
Settings Button
Allows users to set a variety of app settings related to display modes, highlighting, and user controls (see below anchor tag needed to below).
Increase Contrast Button
Increases the contrast
Increase Zoom Button
Increases the zoom
Zoom levels between 2x and 20x
Decrease Contrast Button
Decreases the contrast
Change Mode Button
Color Video
Color video is always enabled and “…provides color video, great for looking at photos and magazines.”1
Highlights
Highlights mode “…provides a high contrast image in two colors.”1 Highlights Mode colors include black on white, white on black, black on yellow, and blue on yellow. Users can also enable inverse of each color mode.
Smart Text
Smart Text mode “…uses our advanced algorithms to highlight and enhance text particularly on uneven backgrounds. Great for reading newspapers or books.”1
Black and White Video
B&W mode “…provides grayscale video”1
Pause Display Button
Freeze the screen and save images of whatever you’re magnifying
When you have paused the screen, the controls to change mode and increase/ decrease zoom will work on the paused image.
When the Pause Display button is activated, a Save Image button will appear along the bottom edge of the screen in the middle between Change Mode and Pause Display. When screen shot is saved, the interface buttons will not show on your image but the magnification, contrast, and color mode will. Users will find these images available in their iOS Photos app.
Decrease Zoom Button
Decreases the zoom
VisionAssist Settings
Display Modes
These settings allow users to change what color modes are available when using the Change Mode button.
Highlights
Toggle Highlights on and off
Smart Text
Toggle Smart Text on and off
Black and White Video
Toggle B&W Video on and off
Highlights Mode Colors
Allows you to choose one of the four settings: black on white, white on black, black on yellow, and blue on yellow.
Enable Highlights Inverse Color Mode
Toggle the inverse of the selected Highlight on and off
User Controls
Enable Panning Only When Paused
When enabled, allows user to pan around the paused image. At this time, this feature does not work with VoiceOver.
Tap Screen to Hide Controls
When enabled, allows users to hide/show the interface controls. At this time, this feature does not work with VoiceOver.
Disable Auto Dimming of Display
When enabled, prevents the display from timing out due to inactivity.
Use Buttons for Zoom and Threshold
When enabled, changes the increase/decrease buttons for zoom and contrast to sliders.
Windows gives users 255 characters for a file name. However, the file name doesn’t just include the title you give your folder or file, it includes each subdirectory along the path and the filename!
Example of a Windows File path: C:\Documents and Settings\%username%\Desktop\folder1\folder2\file.docx
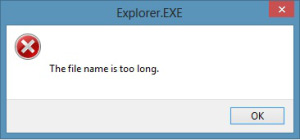
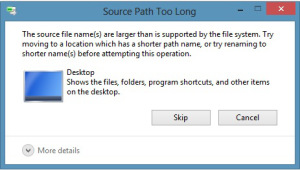
In some cases you may encounter errors related to over-sized file names
Example errors:
Destination Path Too Long
Occurs when moving files into a new folder where the new path length would be greater than the Windows character limit
File Name Too Long
Occurs when a new file name would result in the file path being greater than the Windows character limit
Source Path Too Long
Occurs when you attempt to import files which would result in a file path that is greater than the Windows character limit
Issues from Related to Over-sized File Names
You’ll get a Windows error message like the ones above.
In some cases, you won’t get the Windows error. Instead you’ll get a message that just says “Cannot Copy”.
In some cases, your files simply won’t open or might cause errors when opening or closing.
Another issue is that the file context menu(right click) won’t have as many options as other folders with acceptable file paths.
How do you fix it?
Shorten folder names or your file name!
Consider your use of folder layers – eliminating a folder layer entirely would save characters!
Be cognizant about where your saving files. You might think saving on the Desktop will save space but the actual file path to the desktop will be C:\Documents and Settings\%username%\Desktop or C:\Users\%username%\Desktop depending on your version of Windows.
As of iOS 7, you can now use Siri to check your voicemail and messages. This can be especially helpful for VoiceOver users who might miss the visual notifications and reminders of an unread or unseen message.
Having Siri Check Your Voicemail
To have Siri check your voicemails, simply press the home button and ask the question: “Siri, can you check my voicemail?”
If you inquire about your voicemail while your iDevice is locked, Siri will still tell you if you have or don’t have any unseen voicemail messages. However, regardless if you have multiple unseen voicemails, while your phone is locked Siri will only tell you about your most recent message.
Screen shot of locked iPhone showing Siri reporting only on most recent new voicemail message
If you ask Siri to check your voicemail while your phone is unlocked, she’ll tell you about all your unseen voicemail messages
Screen shot of locked iPhone showing Siri reporting only on most recent new voicemail message
Asking Siri if you have any voicemail will have her report on both new and old voicemail. She also refers to voicemail that you’ve seen as “new”.
Screen shot of locked iPhone showing Siri reporting only on most recent new voicemail message
Asking Siri if you have any voicemail will have her report on both new and old voicemail. If you’re just interested in new voicemail messages, ask, “Siri, do I have any new voicemail messages?”
Screen shot of locked iPhone showing Siri reporting only on most recent new voicemail message
To actual have Siri play your voicemail, you’ll need to specify that you’d like her to do so. Try asking, “Siri, play my new voicemail.” Note that with this command, Siri will play your most recent voicemail message.
Screen shot of locked iPhone showing Siri reporting only on most recent new voicemail message
Checking Your Messages in VoiceOver with Siri
Checking your messages via Siri is similar to checking voicemail. Simply ask Siri, “Siri, do I have any messages?”
Screen shot of iPhone showing Siri checking on new messages
One important difference between checking messages and checking voicemail is that Siri will not tell you about old messages. Also, after Siri checks your new messages, they are no longer new!
Screen shot of iPhone showing Siri finding no new messages
You can ask Siri if you have new messages from a specific contact
Screen shot of iPhone showing Siri checking messages from a specific contact
After Siri reads you a new message (or series of messages), she’ll ask if you’d like to reply and let you dictate a response.
Screen shot of iPhone showing Siri having the user dictate a text message response
Siri let you review your dictated message before sending.
Screen shot of iPhone showing Siri having the user review their text message response before sending
Accounts are for “…students who are deaf, hard of hearing, blind, visually impaired, or deaf-blind,” and for “…teachers, parents, and other professionals…” who serve those students. Find out if you qualify by creating an account.
Accessibility Review: DCMP v 1.1.0 for iOS
The DCMP app (v 1.1.0) is not optimized for use with VoiceOver or other accessibility features relating to vision in iOS. Users who are blind or visually impaired may have a difficult time using this app.
For starters, the app allows users to choose appearance options. There are two themes in that users can choose between – “Default” and “High Contrast”. The default mode is what users will see upon initial start-up of the application – a blue background with white lettering. The High Contrast mode will change the background to black and keep the white lettering. Changing the theme will also change the background image on the home page of the app (see below).
DCMP app home page with default theme
DCMP app home page in high contrast theme
The app will work with built-in iOS color enhancements. However, this changes the appearance of both the interface and the video.
DCMP works with the Bold Text and Button Shapes features. However, there are some issues with the larger text feature. When the Larger Accessibility Sizes feature is enabled, “apps that support dynamic type will adjust to your preferred reading size.” Users will notice when they initially set a preferred text size after enabling this feature, they will see a response in the DCMP app. Unfortunately, this change is short-lived as the font size will revert back to the unaltered size after closing the program or navigating in the interface.
When navigating the app in VoiceOver, the navigation menu (which is labeled the name of the Unicode character “trigram for heaven”) opens up a menu in the middle of the screen that is difficult to navigate with VoiceOver because opening this menu does not change the focus of the iDevice. To access this menu, a VoiceOver user would need drag their finger along the middle of the screen until they landed on one of the navigation controls. However, the menu box is translucent and users will easily select options from the page below as they drag their finger between buttons. As well, if users manage to select a button, they can move through the navigation buttons by single-finger swiping left and right. However, since the sections of the underlying page are still active, you can easily select these content units by accident.
Another issue is encountered in VoiceOver when video is playing. Users can one finger double tap to open the video controls. They can one finger swipe left and right to move between the back, track position, volume, 30 second rewind, pause, next track, and alternative track buttons. However, the video controls layers will timeout relatively quickly, even when moving through controls with VoiceOver. This makes it very difficult to use these controls in VoiceOver.
The biggest issue with the DCMP app for VoiceOver users is an error that occurs when playing videos. This error doesn’t happen every time you play a video, but I encountered it several times while testing out the app. In VoiceOver mode, the screen will go completely black. You’ll hear the audio from the video, but you will not see any video. No VoiceOver gestures will have any effect when this error happens. The only way to remedy this situation is to close the app and relaunch.
Final Conclusion
This app is not accessible for VoiceOver users. That being said, if a VoiceOver user was motivated enough by the fantastic content this app has to offer, they could get it to work with a series of workarounds (like restarting the app when they get the black screen and some tips to accessing the navigation menu).
The basic search box appears above the current mailbox, between the list of folders and accounts to the left and the message preview box to the right, and just below the ribbon
Quickly access the basic search box with the keyboard combination Ctrl + e
Change where you’re searching by using the dropdown menu directly to the right of the search. Press Ctrl + e then Tab, Tab, Enter and use the arrow keys to change between searching the current folder, subfolders of the current folder, current mailbox, or all Outlook items!
Use the Advanced Find to easily execute complex searches without using Outlook Search Syntax
Open the Advanced Find by pressing Ctrl + Shift + f
Use tab to move around the areas of the menu – note that when the Advanced Find menu opens, your cursor will be in the Search for the word(s) text box and the default is to search messages in whatever folder context Outlook was in when the menu was launched
Keyboard Shortcuts for Advanced Find
All Tabs
These are shortcuts that can be used in all three tabs of the Advanced Find menu
Move focus to the Look dropdown menu to change what sort of document your search is looking for (contacts, messages, notes, tasks, etc.)
Alt + k
Launch the Select Folder(s) menu to choose which folders your search is looking in
Alt + b
Execute your search
Alt + n
Start a new search – note that using this shortcut will result in a pop-up message that says: “This will clear your current search” and requires you to confirm or cancel the action
Alt + S
Select Folder(s) Menu
This is a shortcut for the Select Folder(s) menu which you can open by using the keyboard shortcut Alt + b in the Advanced Find menu
In the Select Folder(s) menu, clear all current selections
Alt + l
Messages Tab
These shortcuts can only be used in the Messages Tab. The Messages Tab is open when the Advanced Find menu is launched.
Move focus to the Search for the word(s) text box
Alt + c
Move focus to the In field to change where Outlook is searching between subject field only, subject field and message body, and frequently-used text fields
Alt + i
Move focus to the Time field to look for messaged from specific contexts (sent, received, modified, etc.) and times
Alt + m
More Choices Tab
These are shortcuts for the More Choices tab. To get to the More Choices tab from the Messages tab, simply navigate through the menu with the tab button until focus is on the Messages tab and use the arrow keys to move to the More Choices tab.
Open the Color Categories menu to select color categories, create new color categories, rename existing categories, delete categories, and assign shortcut keys to color categories
Alt + c
Toggles on and off the Whose Importance is dropdown menu. The default setting for this menu is normal, but press tab and then the up or down arrow keys to switch this between normal, high, and low
Alt + o
Toggles on and off the Only items which dropdown menu. The default setting for this menu is are flagged by me, but press tab and then the up or down arrow keys to switch this between are marked as completed, are flagged by someone else, have no flag, and are flagged by me
Alt + i
Toggles on and off the Match case feature
Alt + m
Puts focus on the Size dropdown menu
Alt + z
Color Categories Menu
These are shortcuts for the Color Categories menu. Open the color categories menu by using Alt + c in the More Choices tab
Put focus on the list of existing color categories
Alt + t
Opens the Add New Category menu
Alt + n
Edits the color category name that has focus
Alt + r
Deletes the color category that has focus
Alt + d
Opens the Color dropdown menu
Alt + o
Opens the Shortcut Key dropdown menu
Alt + s
Add New Category Menu
These are shortcuts for the Add New Category menu which you can open from the Color Categories menu by pressing Alt + n
Put focus on the Name text field
Alt + n
Put focus on the Color dropdown menu
Alt + o
Put focus on the Shortcut Key dropdown menu
Alt + S
Advanced Tab
These are shortcuts for the Advanced tab. To get to the Advanced tab from the Messages tab, simply navigate through the menu with the tab button until focus is on the Messages tab and use the arrow keys to move to the Advanced tab.
knfbReader allows you to use your iDevice camera to take a picture of a printed page and have the contents of that page be turned into text that is read to you
Cost
$99.99
Compatibility
Requires iOS 7.0 or later. Compatible with iPhone, iPad, and iPod touch.
Take a picture of a printed page and have the printed text be automatically recognized by the application, turned into a text file, and read aloud!
Taking image of printed page
Image of print page
OCR text conversion
knfbReader Walkthrough
Start-up
When opening knfbReader for the first time, you’ll see the loading screen below
Interface
The knfbReader interface looks very similar to what you see when you open your camera app with some added buttons on top.
File Explorer
Back Button
Returns you back to the default interface
Settings
Same as below
Edit
Allows users to share, rename, and delete documents in their knfbReader app. For more information, see below.
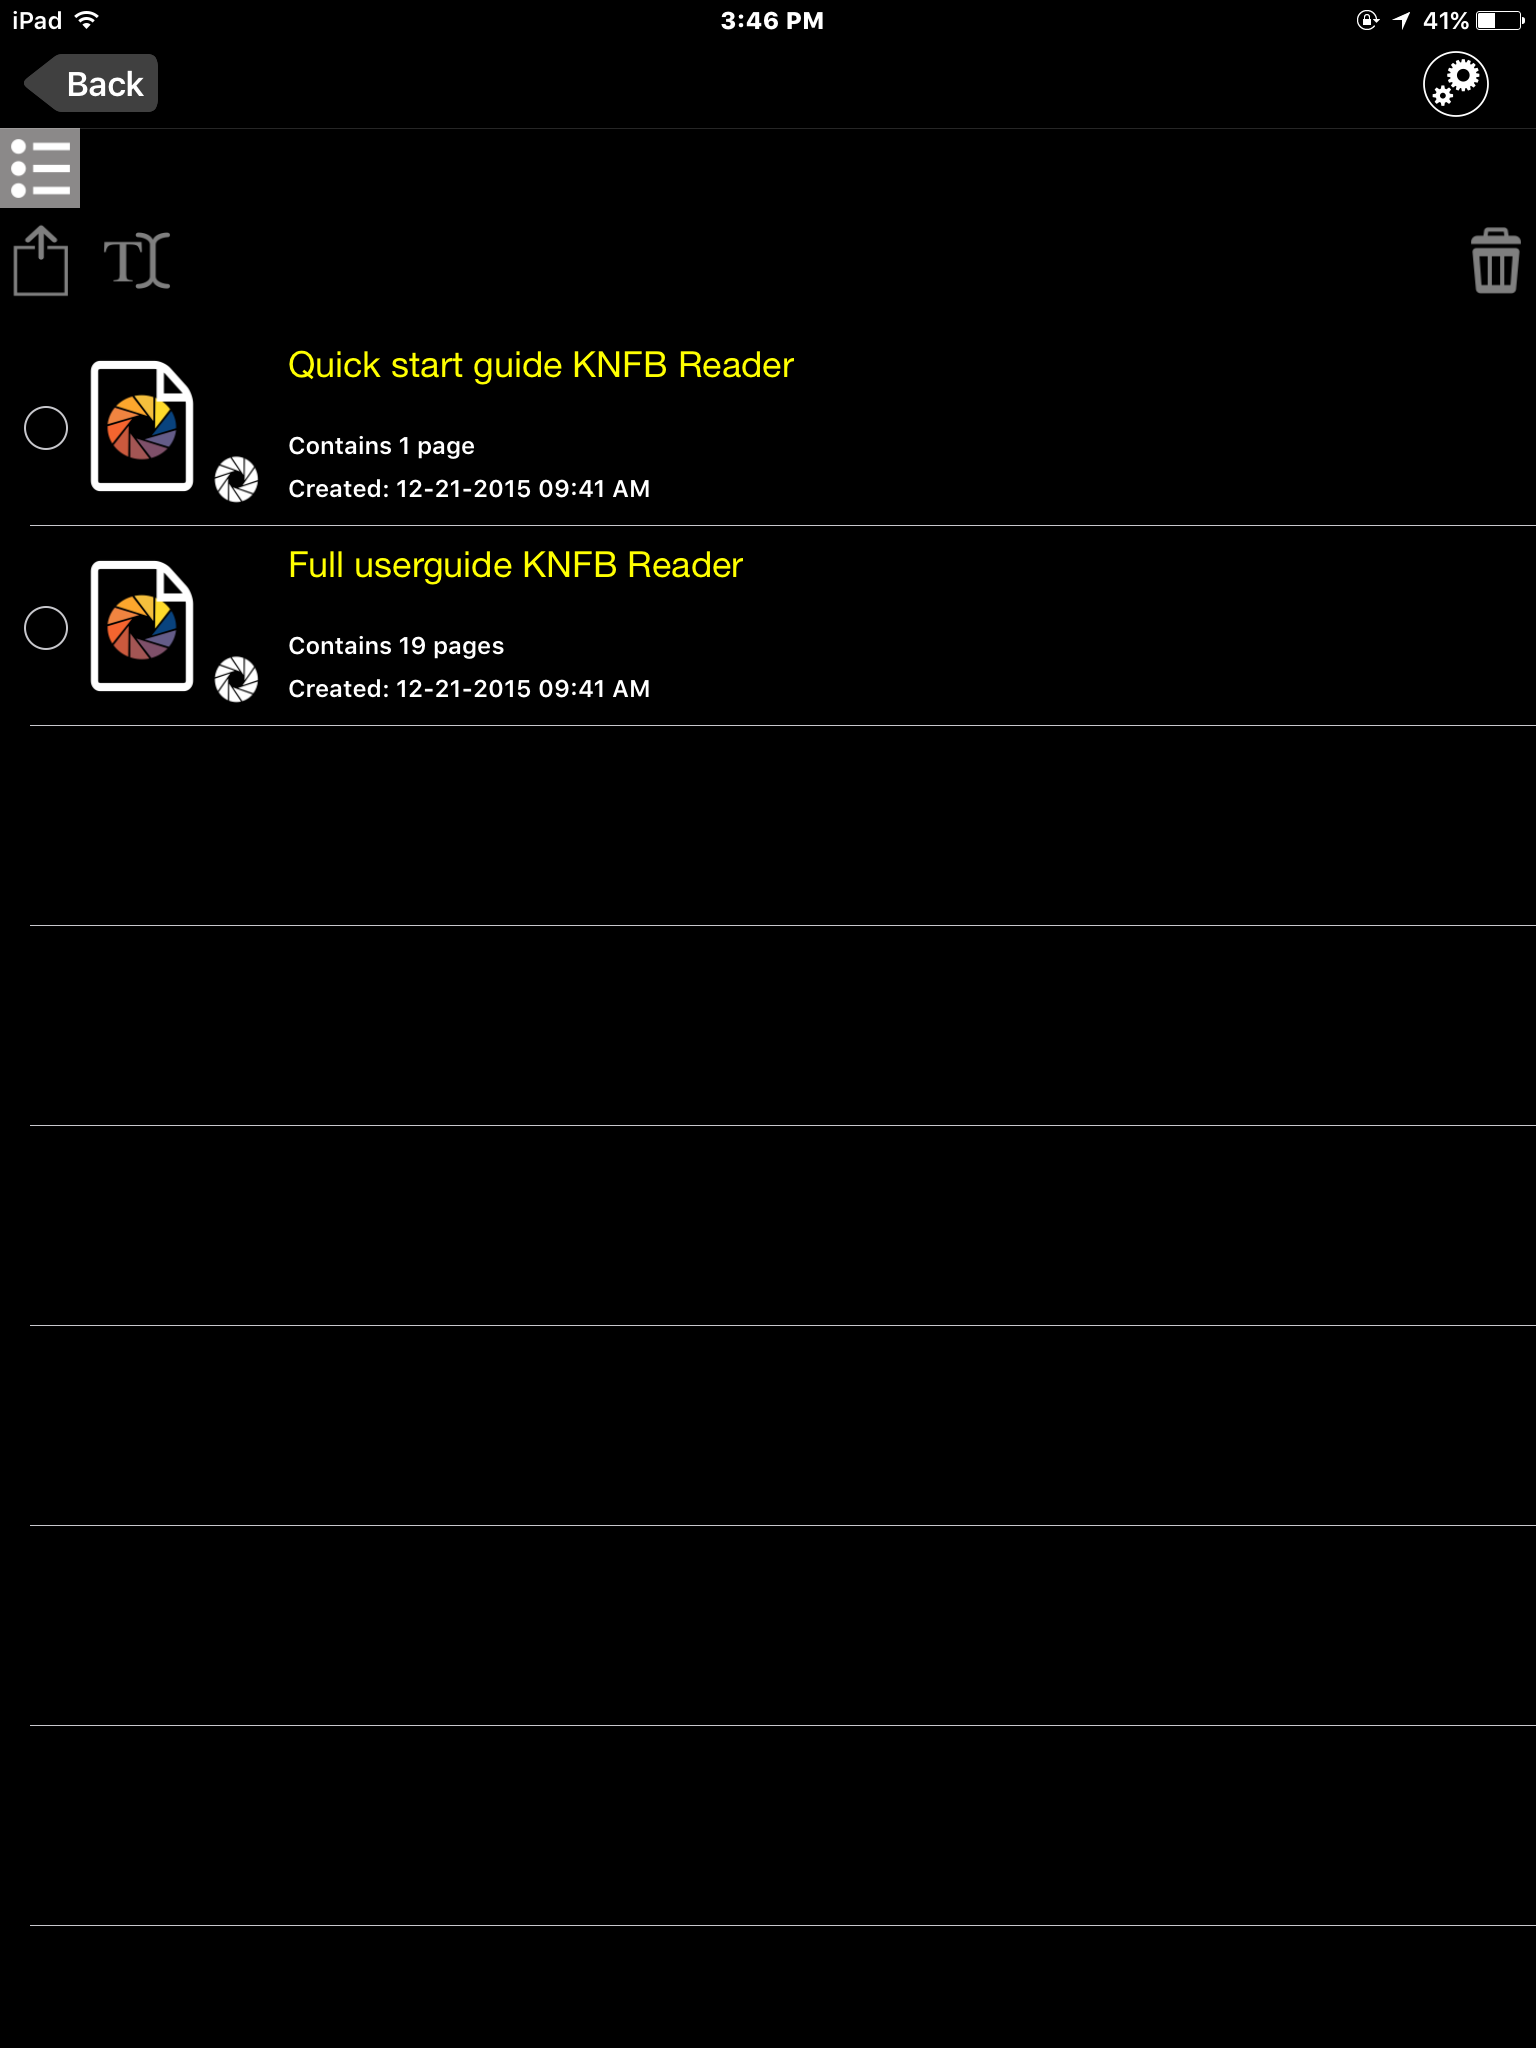
Documents
List of documents in the knfbReader app.
Settings
Menu where users can choose general settings relating to the camera, reader, file explorer, and Dropbox backup and text settings such as font and highlight options. Users can see their current version, developer info, leave feedback, and restore documentation in the About tab. For more information about this area, see below.
Camera Flash Mode
Camera Flash is Automatic
The knfbReader app will automatically detect if the flash is required and utilize it when needed.
Camera Flash is On
The flash will be used every time you capture an image.
Camera Flash is Off
The flash will never be used when capturing an image.
Tilt Guidance
Button that toggles tilt guidance mode on and off
When on, your device will vibrate when trying to capture an image if the device is not level or parallel with the document.
Take Picture
Located on the left half of the screen, the Take Picture button will capture the image of the document you’re working with.
Field of View Report
Located on the right half of the screen, the Field of View Report button will give the user feedback about how to move the iDevice to ensure better capture of the document.
Camera Roll
Allows user to open their Photos app to import photos to be processed by knfbReader
Batch Mode
Enabling batch mode will
OCR Language
Change the language between English, French, Spanish, and German
Document Type
Choose the format of the original printed page – Single column or Multi column
Profile
Manual picture
Image capture requires user to manually press the Take Picture button
Automatic picture
knfbReader will capture image automatically
Document Stand
Mode for use with a document stand
Document Mode
Following a scan or opening a saved document, the app will bring you to the document view
In this mode, users can view document image, combine, re-do OCR, save, and have documents read.
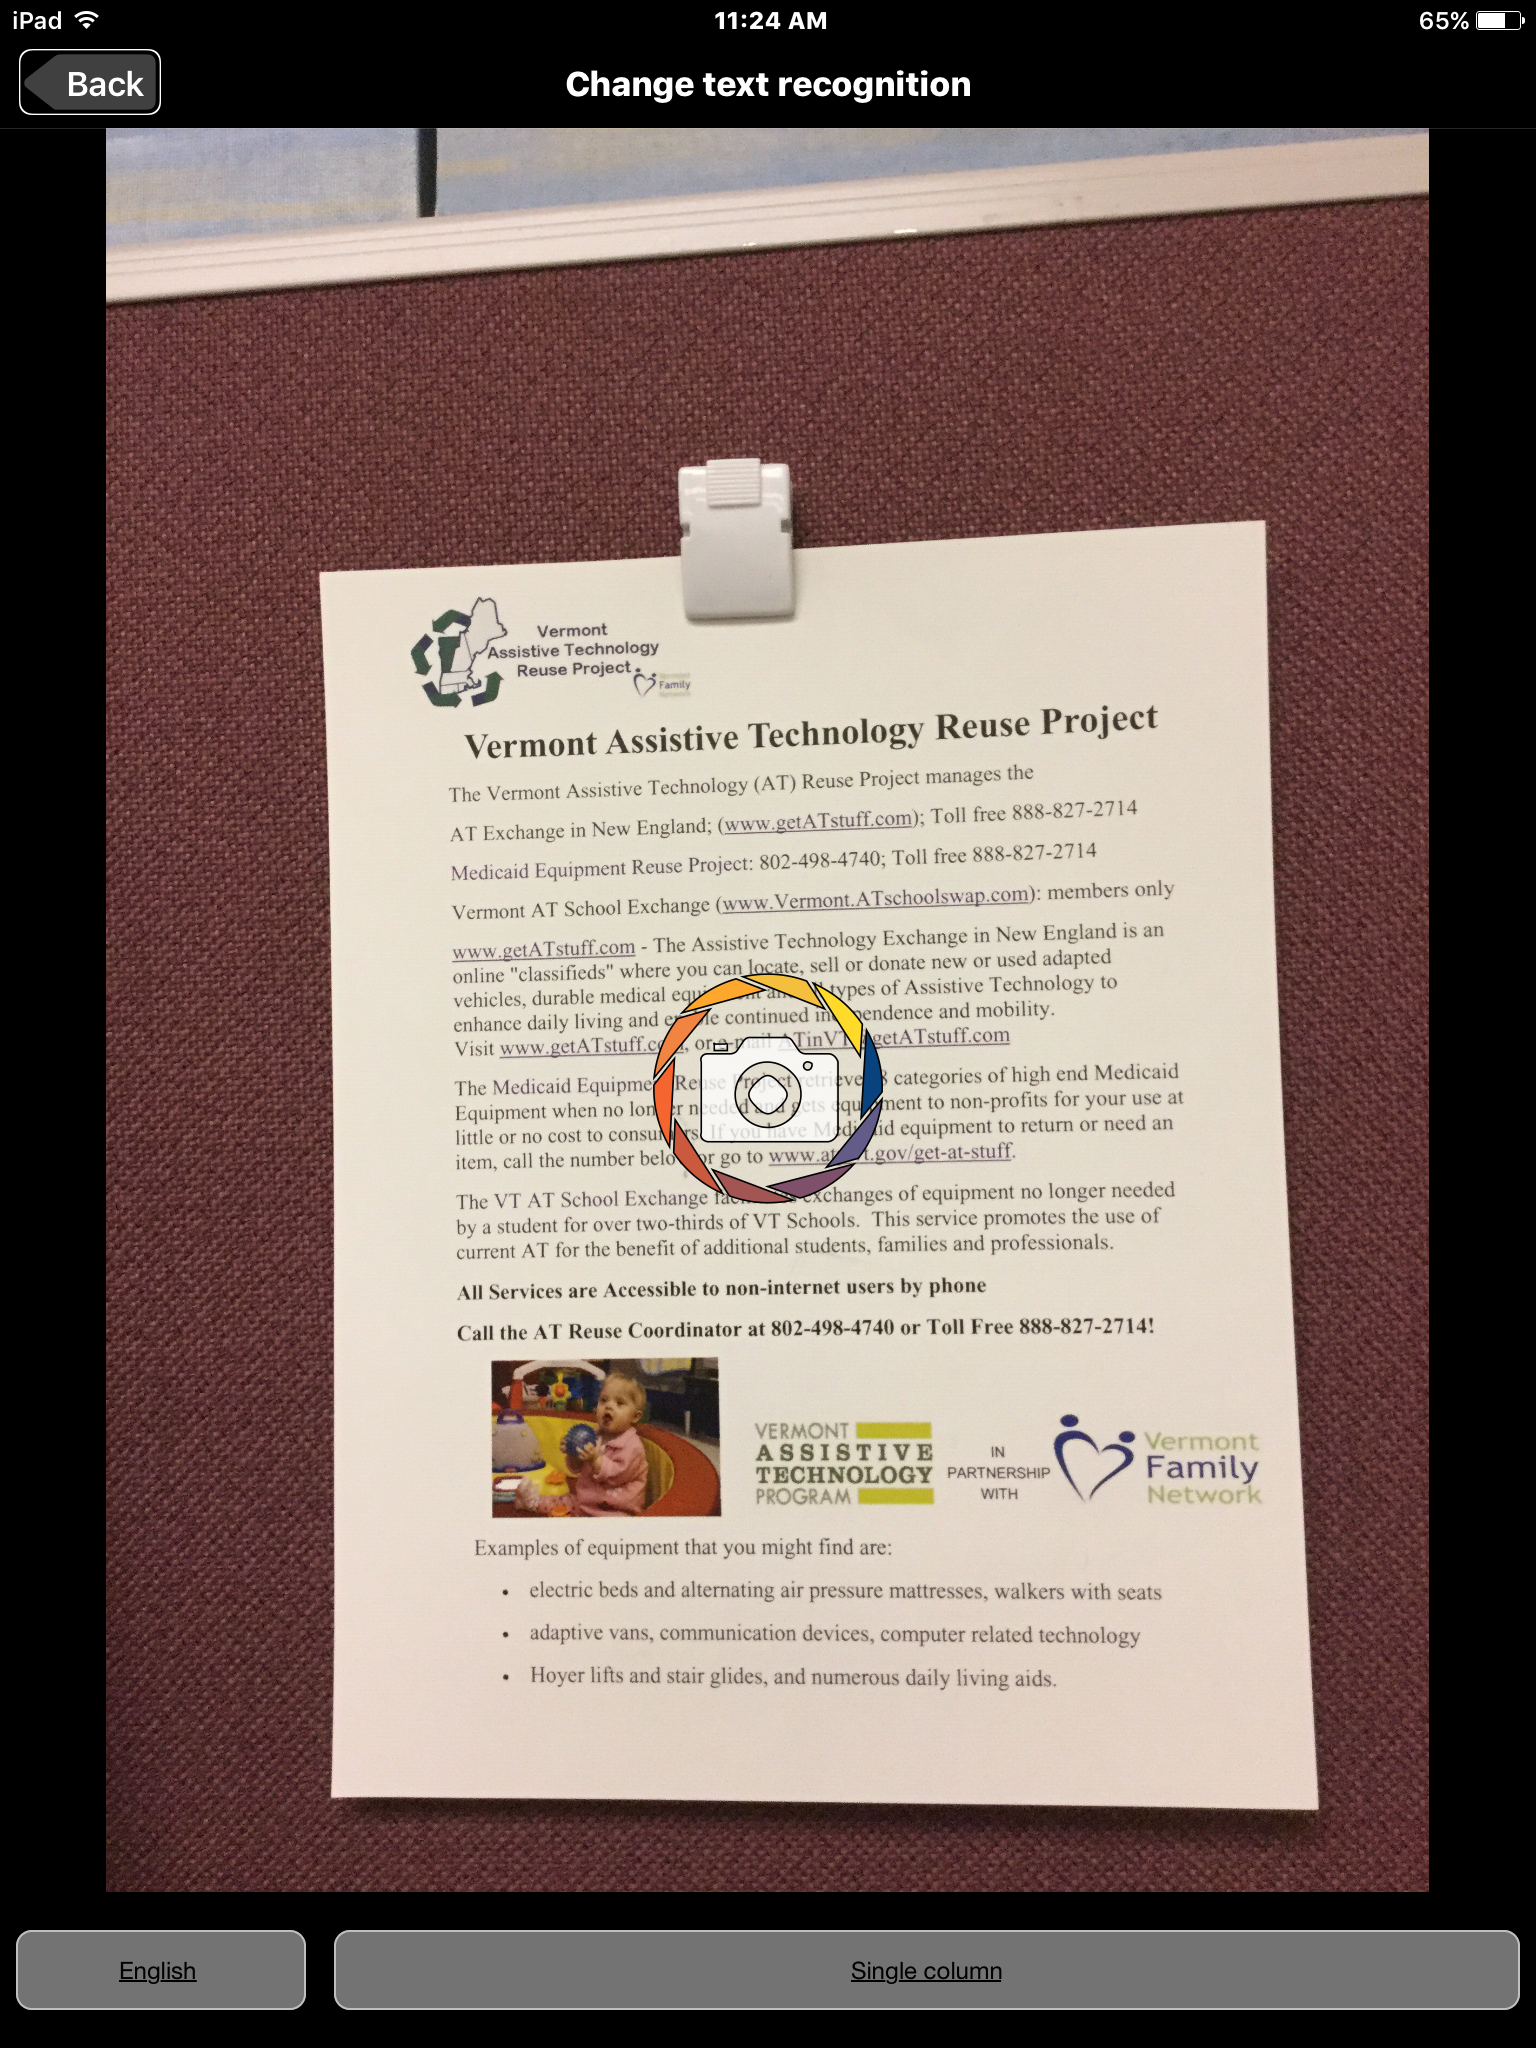
View Image Associated with Document
Shows the image the OCR scan was taken from
The first three items you’ll encounter in this view are the Back button, current page (ex. 1/1), and Settings
Add Page to Document
Selecting this feature will bring you back to the image scan interface of knfbReader. The difference between this mode and the normal mode is that the next scan will be added as the last page of the document that was just under review.
Change Text Recognition
This button allows users to have knfbReader re-do the OCR on an image with different settings. Specifically, users can change the OCR Language and the Document Type and then re-do the scan
Save Document
Save the document
Text View
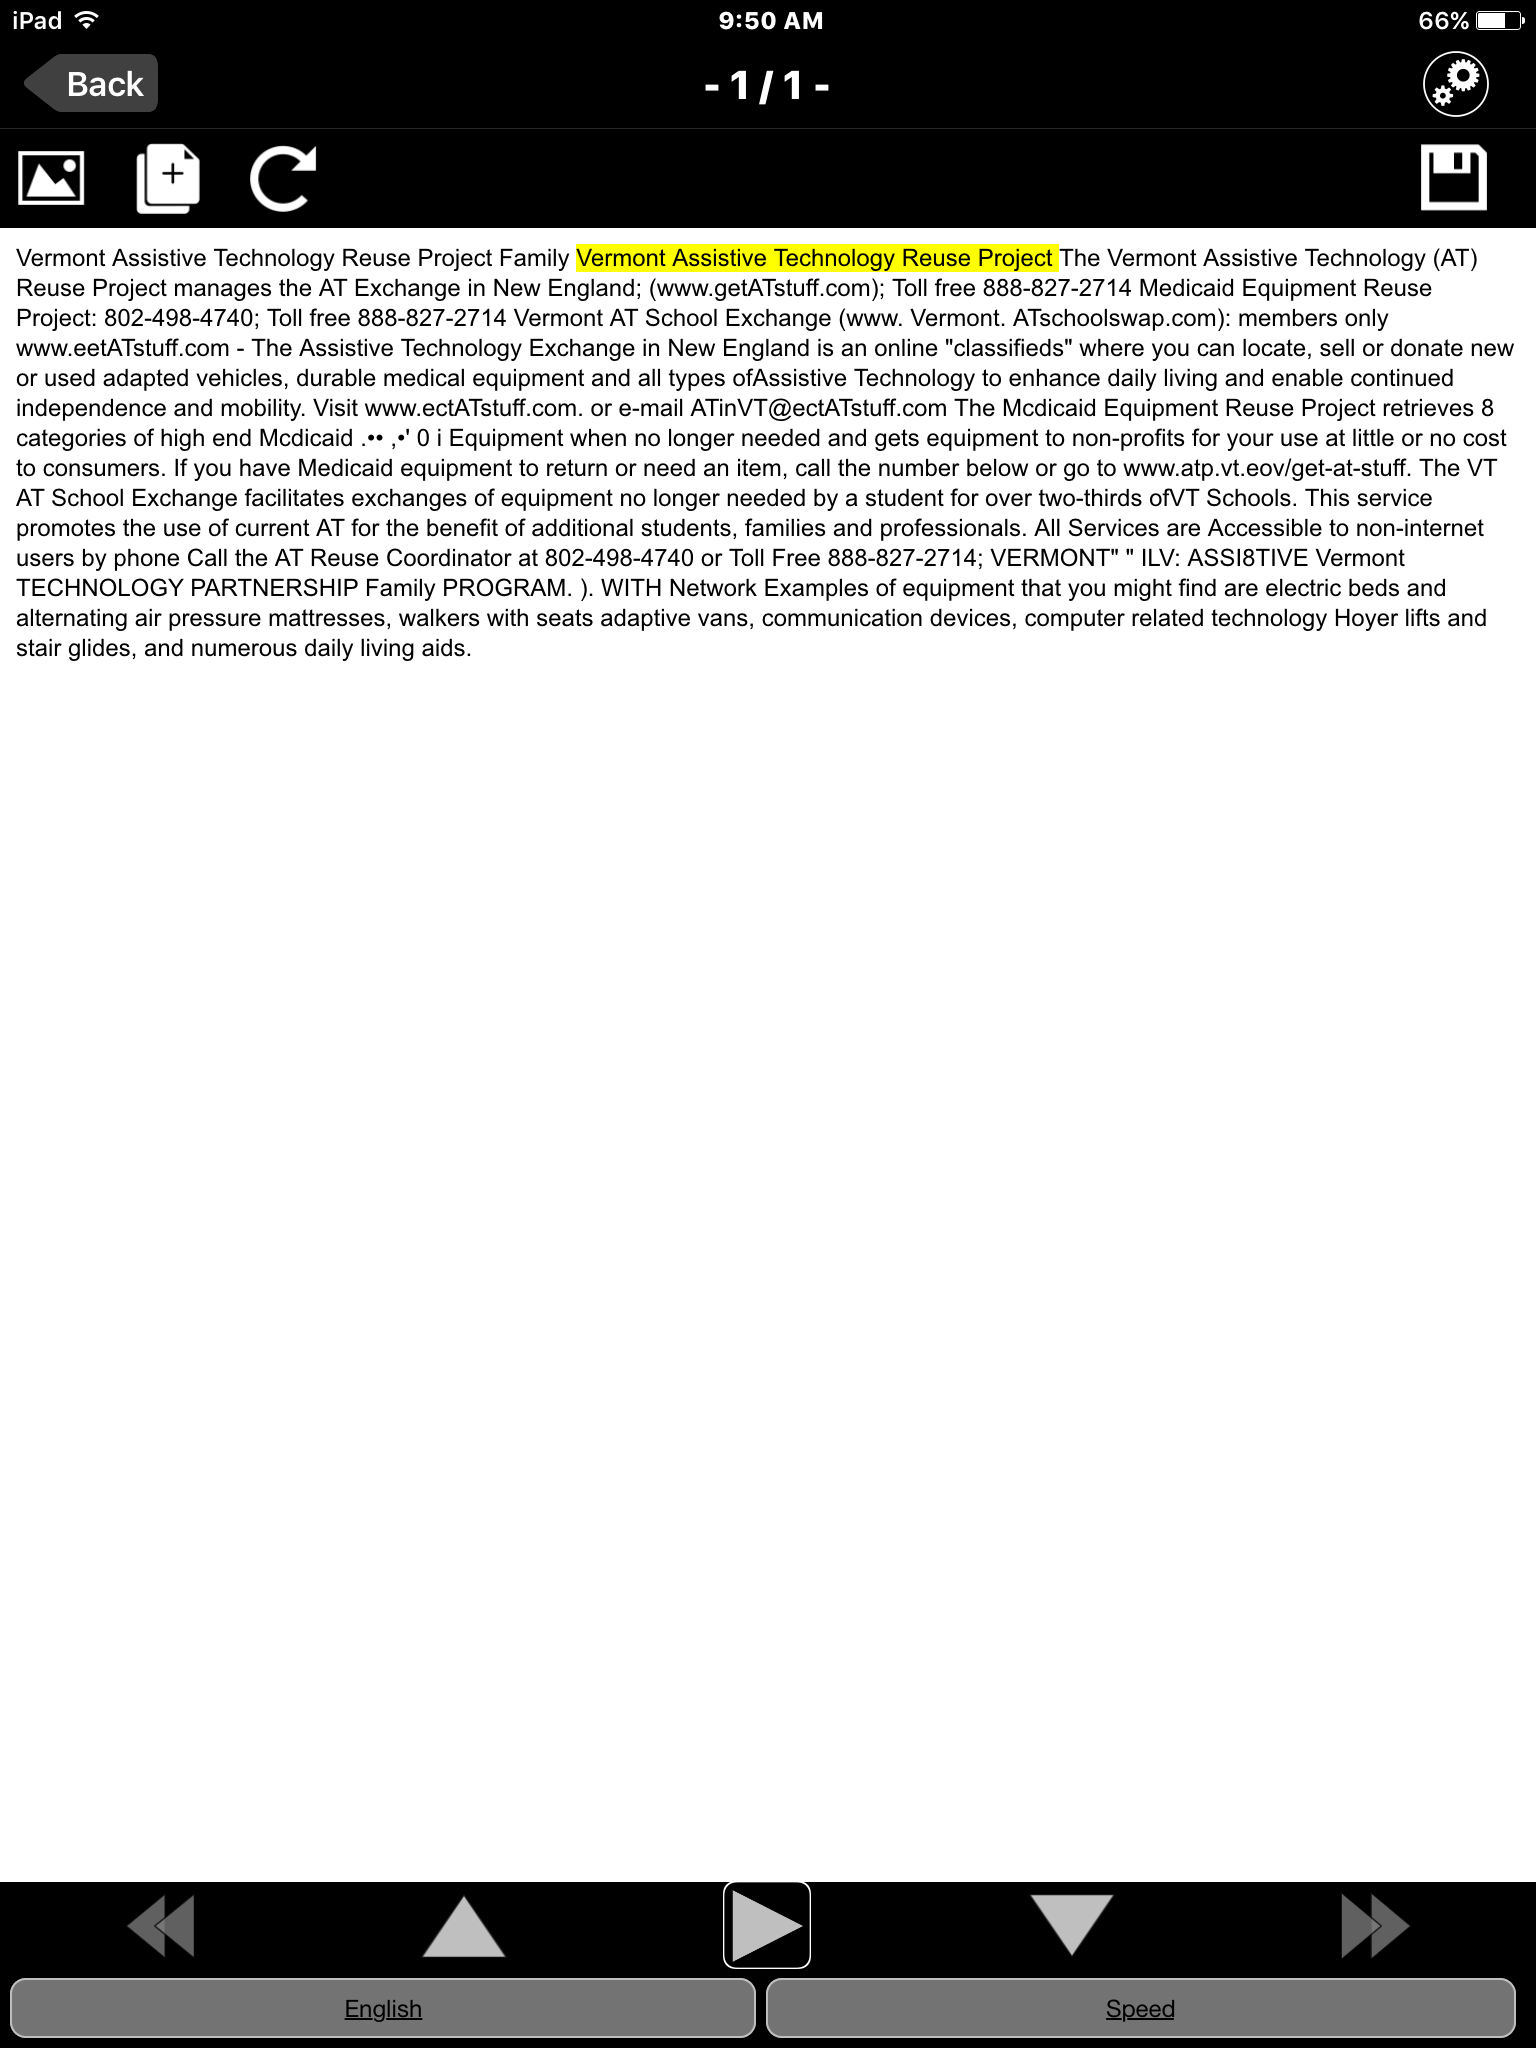
The majority of the screen is taken up by the OCR generated text from the image. The “text version” of the image will appear here as simple text.
Previous Page
In a multi-page document, this button will send you to the previous page
Previous Sentence
In the OCR text, this button will send the focus back to the previous sentence
Play/ Pause
Start and stop the reader
Next Sentence
In the OCR text, this button will send the focus back to the next sentence
Next Page
In a multi-page document, this button will send you to the next page
Document Language
Change the language of the reader
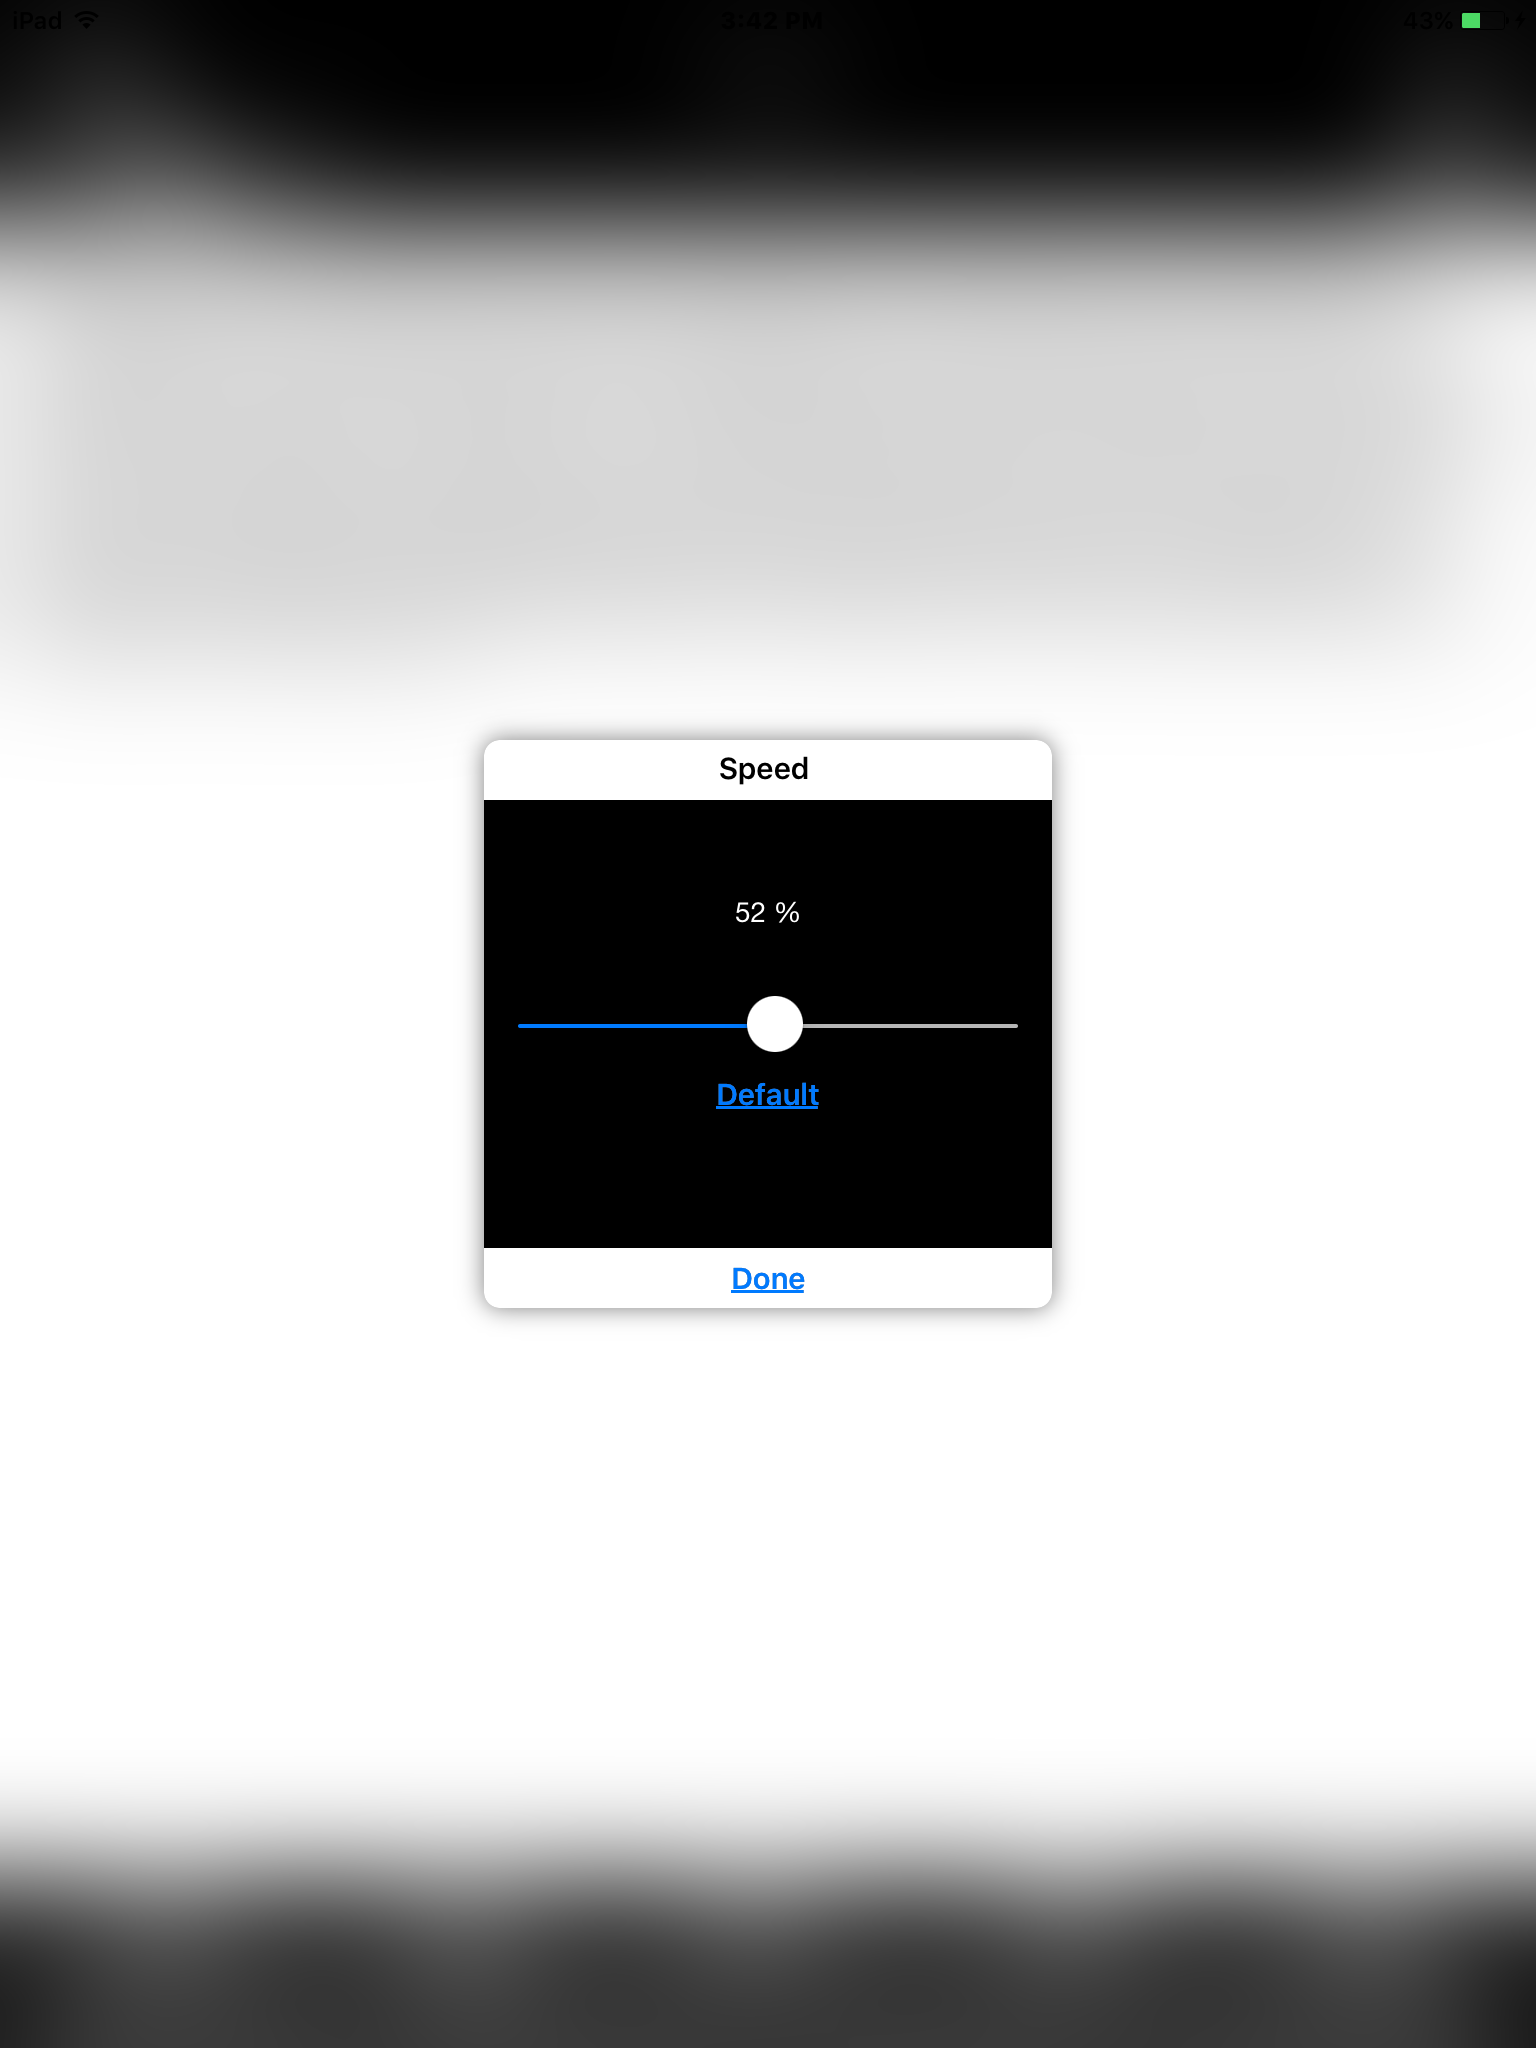
Speed
Change the speed of the reader. Note that this is not the same as the VoiceOver speech rate.
VoiceOver Gestures for Navigating the knfbReader Document
Single finger Swipe Left and Right
Best way to navigate through the controls of the app. It is also helpful for navigating the OCR text document. Each swipe will send you forward or back by one sentence.
The Rotor
Another way to navigate the OCR text document. Options in this setting include words, characters, and lines.
Four Finger Single Tap
Extremely helpful for navigating to controls in the document reader. Four finger single tap at the top half of the screen will put focus on the Back button, and a four finger tap on the lower half of the screen will put focus on the Speed button.
Two Finger Double Tap
Play and pause reader
Sharing, Deleting, and Renaming Files
In File Explorer users can see the scanned documents they have created with knfbReader. Saved files will appear in the order which they were created regardless of file name. As VoiceOver users move through the files, they will hear the file name, the number of pages, and the date the file was created.
Selecting the Edit button will enable the editing mode. In this mode, users can select single files to rename or select multiple files to share or delete.
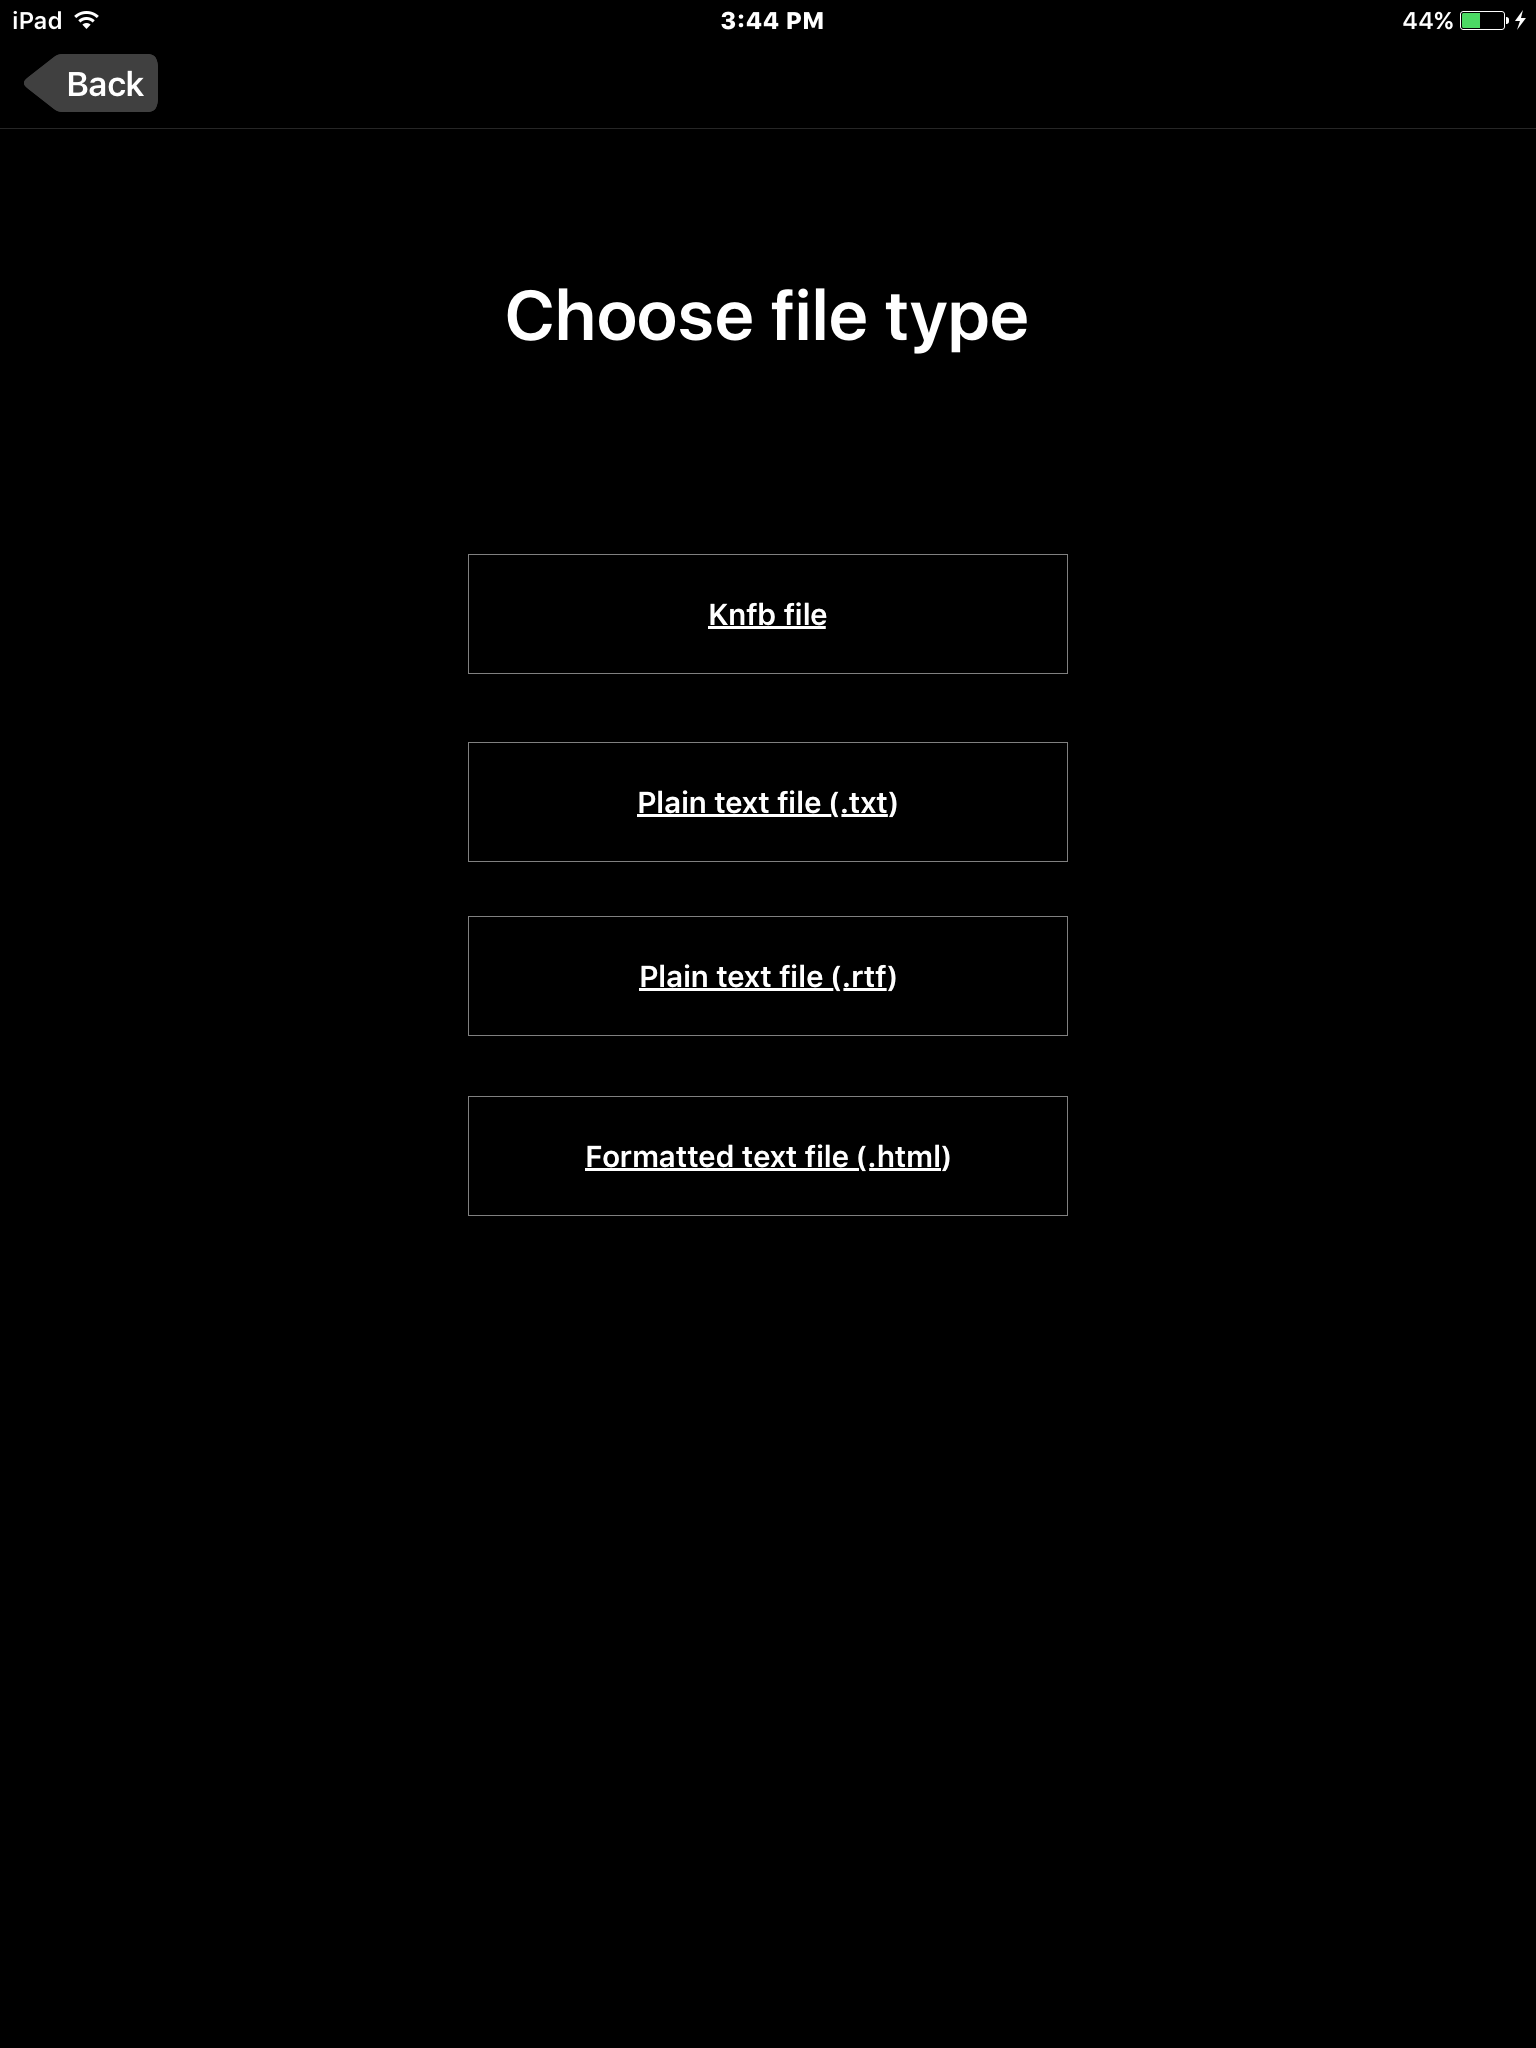
Selecting Share will bring users to menu that asks them to choose a file type from a list that includes: knfb file (.knfb), plain text file (.txt), plain text file (.rft), and formatted text file (.html).
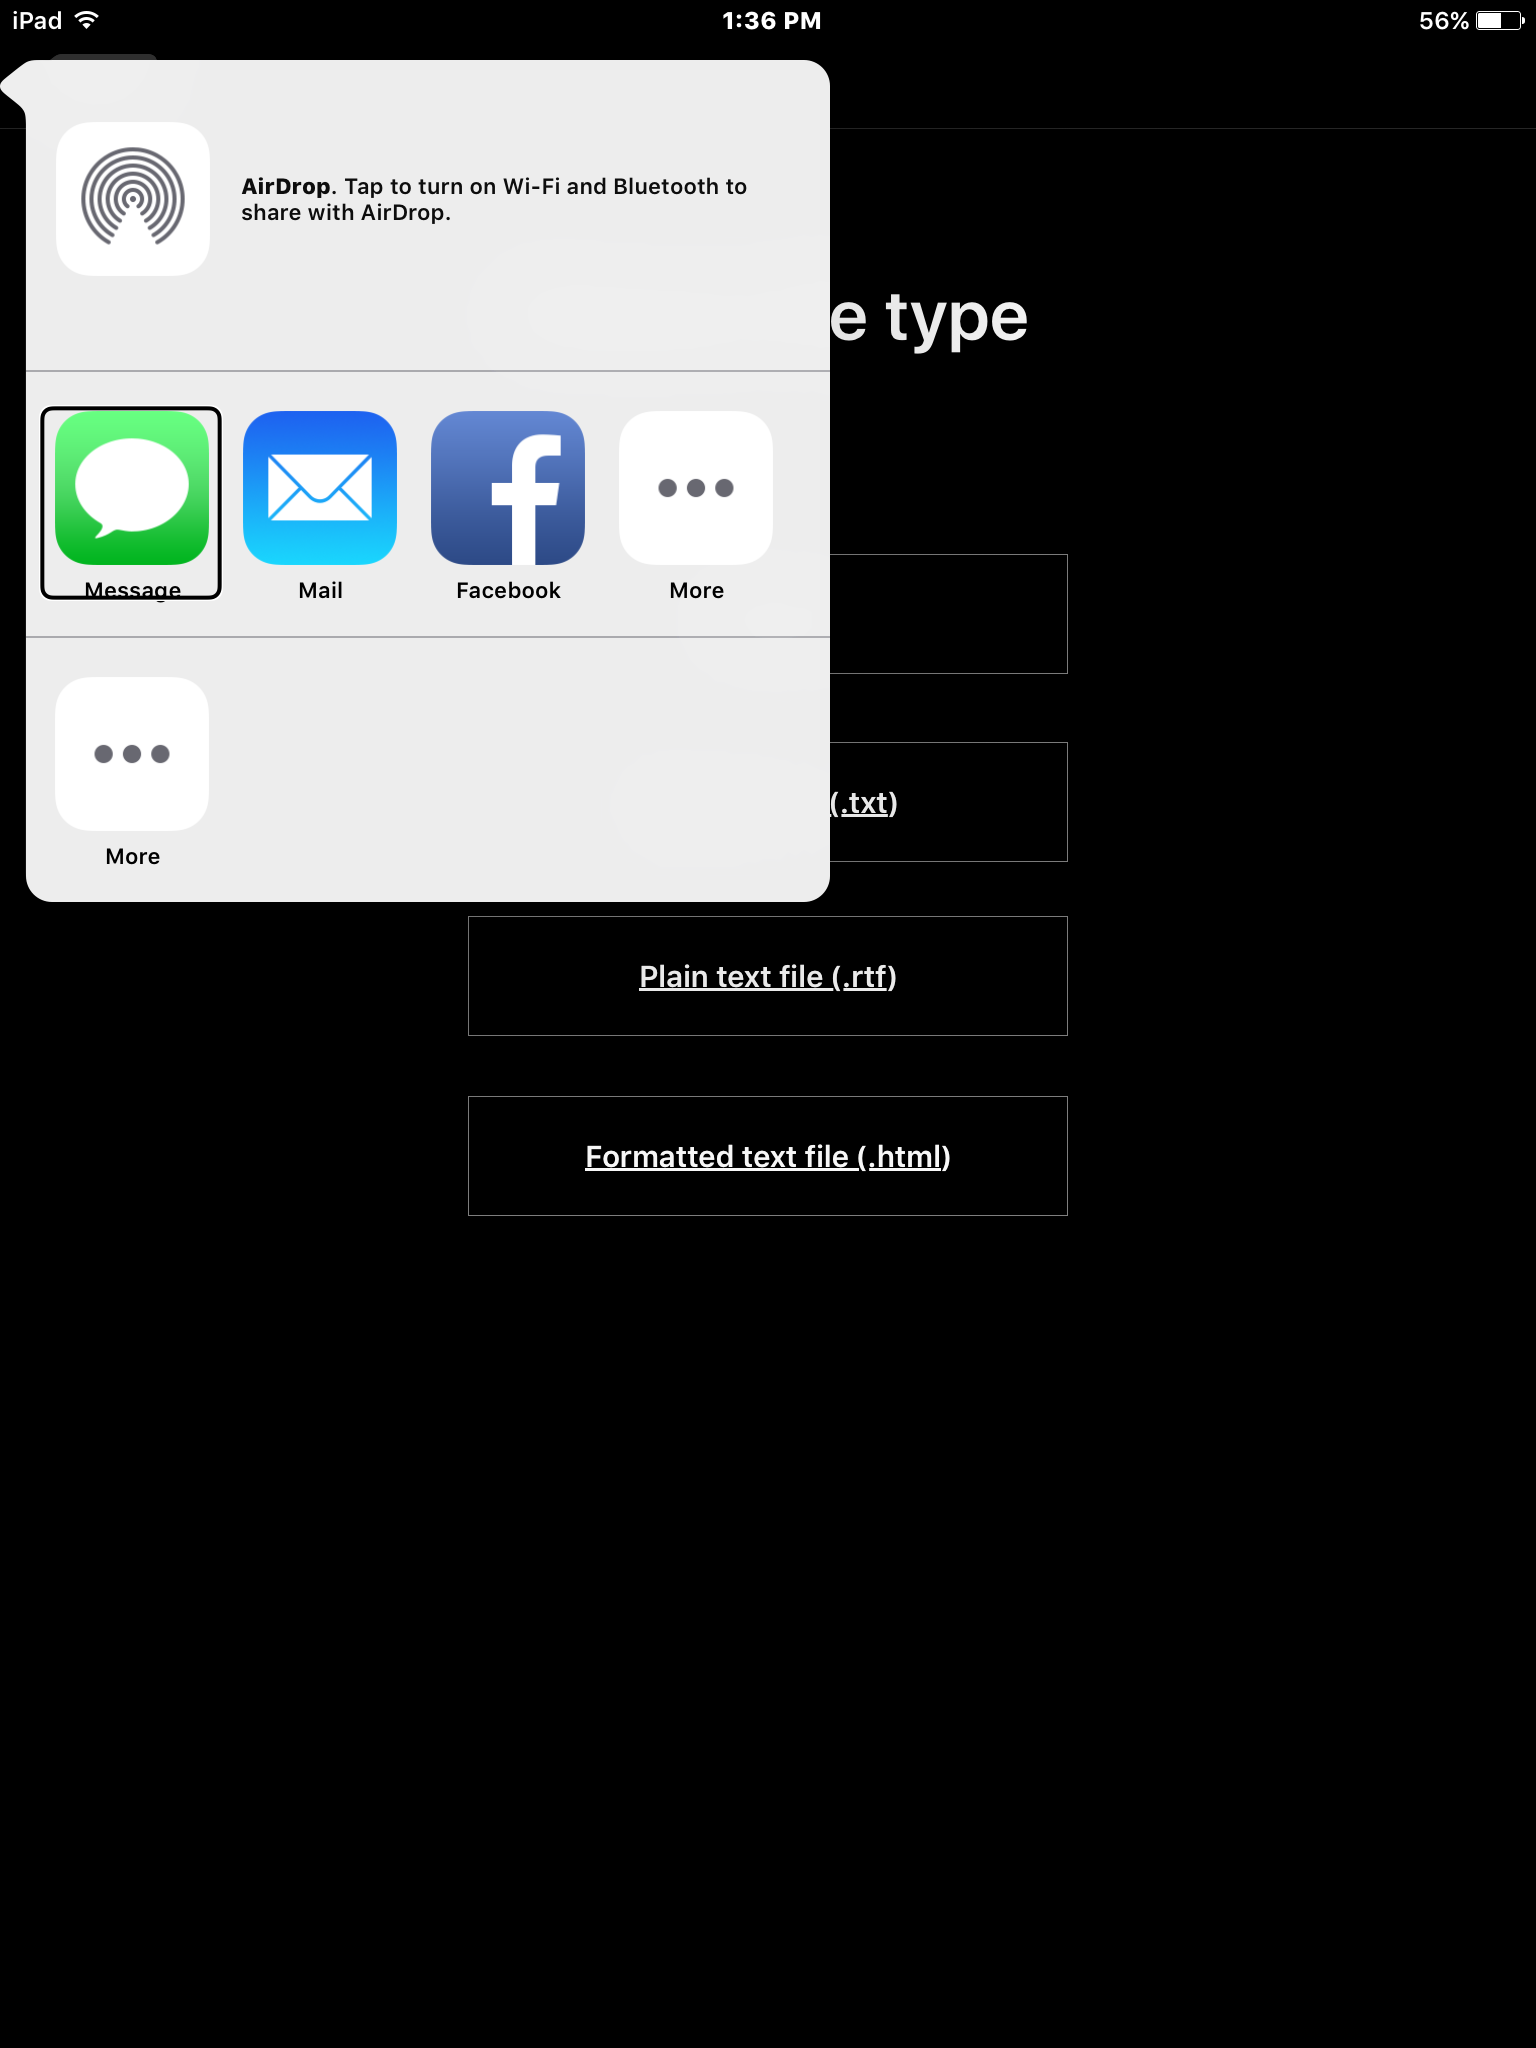
Once users select a desired file type, an iOS pop-up message will appear with options for how the document will be shared. What apps appear here depends on the user’s device. The Message and Mail apps are both in this list, so documents can be sent via either of these apps.
Settings
General Tab
Camera
Flashlight is Always On
Toggle on/off this setting which leaves the your flashlight on when taking images for this app.
Field of View Landscape Mode
Enables better OCR for images taken in landscape orientation
Field of View Reports Visible Corners
Toggles on/off whether or not visible corners are reported on in the Field of View Report
Select Recognition Language
Allows users to add and remove recognition languages from the list of OCR languages
Reader
Automatically Start Reading
Toggles on/off the feature that automatically has the reader begin with a newly scanned page
Allow Reading in Background
Toggles on/off the functionality of the reader continuing in the background even after leaving the knfbReader app
Allow Word Highlighting
Toggles on/off word highlighting
Speech Volume
Change the volume of the reader
Speech Rate
Change the speech rate
Select Reading Language
Allows users to add and remove reading languages from the list of document languages
File Explorer
Confirm Before Deleting
Toggles on/off the Are you sure you want to delete this file? message that comes up upon deleting a file
Dropbox Backup
Link to Dropbox
Enable a link between your knfbReader app and a Dropbox account. Selecting this button will bring up a login window for Dropbox (see below):
Allow Mobile Data for Dropbox
Allow file synchronization with Dropbox to utilize mobile data
Backup All KNFB Files to Dropbox
Initiate a backup of all files currently in your knfbReader app on your Dropbox account
Restore All KNFB Files from Dropbox
Restore all your files from your Dropbox account on your knfbReader app (replace the files on your knfbReader with the files on your knfbReader files on Dropbox)
Text Tab
Text Settings
Font Type
Choose font text from Academy Engraved LET to Zapfino
Font Size
Choose from 12 pt to 42 pt font
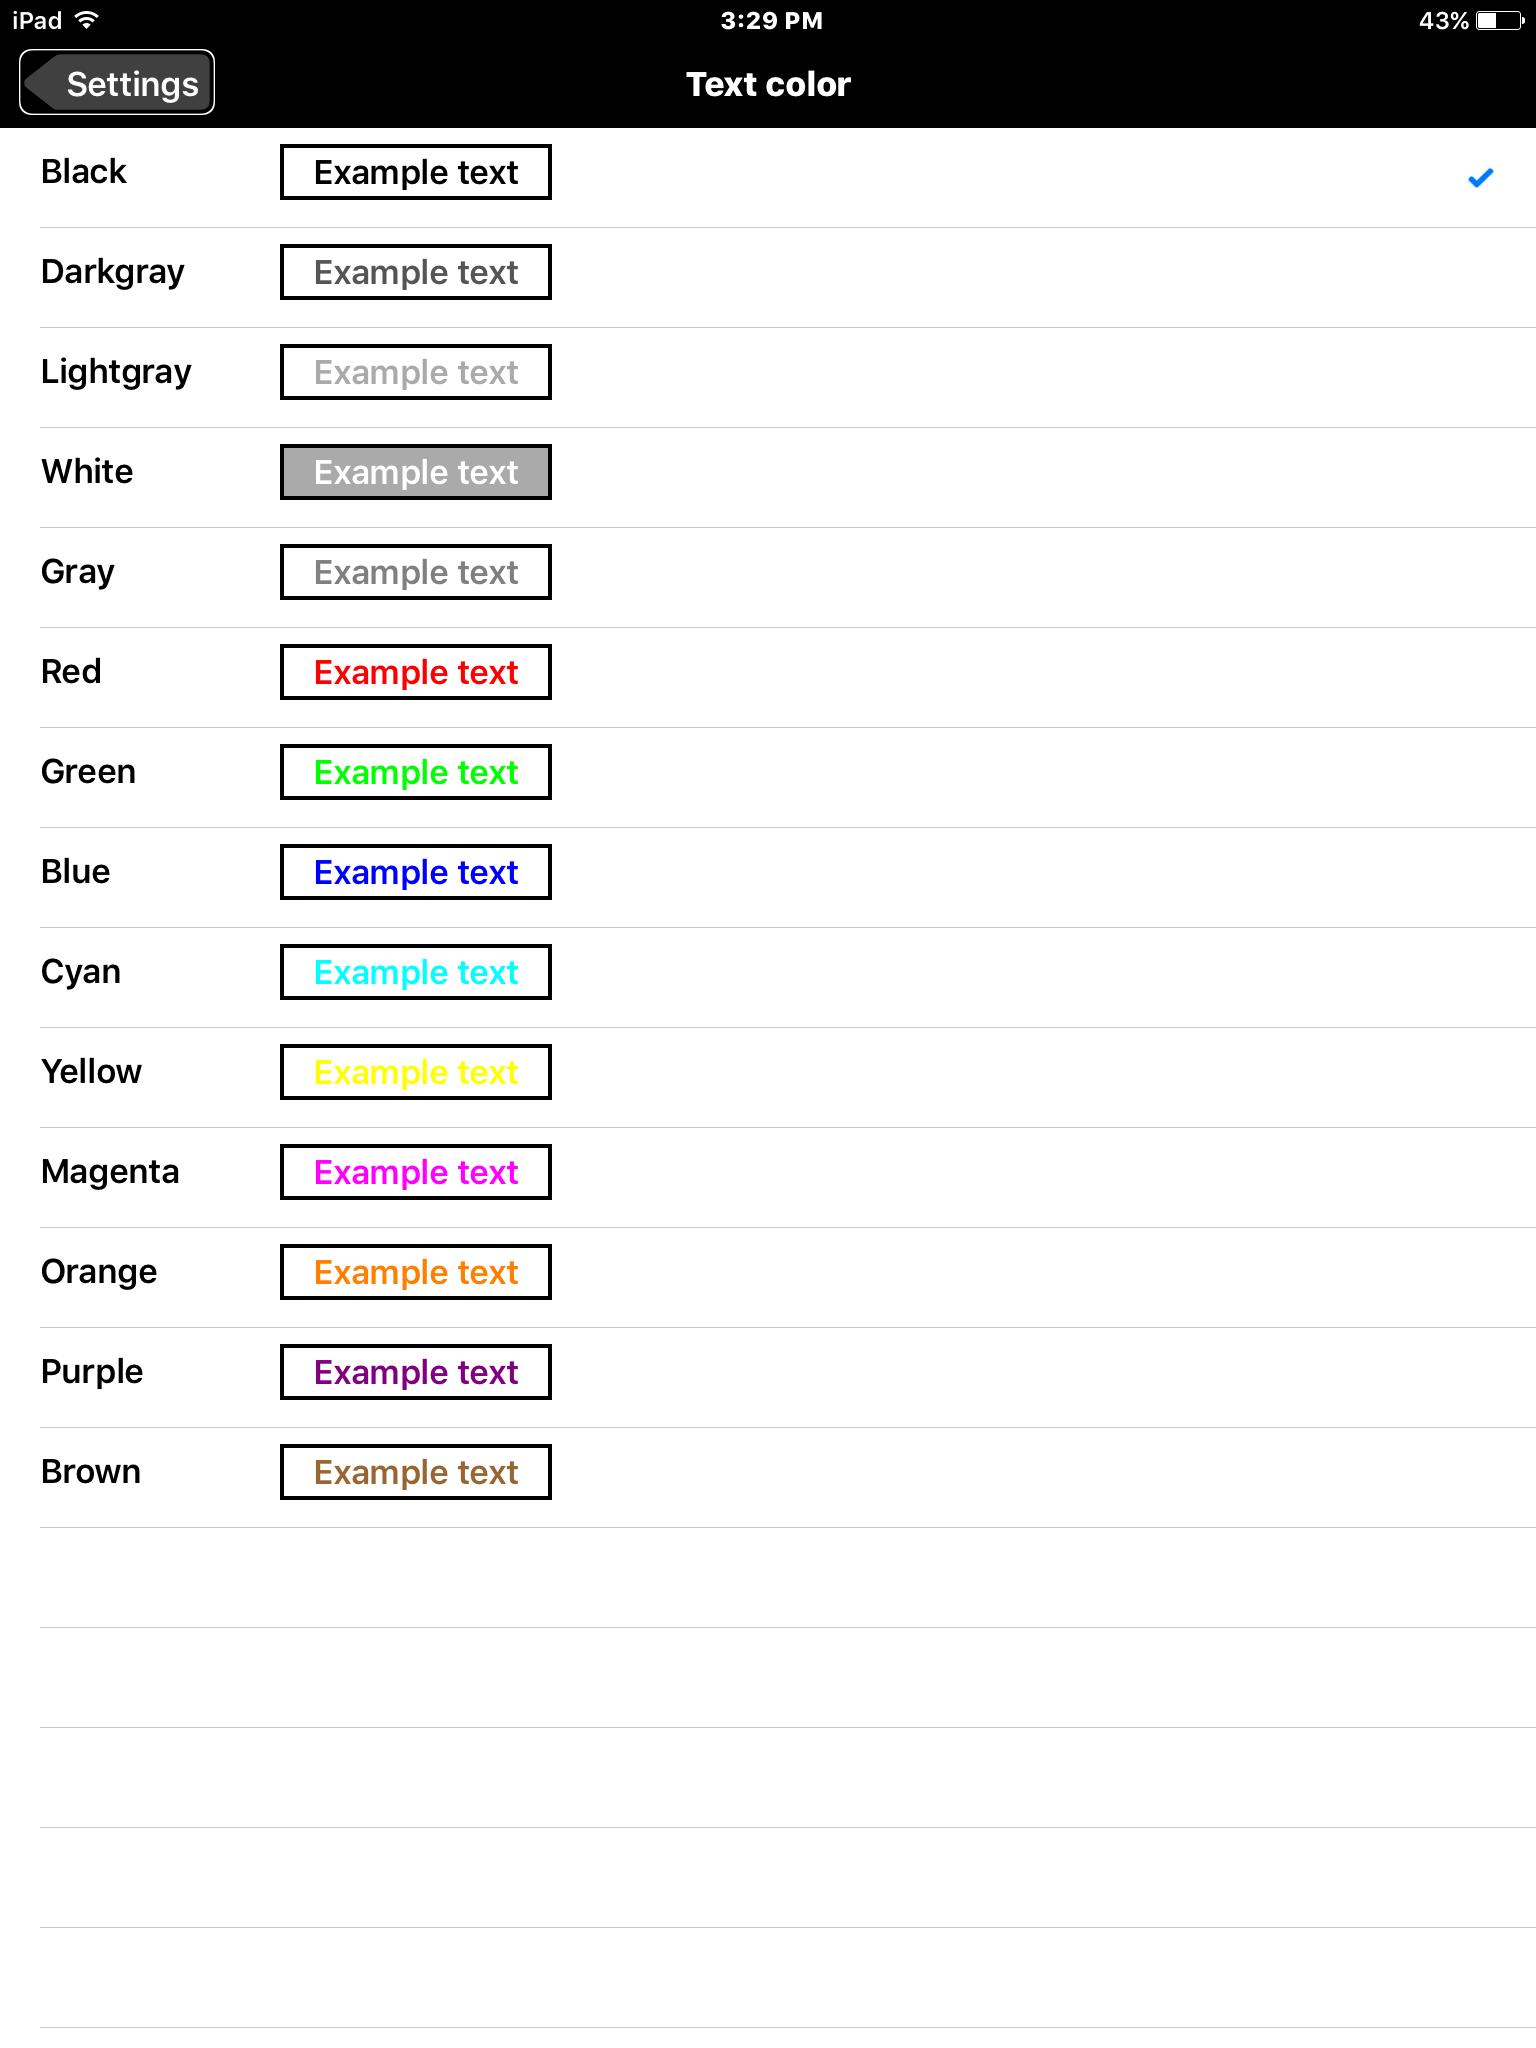
Text Color
Choose a color for your text – see below
Text Background Color
Choose a color for the background of text
Line Distance
Customize the distance between lines
Highlight Settings
Highlight Text Color
Set a custom color for highlighted text
Highlight Background Color
Set a custom color for the background of highlighted text
About Tab
Version
The current version of your knfbReader app
Copyright Statement
Statement that Sensotec NV and KNFB Reader, LCC own the rights to the knfbReader app
Company Partners
List of company partners (ex. Dropbox)
Leave feedback
Activating this button will open the mail app with a new, blank message addressed to support@knfbreader.com with the subject line KNFB Reader feedback
Restore Documentation
Use this function if you accidentally deleted or altered the Quick Start Guide or the User Guide and would like to restore them.
Training Resources for knfbReader
Hadley School for the Blind: iFocus Using the KNFB-Reader
Learn how to use the Zoom feature in iOS to magnify the screen
Accessibility Apps for iPad
Ocular Character Recognition (OCR) Apps
knfbReader
Can be used read PDF, ePub, Text, Word, PowerPoint, Pages, Keynote, RTF and HTML files. Integrates with BookShare, Dropbox, Project Gutenberg and more. Highlights, reads and auto scrolls documents.
Cost: $99.99
TextGrabber + Translator
Easily and quickly scans, translates and saves your chosen text from virtually any printed material.
Simply take a picture of the text and immediately edit, hear it spoken aloud via VoiceOver,
Cost: $1.99
Magnification Apps
Over 40 Magnifier and Flashlight
Flashlight and Magnifier in One App PLUS a Tip Calculator
Cost: $1.99
VisionAssist
“VisionAssist is a very impressive app that, over time, could make portable electronic magnifiers obsolete.” – VisionAssist gains 5 stars in review on About.com from assistive technology writer Andrew Leibs.