
| Function | Equivalent VoiceOver Gesture | Refreshabraille18 |
| Select the previous/ next item | Single finger flick to the left and right | Left/ right on the Directional Button |
| Activate an item | Single finger double-tap | Push down on the Directional Button |
| Pan braille left | Left Advance Bar or Chord + Dot 2 | |
| Pan braille right | Right Advance Bar or Chord + Dot 5 | |
| Press the home button | Single press of the home button | Chord + Dots 1-2-5 |
| Open App Switcher | Double press of the home button | Chord + Dots 1-2-5 twice quickly |
| Turn VoiceOver off | Triple press of the home button | Chord + Dots 1-2-5 three times quickly |
| Pause reading | Two finger single tap | Chord + Dots 1-2-3-4 |
| Read from the current position | Two finger swipe down | Chord + Dots 1-2-3-5 |
| Read from the top of the page | Two finger swipe up | Chord + Dots 2-4-5-6 |
| Scroll up | Three finger swipe up | Chord + Dots 3-4-5-6 |
| Scroll down | Three finger swipe down | Chord + Dots 1-4-5-6 |
| Scroll left | Three finger swipe left | Chord + Dots 2-4-6 |
| Scroll right | Three finger swipe right | Chord + Dots 1-3-5 |
| Announce page number or rows displayed | Three finger single tap | Chord + Dots 3-4 |
| Move to the first item | Four finger single-tap on the top half of the screen | Chord + Dots 1-2-3 |
| Move to the last item | Four finger single-tap on the bottom half of the screen | Chord + Dots 4-5-6 |
| Adjust the rotor | The rotor gesture | Chord + Dots 2-3 / Chord + Dots 5-6 |
| Select the previous/ next Rotor item | Single finger flick up and down | Up and down on the Directional Button |
| Move to status bar | Chord + Dots 2-3-4 | |
| Open Notification Center | Chord + Dots 4-6 | |
| Open Control Center | Chord + Dots 2-5 |
The Victor Reader Stream
What Does the Victor Reader Do?
| The Victor Reader is a multi-purpose electronic device designed for blind or low vision users. The device can play DAISY Books, read text documents, and record, playback, and organize audio notes. |
Unpacking the Victor Reader
| You’ll find the following hardware in your Victor Reader Stream box: |
| The Victor Reader Stream Device |
| Silicone Case |
| Power Adapter |
| Long USB Cable for connecting to computer or power adapter |
| Short USB Cable for connecting to USB flashdrive |
| Earphones |
| If you have problems or questions and need to contact Humanware, their number for US and Canada is: 1-888-723-7273. |
Device Layout
| The Victor Reader Stream is a rectangular device about the size of a mobile phone. The device has no screen and features 23 different buttons. It resembles a television remote control. | |
| Front Side | The front side has a total of 19 different button on it, organized into three columns. |
| Back Side | There are no buttons on the back side of the device. However, users will find a latch that will dislodge the battery. |
| Top Edge | The top edge has no buttons. There is a headphone jack on the right side and the center of this edge is where users will find the slot for the SD card. |
| Bottom Edge | The bottom edge has no bottons. In the center of this edge, users will find the Mini USB port for the long and short USB cables. |
| Left Edge | There are three buttons on the left edge: power, increase volume, and decrease volume. |
| Right Edge | There is one button on the right edge – the record button. Users will also find an input jack to plug in a microphone on this side. |
Button Descriptions
Front-side Buttons
| It is easier to think of the front side having three separate groupings of buttons: upper, middle, and lower. | |
| Upper Front Buttons | The first row of buttons are all different shapes – square, circular, and diamond. From left to right they are “Go To”, “Online Features”, and “Bookmark”. |
| Middle Front Buttons | The middle buttons are organized into three columns of four buttons each. All of these buttons are the same shape and size. These 12 buttons make up a keypad in the same layout as typically found on a telephone. Here are the rows from left to right: row 1 – 1, 2, 3; row 2 – 4, 5, 6; row 3 – 7, 8, 9; and row 4 – *, 0, # |
| Lower Front Buttons | The four lower buttons are organized into 2 rows with a single button in the center of the upper row and three buttons in the lower row. The button in upper row button is circular and is the sleep button. In the lower row, you’ll find a square button between two triangular buttons. These buttons from left to right are: “Rewind”, “Play/ Stop”, and “Fast-forward”. |
Left Edge Buttons
| Power Button | The power button is the topmost button on the left edge. It is a circular button. |
| Volume Buttons | The two lower buttons on the left edge are both triangular. The lower button is “Volume Down” and the upper button is “Volume Up” |
Right Edge Buttons
| Record Button | The right edge only has one button. The square button on the right edge is the “Record” button. |
Starting the Victor Reader
| Power Button | Holding the Victor Reader upright in your right hand with the buttons facing you, you’ll find the on and off button on the left edge of the device. It is the topmost button of the three buttons on the left edge and is circular. |
| Turn on Victor Reader | Press and hold power button. You’ll hear a beep and a welcome message. |
| Turn off Victor Reader | Press and hold the power button. You’ll hear two beeps. |
| Turn on/ off Key Describer | Press and hold the 0 key |
| 1 | Bookshelf |
| 2 | Scroll up |
| 3 | Delete note |
| 4 | Move back |
| 5 | Where am I? |
| 6 | Move forward |
| 7 | Menu |
| 8 | Scroll down |
| 9 | Playback mode |
| * | Cancel |
| 0 | Info |
| # | Confirm |
| Starting/stopping the built-in Victor Reader User Guide | Press and hold the 1 key. Move through the parts of the user guide by using the 4 and 6 keys. Play and pause audio using the play and pause button. |
JAWS Topic: Navigating and Combining Documents in Word
Navigation
| Below you’ll find some helpful keystrokes for navigating a large Microsoft Word document. | |
| Move to the top of document | Ctrl + Home |
| Move to the bottom of document | Ctrl + End |
| Go to a specific page of the document | F5 |
| Expand/ Collapse Ribbon | Ctrl + F1 |
Combining Documents
| There are two methods for combining documents in Microsoft Word. You can simply use the cut, copy, and paste commands to paste text from one document into another.You can also use insert text from one document to another using the Text from File function on the Insert tab. |
Cutting and Pasting Between Two Documents
Step 3 – Use the Copy or Cut commands to add your text selection to the clipboardStep 4 – Switch to document A and move the text cursor (insertion point) to where you’d like the text selection from document B to be addedStep 5 – Paste text from clipboard
| Lets say we have two documents: document A and document B. We’d like to copy the text out of B and paste it into A. | |
| Step 1 – Open both documents | |
| Step 2 – Select the text from document B that you’d like to add to document A | |
| Select by character | Shift + Left or Right Arrow |
| Select by word | Shift + Insert + Left or Right Arrow (using JAWS or MAGic) |
| Select by line | Shift + Up or Down Arrow |
| Select all | Ctrl + A |
| Copy – adds the selected text to clipboard | Ctrl + C |
| Cut – adds the selected text to clipboard and deletes selection | Ctrl + X |
| Switch between open applications | Alt + Tab |
| Paste | Ctrl + V |
| Undo | Ctrl + Z |
Using the Insert Tab
Lets again say we have two documents: document A and document B. We’d like to insert document B at the end of document A.
| Step 1 – Open document A | |
| Step 2 – Move the text cursor (insertion point) to where you’d like the text selection from document B to be added | |
| Step 3 – Switch to the Insert tab | |
| Move focus to the Insert Tab | Alt, then N |
| Step 4 – Open the Objects dropdown menu and select Text from file… | |
| Open Text from file | Alt, then N, then J, then F |
| Step 5 – Using the Windows File Explorer Dialog, select document B | |
| Note that you can choose to add multiple documents at once using this method. Simple use shift to select multiple documents in the Windows File Explorer Dialog. | |
Numbers with VoiceOver for macOS
Pages to Numbers
| We learned a range of functions in Pages prior to this lesson. During this session, we’ll start learning about using VoiceOver in Numbers. We’re going to see that the majority of the hotkeys we learned last time for Pages also work in Numbers. |
Numbers
| Numbers is a spreadsheet application that can used for making tables and graphs, running calculations and transforming data, and organizing information. |
| Numbers is organized by columns (vertical) and rows (columns). Rows are numbered, starting with 1 and continuing to infinity. Columns are are numbered alphabetically, starting with A and continuing to Z. After Z, you’ll find column AA, AB, AC, and so on until AZ. This continues until all two letter alphabetical pairs are used (until ZZ) and then Numbers used three letter series to mark columns. |
| The unit where a column and row meet is called a cell. Cells are where the data (numbers, text, etc.) of the spreadsheet resides. A cell will be titled by the combination of its column and row numeration. For example, the cell in the first row and first column is titled “A1”. Further, the cell in the 4th column and 18th row would be titled “D18”. |
| We can move from cell to cell using the arrow keys. Each arrow key will move you on cell in whatever direction you’ve selected. If your focused on cell B2, pressing up will bring you to B1, pressing down will bring you to B3, pressing left will bring you to A2, and pressing right will bring you to C2. As we move into new cells, VoiceOver will announce the contents and location of the cell. |
In-session Exercise 1: Explore a Spreadsheet
| Open the example spreadsheet below. Use the arrow keys to read each populated cell. |
| example spreadsheet 1 |
| What’s the difference between the contents of row 1 and the rest of the cells? |
| Where is the data in this spreadsheet? In what row do you stop finding data? What column? |
Navigation
| To navigate through the Numbers interface, users can use the interaction system (VO + Shift + Down Arrow to start interacting and VO + Shift Up Arrow to stop interacting), as well as using Tab and VO + J. | |
| Read the Title Bar of the Active Program | VO + F2 |
| Read the Item Currently in Focus | VO + F3 |
Opening, Saving, and Printing
| Open the File Tab to Save, Open, Print, and More | VO + M, then F |
| Create a New Empty Document | Command + N |
| Open a Saved Document | Command + O |
| Command + P |
In-session Exercise 2: Explore Another Spreadsheet
| Open the example spreadsheet below. Use the arrow keys to read each populated cell. |
| example spreadsheet 2 |
| Where is the data in this spreadsheet? In what row do you stop finding data? What column? |
Navigating the Workbook
| Navigating the Numbers spreadsheet requires a whole series of hotkeys on its own. Spreadsheets can be large and complex, and it is easy for people to get lost. We already learned we can navigate the spreadsheet by using the arrow keys, but this will be too slow in some cases. We can name rows and columns by simply inputting that text in row 1 and/or column A. | |
| Read the active cell’s coordinates | VO + Shift + T |
| Read the Header title | VO + C |
| Read the column title | VO + C (twice) |
| Read the row title | VO + R |
| Read table dimensions | VO + Shift + T (twice) |
| Move to the last populated cell in any direction | Command + Arrow Keys |
Selecting Data
| Selecting data is an important skill in Numbers. You’ll find yourself needing to quickly delete, move, or format entire columns, rows, or sections of a spreadsheet. | |
| Select all | Command + A |
Formatting Text
| Bold Selected Text | Command + B |
| Italicize Selected Text | Command + I |
| Underline Selected Text | Command + U |
| Read Formatting Attributes of Selected Text | VO + T |
Data
| Numbers can do much more than simply hold date in columns and rows. It can be used to do a range of computations. If you start a cell entry with the equals sign, that will make that cell a formula. Try this out! Enter the following text into a cell in Numbers: =1+1. What does VoiceOver say when you read the contents of this cell now? | |
| Edit a cell | Option + Return |
MAGic: Level, Speaker, Echo, and Reading
Using the Reader Functionality in MAGic
| While MAGic is primarily a magnification program, it does include some screen reader functionality. Screen readers are software applications that will attempt to identify, interpret, and read the information being presented on the computer’s screen. You might have heard of screen reading programs such as JAWS, NVDA, Window-Eyes, and Dolphin. |
| Using the reading functionality in MAGic, you can have the text on the screen read to you by a synthesized voice. Some examples of synthesized voices you might be familiar with include Apple’s Siri, Microsoft’s Cortana, Amazon’s Alexa, or possible good ol’ Microsoft Sam (the default text-to-speech voice from Windows 2000 and XP). |
The MAGic Speech Tab
| The MAGic Speech Tab can be found between the Visual and Tools tabs on the MAGic User Interface |
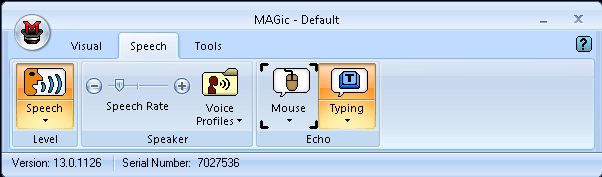 |
| The Speech tab has three sections: Level, Speaker, and Echo. |
Level
| The Level section includes only the Speech Split Button. With the top half of this split button, users can toggle between Full Speech and Speech on Demand. | |
 |
|
| Full Speech | Speech is on all the time |
| Speech on Demand | Limited speech mode where MAGic will only speak from designated unit commands (reading commands via the keyboard), typing echo, and mouse echo. |
| Keyboard shortcut to toggle between Full Speech and Speech on Demand | MAGic Key + F3 |
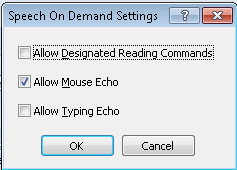
| Clicking the bottom half of the Speech Split Button will open the Speech dropdown menu. With this menu, users can open the Speech on Demand Settings menu. | |
 |
|
| Here you can enable or disable what will be read using Speech on Demand mode. “Designated reading commands are commands that you might press when you want to hear more information. For example, say word, say line, next word, prior word, spell word, and so on. Most of the time you won’t hear or need to hear this sort of thing, but when you need to, simply press the appropriate keystroke to get more information”1. Mouse echo will speak the parts of the screen below the mouse pointer. Typing echo will speak characters and words typed on the keyboard. | |
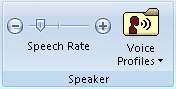
Speaker
| The Speaker section includes the Speech Rate Slider and the Voice Profiles Button. | |
 |
|
| An important part of working with a screen reader is setting the speech rate. In some instances, you’ll need the speaker to slow down. In other instances, you’ll want to speed up. This is especially important work working in a document as you will alter the speech rate depending on what you’re doing. For example, you might want the speaker to speed up when you’re having it read back a section you just finished writing. | |
| Users can adjust the Speech Rate Slider to permanently increase or decrease the speaking rate of the speaker. | |
| MAGic gives users two ways to change the speech rate: temporarily or permanently. Temporary changes are great for the purpose of editing, reviewing, or skim reading. Temporary changes are only retained while the program where the change took place remains active. In other words, if you do a temporary change in Microsoft Word and then switch to Internet Explorer and back, you’ll find your speech rate has been reset to your permanent setting. | |
| Keyboard shortcut to temporarily increase speech rate | Alt + Ctrl + Page Up |
| Keyboard shortcut to temporarily decrease speech rate | Alt + Ctrl + Page Down |
| Keyboard shortcut to permanently increase speech rate | Windows + Alt + Ctrl + Page Up |
| Keyboard shortcut to permanently decrease speech rate | Windows + Alt + Ctrl + Page Down |
| The Voice Profiles Button opens the Voice Profiles Dropdown Menu. In this menu, users can change their default synthesizer voice or open the Voice Adjustment Menu. | |
 |
|
| In the Voice Adjustment Menu users can choose their speech profile, synthesizer, and synthesizer language. Further, users can also use this menu to create custom voices for different contexts; adjust the pitch, rate, and volume; and choose what level of punctuation should be spoken. | |
Echo
| The Echo Mouse Split Button and the Typing Split Button. This section of the interface allows user to change echo settings. “Echo” refers to the reader speaking the input the program is receiving from the user via the keyboard (typing characters and words) and the mouse (what is clicked on or hovered over). | |
 |
|
| Users can click the top half of the Mouse Split Button to enable or disable the mouse echo. | |
| The keyboard shortcut to toggle between mouse echo word, mouse echo line, and mouse echo off | MAGic Key + M |
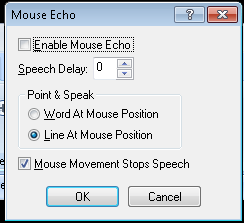
| Users can click the bottom half of the split button to open the Mouse Dropdown Menu. Here users can turn on echo words or echo lines. Also in this menu is the option for Mouse Stops Speech. When enabled, this will silence the current speech when the mouse pointer is moved. Lastly, you can use this dropdown to open the Mouse Echo Menu. | |
 |
|
| The Mouse Echo Menu can be used to enable or disable mouse echo. As well, users can choose the speech delay for mouse echo. This is the amount of time need users will need to hover over an item before MAGic will speak it. Users can also choose to echo words or lines in this menu. Finally, this menu includes settings to enable or disable Mouse Movement Stops Speech. | |
| Users can click the top half of the Typing Split Button to enable or disable typing echo. | |
| Keyboard shortcut to toggle through typing echo options – characters, words, both characters and words, and none. | Insert + 2 |
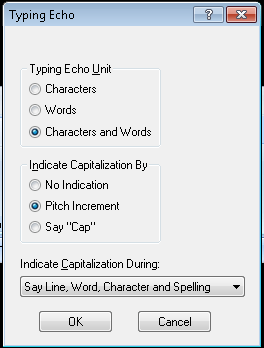
| Users can click the bottom half of the split button to open the Typing Dropdown Menu. Here users can choose to enable Character echo, Word echo, or Character and Word echo. You can also open the Typing Echo Menu. | |
 |
|
| With this menu, users can enable or disable typing echo and choose their echo mode: Characters, Words, Both Characters and Words, and None. Further, users can choose how MAGic indicates capitalization: No Indication, Pitch Increment, or Say “Cap”. If the Pitch Increment is selected, users can customize when MAGic indicates capitalization: Say Character and Spelling, Say Word, Character and Spelling, or Say Line, Character and Spelling | |
Reading
Read Characters |
|
| Read Previous Character | Numpad 4 (left arrow) |
| Read Current Character | Numpad 5 |
| Read Next Character | Numpad 6 (right arrow) |
Read Words |
|
| Read Previous Word | Insert + Numpad 4 (left arrow) |
| Read Current Word | Insert + Numpad 5 |
| Read Next Word | Insert + Numpad 6 (right arrow) |
Read Lines |
|
| Read Previous Line | Numpad 8 (up arrow) |
| Read Current Line | Insert + Numpad 8 |
| Read Next Line | Numpad 2 (down arrow) |
Read Sentences |
|
| Read Previous Sentence | Alt + Numpad 8 (up arrow) |
| Read Current Sentence | Alt + Numpad 5 |
| Read Next Sentence | Alt + Numpad 2 (down arrow) |
Read Paragraphs |
|
| Read Previous Paragraph | Ctrl + Numpad 8 (up arrow) |
| Read Current Paragraph | Ctrl + Numpad 5 |
| Read Next Paragraph | Ctrl + Numpad 2 (down arrow) |
Read To End |
|
| Read from cursor to end of document | Insert + Numpad 2 (down arrow) |
Using Mail with VoiceOver in macOS
OS X Commands for Mail
| Navigate the interaction and/ or by using Tab. The program consists of major sections including Toolbar, Favorites Tab, Mailboxes, Messages, and Message Content. | |
| Jump between sections of the interface | VO + J |
| Go to Favorites Menu | Control + 1, 2, 3, etc. |
| Get new mail | Shift + Command + N |
| Open mail | Command + O |
| Reply | Command + R |
| Reply all | Shift + Command + R |
| Forward | Shift + Command + F |
| Redirect – creates a new message with a blank “To:” field with the sender in the “Reply To:” field | Shift + Command + E |
| Add sender to address book | Shift + Command + Y |
| Save email as… | Shift + Command + S |
| Print email | Command + P |
| Mark as read/ unread | Command + Shift + U |
| Flag a message | Command + Shift + L |
| Search | Command + Option + F |
| Show or hide deleted messages | Command + L |
| Send mail | Command + Shift + D |
Zoom for macOS
How to Zoom
| Navigate to the Zoom settings (this path may vary depending on your version of OS X) | Apple Menu > System Preferences > Accessibility > Zoom |
| Turn Zoom on/ off | Command + Option + 8 |
| Zoom in | Command + Option + Plus |
| Zoom out | Command + Option + Minus |
| Display Settings | You can enable black on white, white on black, or grayscale. You can also enhance the contrast. |
LEAP Session – All Things iOS
1. Who here is a VoiceOver user? What other AT do you all use? What do you like about VoiceOver? What do you dislike?
2. iOS VoiceOver Gestures
3. VoiceOver Trivia
4. VoiceOver with the Apple Wireless Keyboard
5. Siri and Dictation Trivia
6. iOS Apps
- Adaptive Apps for iOS
- Quick Record – Easy, accessible voice recorder
- Capti Narrator – Turns text into audiobooks
- VisionAssist – Magnifier App
7. Questions?
8. Want to learn more about VoiceOver?
- Talk to your DBVI counselor about setting up a session with me (Jimmy Allen, AT Trainer)
- Check out the Hadley School for the Blind’s iFocus Series
- Go to AppleVis – A community powered site on vision accessibility for Apple products
Siri & Dictation Trivia
Trivia Questions
| 1 | Using dictation, how can you move down to the next line? This would be the equivalent of hitting enter with the keyboard. |
| 2 | What does Siri do if you ask her to “Take a Selfie?” |
| 3 | Which of the followings things can Siri NOT do?
|
| 4 | What symbol on a QWERTY cannot be printed using dictation? |
| 5 | You can ask Siri to remind you of something at a certain time, but can you have Siri remind you or something at a certain place? |
| 6 | Can you have Siri check your Facebook updates? |
| 7 | Can you have Siri write tweets for you? |
| 8 | Which of the following relationships can you not add to contacts with Siri?
|
| 9 | Which of the following apps can you not use Siri with?
|
| 10 | Which of the following Siri commands will not work as intended?
|
Answer Key
| 1 | Say “new line” |
| 2 | Opens the camera app but the camera is not automatically set to front facing. |
| 3 | c – Turn on Zoom |
| 4 | Trick question! Dictation can create any symbol on a QUERTY keyboard – typically by adding the word “symbol”. |
| 5 | Yes |
| 6 | No |
| 7 | Yes |
| 8 | e – Sister-in-law |
| 9 | h – You can use Siri with all the apps above |
| 10 | a – “Search Facebook for Jimmy Allen” |
VoiceOver Trivia
Trivia Questions
| 1 | Name the gesture that will read all the information from the top of the screen to the bottom |
| 2 | Name the gesture that will read all the information on the screen from the point of focus to the bottom |
| 3 | This gesture can be used to start and end phone calls as well as start and stop the stopwatch |
| 4 | This gesture will give you more information about whatever item has focus |
| 5 | This gesture will turn off speech |
| 6 | This gesture will silence VoiceOver until it receives further input |
| 7 | The easiest way to turn VoiceOver on and off is |
| 8 | This gesture moves your focus to the last item on the screen |
| 9 | This gesture opens the item chooser |
| 10 | This gesture turns on the screen curtain |
Answer Key
| 1 | Two finger swipe up |
| 2 | Two finger swipe down |
| 3 | Two finger double tap |
| 4 | Three finger single tap |
| 5 | Three finger double tap |
| 6 | Two finger single tap |
| 7 | Triple click the home button |
| 8 | Four finger single tap on the bottom half of the screen |
| 9 | Two finger triple tap |
| 10 | Three finger triple tap |
