The Windows 10 Mail app has had some accessibility issues in the past. How the app functions for screen reader users seems to be improving, but it certainly isn’t at 100 percent accessibility and usability as of yet. Below are a couple of articles and resources from Microsoft on accessibility and Windows 10 Mail.
Square is a financial app that allows users to manage, organize, and perform monetary transactions. Square is especially famous for producing credit card swipers that work with their app and allow people to do credit card transactions on the go.
The Square Register app is free to download from the AppStore but requires users create a Square account. New users can request a free Square Reader (the credit card swiper that plugs into the headphone jack of an iDevice).
Square Register Walkthrough
The app is organizes into 5 tabs: Register, Activity, Customers, Settings, and Help. As you enter each tab, the first control which is given focus is the applet switcher. Activating the applet switcher button will open the menu that allows you to move between the 5 tabs.
Register
Use the Register tab to enter a subtotal and have customers pay with cash, check, gift card, invoice, or credit or debit card. You can also split a payment out over multiple payment types – for example, if someone wanted to pay a certain amount in cash and the rest on a credit card.
The default interface of the Register tab is the Custom Amount tab where users have a number pad to enter amounts. Here you can add multiple custom amounts which are subtotaled.
The Current Sale button will tell you the number of separate items on the current sale. Activating this button will show you a detailed list of the various amounts on the current bill.
The Charge button will give you your current subtotal. Users can select the charge button to choose payments options.
Add notes on the item with the notes button. The amount will give you the price of the current item. Set the price of the current button with the number pad. Note that the amount starts as $0.00 and as you input digits, they populate in from the right. So, if I press the 9, the amount will be $0.09. If I add a 5, my amount will now be $0.95. If I add a zero, my amount will be $9.50. Press the add button to add the current item to the subtotal. Press the charge button when you’re done adding items.
Users can also setup inventory items using the app to quickly add items at certain prices and track inventory of physical items. To do this, you must switch from the custom amount tab to the items library tab. You’ll find these controls on the bottom of the register tab.
In the item library tab, you’ll see a list of your previously created items. Use the search box to easily search for items. Use the edit button to edit existing items or create new items.
Activity
The Activity tab has all your recent transactions. Select specific transactions to see details and issue receipts or refunds.
Transactions will be organized by day, with the most recent transactions appearing above older transaction. There is a search field where you can search by receipt number, credit card number, or by swiping a card with the card reader.
Customers
Add customers to track contacts, speed up transactions, and a issue receipts and refunds more easily.
Browse and search all customers. View lapsed, reachable, and regulars with Smart Groups. You can also create your own customer groups!
Settings
The Settings tab allows users to customize many features of their Square app.
Checkout Options
Sales Tax
Set up Sales Tax on all or specific items and decide how you’d like taxes presented to the customer (users can choose to have the tax rolled into the price or shown to the customer prior to completing the transaction).
Signature
Decide how you want customers to provide their signature – either through your iDevice or on the printed receipt. You call also allow customers to skip the signature for transactions that are $25 or less.
Tipping
Set up options for tipping. Users can decide to enable or disable tipping. With tipping enabled, users can decide to either set up their own recommended tipping percentages or use Square’s Smart Tip Amounts where, “Payments under $10 enable tip choices in whole dollar, and payments over $10 enable tipping by percentages.” Users can also choose to enable or disable the option for users to set their own custom tipping amounts. Finally, there is an option to add a separate tipping screen to the checkout process.
Help
Link your bank account, view messages in the Message Center, change your bank account, access support center, and review user agreements.
Alternatives to Square
PayPal is another financial app available free for download. Unfortunately, this app is not optimized for use with VoiceOver.
In this lesson, we’re going to start learning how to use JAWS to navigate, read, and edit an electronic document. What is an electronic document? Think of Microsoft Word files (.docx), Adobe Reader files (.pdf), email messages (.msg), and text files (.txt, .rtf, and .html).
We’ll be practicing using a Microsoft Word document. You can download the document below:
When you open a new document in most document editor programs, your cursor will be at the beginning of the document. The page is ready to take your input from the keyboard.
Exercise: Go to your desktop and open Microsoft Word. Type out the line, “Hello World! I am writing in Word with JAWS!”
When you’re done, move the cursor over to the left so that it is positioned right behind the exclamation point after, “Hello World”. You can move the cursor by pressing the left arrow button. What does JAWS do when we move through our writing with the arrow buttons?
As we move through a line or word or paragraph with the left and right arrow keys, JAWS will read out the character we just moved past. For example, if my cursor is at the end of the word “cat” and I press left arrow 3 times, I will hear JAWS say “t”, “a”, “c”.
With the cursor in position, press the delete button 24 times. What does JAWS do when we delete characters? What is this similar to doing?
As we delete characters, JAWS will read the character we are about to delete. For example, if my cursor is at the beginning of the sentence, “I love cats”, and I press delete 11 times, I will hear “space”, “l”, “o”, “v”, “e”, space,”c”, “a”, “t”, “s”. If you hear JAWS say “blank”, it means you’ve reached the end of your content. Deleting characters is similar to using the right arrow button.
Now press the Backspace button 12 times. In this instance, what does JAWS do? What is this similar to doing?
The Backspace button will delete characters to the left of the cursor. It is similar to moving through the line with the left arrow key.
Moving Through a Document
In our example document from above, see what happens when you use the up and down arrow keys. How does this differ from what JAWS did with the left and right arrow keys?
As you can see, the arrow keys move vertically between lines. As the cursor arrives on a new line, JAWS will read the entire line. This is different from left and right as those controls moved the cursor horizontally along and read characters.
What happens to the cursor and what does JAWS do when you press the Page Up button? How about when we press the Page Down button? What is this similar to?
The Page Up and Page Down buttons will move the cursor vertically through a document with half page jumps with each press. Continue pressing page up and you’ll arrive at the top of the document. Continue to press page down and you’ll arrive at the button. With each jump, JAWS will read the line.
The up and down keys and page up and page down are all great ways to move through a document.
Reading
Read Characters
Read Previous Character
Numpad 4 (left arrow)
Read Current Character
Numpad 5
Read Next Character
Numpad 6 (right arrow)
Read Words
Read Previous Word
Insert + Numpad 4 (left arrow)
Read Current Word
Insert + Numpad 5
Read Next Word
Insert + Numpad 6 (right arrow)
Read Lines
Read Previous Line
Numpad 8 (up arrow)
Read Current Line
Insert + Numpad 8
Read Next Line
Numpad 2 (down arrow)
Read Sentences
Read Previous Sentence
Alt + Numpad 8 (up arrow)
Read Current Sentence
Alt + Numpad 5
Read Next Sentence
Alt + Numpad 2 (down arrow)
Read Paragraphs
Read Previous Paragraph
Ctrl + Numpad 8 (up arrow)
Read Current Paragraph
Ctrl + Numpad 5
Read Next Paragraph
Ctrl + Numpad 2 (down arrow)
Read To End
Read from cursor to end of document
Insert + Numpad 2 (down arrow)
Changing the Speech Rate
An important part of working with a screen reader is setting the speech rate. In some instances, you’ll need the speaker to slow down. In other instances, you’ll want to speed up. This is especially important work working in a document as you will alter the speech rate depending on what you’re doing. For example, you might want the speaker to speed up when you’re having it read back a section you just finished writing.
JAWS gives you two different ways to change the speech rate. You can change the speech temporarily or permanently. Temporary changes are great for the purpose of editing, etc. Temporary changes are only retained while the active program where the change took place remains active. In other words, if you do a temporary change in Microsoft Word and then switch to Internet Explorer and back, you’ll find your speech rate has been reset to your permanent setting.
Temporarily Increase Reading Rate
Ctrl + Alt + Page Up
Temporarily Decrease Reading Rate
Ctrl + Alt + Page Down
Permanently Increase Reading Rate
Win + Ctrl + Alt + Page Up
Permanently Decrease Reading Rate
Win + Ctrl + Alt +Page Down
Selecting Text
Being able to select text is critical to working in a document. To highlight text hold shift and move the cursor.
Holding shift pressing the left or right arrow keys will highlight text one character at a time. Notice that you can only highlight in one direction at a time.
Since all the key commands we just learned for reading previous and next words, lines, and paragraphs also move the cursor, we can use them to highlight text.
Holding shift and pressing Page Up and Page Down will select items by the half page.
Use the Windows hotkey Ctrl + A to select all the text in a document.
Using Selected Text
Now that you know how to select text, what to do? Well, there are a lot of things. You can read, copy, cut, delete, and replace it.
Read
Shirt + Insert + Numpad 2 (down arrow)
Copy
Ctrl + C
Cut
Ctrl + X
Delete
When text is selected, press Delete or Backspace to remove it.
Replace
If you hit any character key while text is selected, the selected text will be replaced with the new input.
Text that is copied or cut is placed on the “clipboard”. The clipboard is an invisible space on your computer that temporarily stores data. Every time you use the clipboard, the old data is dumped for the new data.
The iPhone is a smart phone made by Apple. It is a mobile computing device that lets people make phone calls, access email, use the internet, and more on the go or from the comfort of their own couch.
The iPhone is a touchscreen device which means that users control it by touching different parts of the screen using various gestures. Note that these devices require bare fingers or specialized gloves.
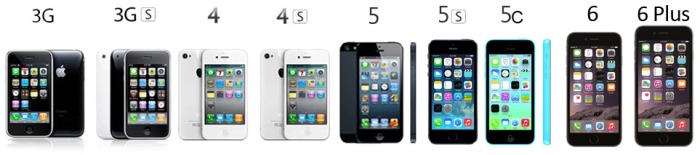
There are various versions of the iPhone. The original iPhone came out in 2007.It was followed by the iPhone 3G in 2008 and then the iPhone 3GS in 2009. The iPhone 4 was released in 2010 and featured Retina Display (high pixel density display). The iPhone 4s came out in 2011 and offered a larger display than previous models. The iPhone 5 was released in 2012 and offered a larger memory capacity, display size, and was thinner than prior models. The iPhone 5c came out in 2013. The iPhone 5s also came out in 2013 and offered Touch ID. The iPhone 6 was released in 2014 and offered an even larger display than previous versions. Also in 2014, the iPhone 6 Plus was released which offered a larger display than the 6. In 2015, these two versions were followed by the iPhone 6s and the iPhone 6s Plus.
iPhones run iOS which is the mobile operating system developed by Apple. iOS is also the operating system for iPad and iPod. iOS is now on its ninth iteration with iOS 9.
Different models of the iPhone from 3G to 6 Plus
Tour of the iPhone Controls
Shape and Size
The iPhone is a rectangle. The feel and exact dimensions may vary depending on whether or not the device is in a case, because different cases comes in different shapes, sizes, and thicknesses. The front screen is flat and slick1.
The Home Button
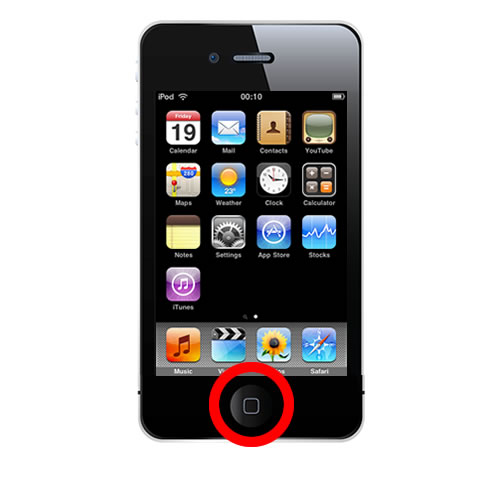
On the front screen, the home button is a small, circular depression users will find along the front edge of the screen. The Home Button might be the most important control on the iPhone as it helps users navigate the iPhone, activate VoiceOver mode, use Siri, and more.
To find the Home Button, users may simply trace a thumb along the edge of the iPhone screen. They’ll find the Home Button in the middle of the edge on one of the shorter sides.
Use the Home Button to navigate back to the home screen of the iPhone, wake up the iPhone, activate Siri, switch between apps, and turn on accessibility modes like VoiceOver and Zoom.
iPhone home button
Sleep and Wake Button
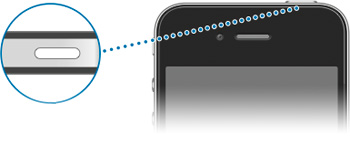
The Sleep and Wake Button is located along the outside edge of the iPhone on the side opposite of the Home Button. The button is small, rectangular and near the corner.
For iPhone 5 and earlier, users holding their device in vertical orientation will discover the home button on the outside of the upper edge on the right. For iPhone 6 and later users, the sleep/ wake button will be on the outside of the right edge near the top.
The Sleep and Wake Button will put the iPhone into sleep mode which dims the screen and uses less energy. When the iPhone is asleep, the button will also wake the iPhone. Holding the Sleep and Wake Button down will turn the iPhone on or off.
Location of the sleep and wake button on the iPhone 5 and earlier models
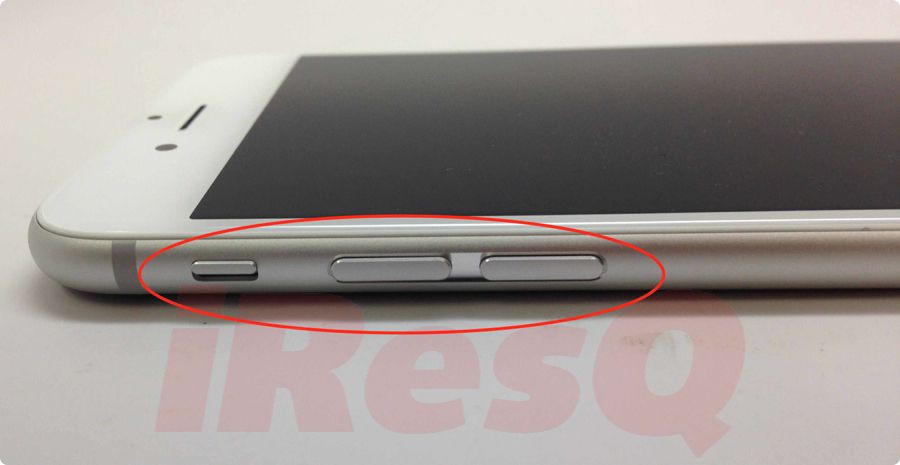
Location of the sleep and wake button on iPhone 6 and later models
Volume Buttons
The volume buttons let you adjust the volume level of the iPhone. These two small, rectangular buttons are found side by side along the outside edge of the iPhone.
If a user is holding the iPhone in vertical orientation, the volume buttons can be found on the outside edge on the left side near the top corner. The top button is volume up and the bottom button is volume down.
Volume buttons on the iPhone
Side Switch Button
On older versions of the iPhone, it is sometimes referred to as the Mute and Screen Rotation Switch2.
So what does the Side Switch do? The Side Switch is used for one of two purposes: to mute and unmute the iPhone or to lock and unlock screen rotation.
Side switch on the iPhone
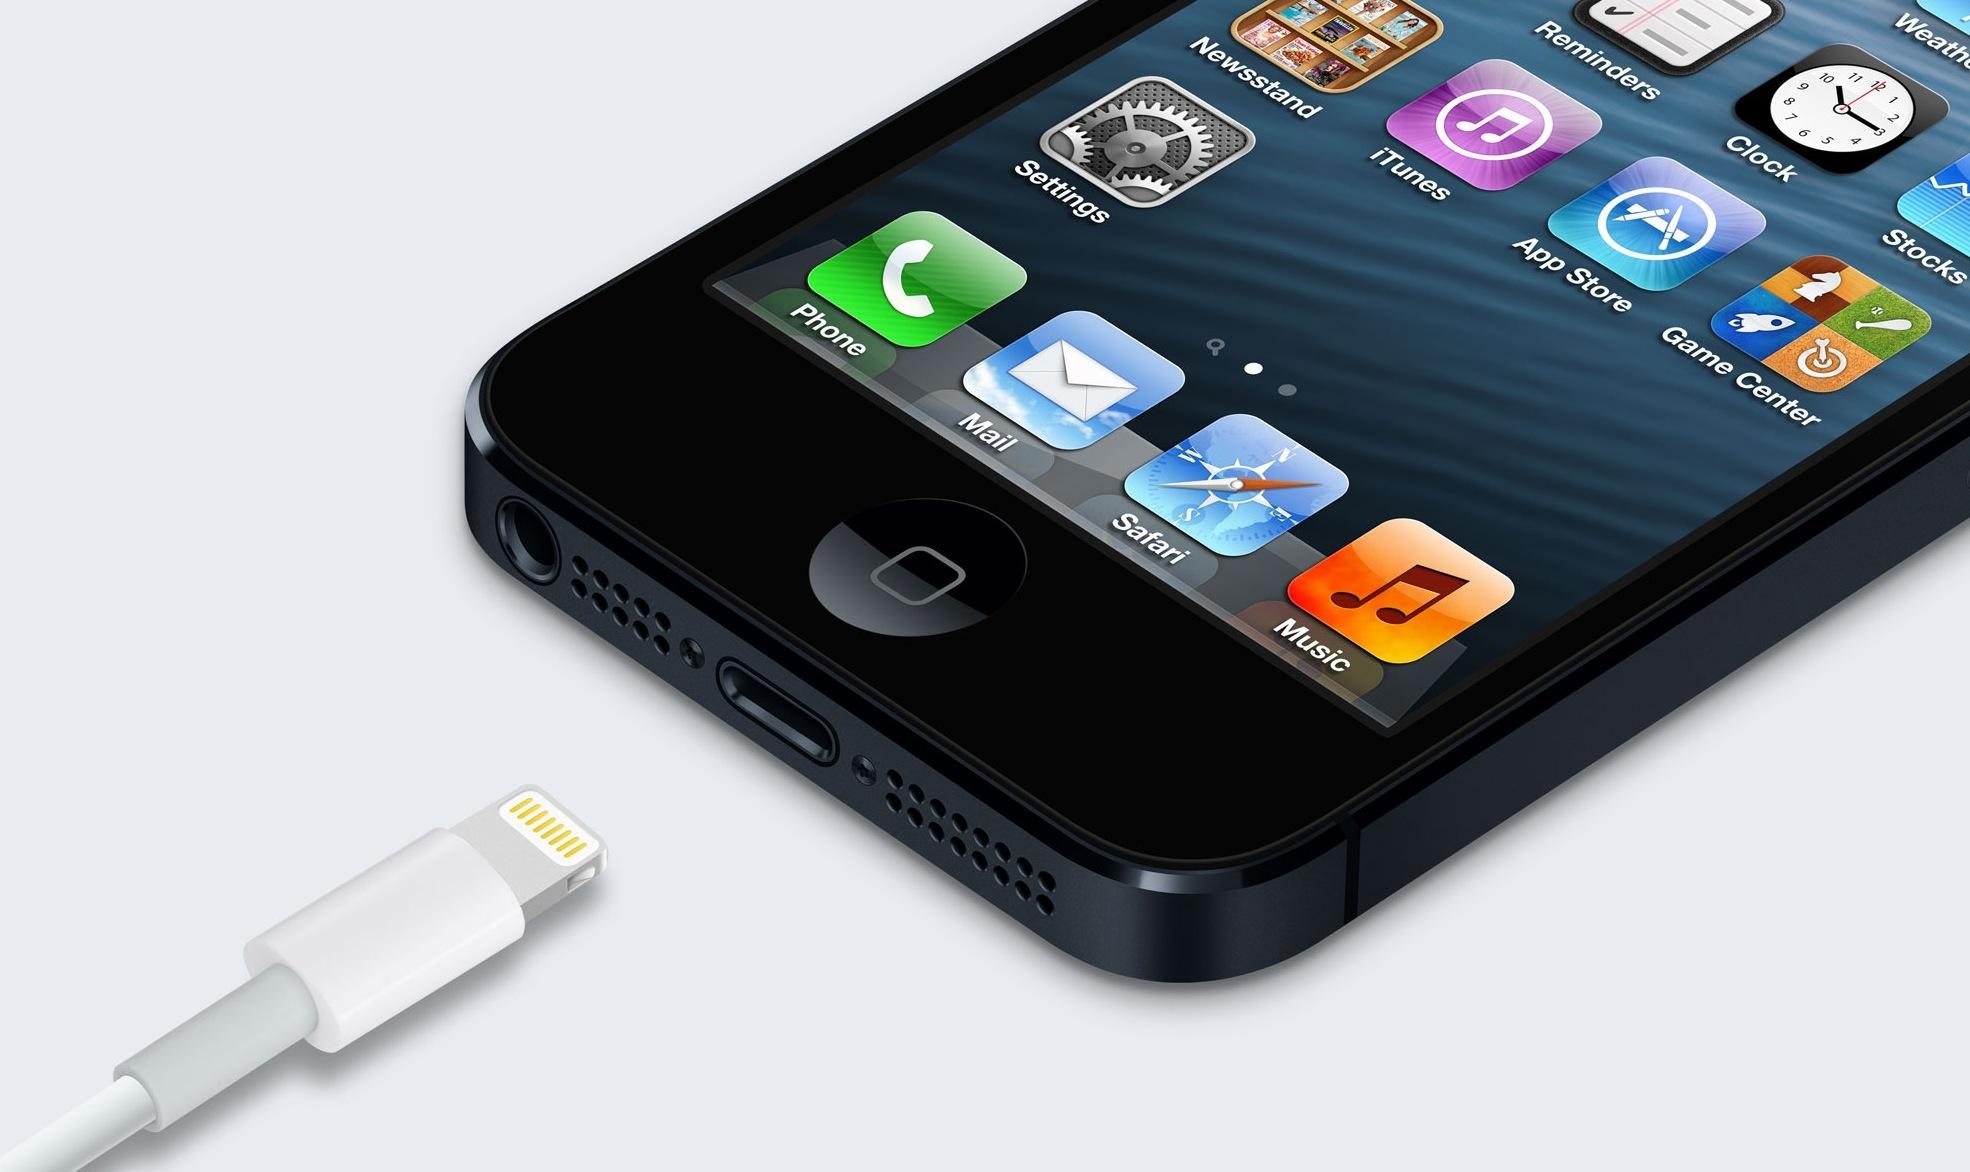
Dock Connector Port
The Dock Connector is how the iPhone is charged and connector to other devices. The Dock Connector can be found on the outside edge of the iPhone below the home button.
Different iPhones have different connector types. Earlier iPhone (iPhone, iPhone 3G, iPhone 3GS, iPhone 4, and iPhone 4s) have a 30-pin dock connection. This connection port is wider than the connection on newer models of iPhone and is approximately 1 inch wide.
Newer iPhones have the Apple Lightning Connector which is an 8-pin connection. This type of connection is present on all iPhone starting with the iPhone 5. This connection is smaller and is approximately half an inch wide.
Charger type for iPhone 4 and earlier
Charger type for iPhone 5 and later
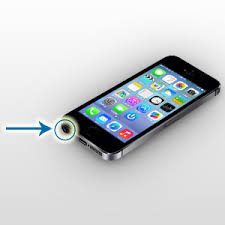
Headphone Jack
The Headphone port is for connecting headphones and other audio devices to the iPhone. On earlier versions of the iPhone (prior to the iPhone 5), the headphone jack was found on the outside edge on the top left side. With newer iPhones (iPhone 5 and newer), the headphone jack can be found along the bottom outside edge on the left side.
Location of headphone jack on iPhone 4 and earlier
Location of headphone jack on iPhone 5 and later
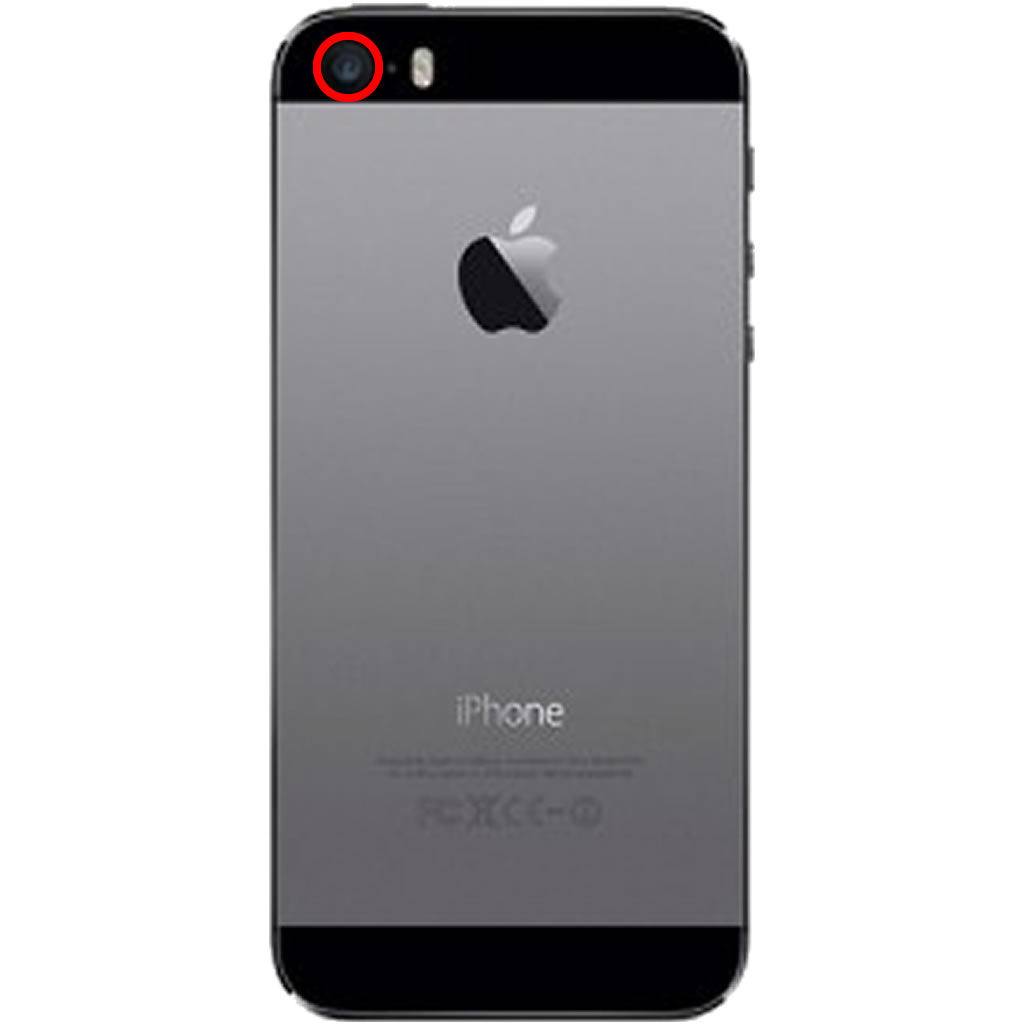
Rear Facing Camera
The Rear Facing Camera is the default camera for the device. It will be used in a range of applications from the iOS Camera app to OCR apps like the knfbReader to magnification apps like VisionAssist and more.
The Rear Facing Camera can be found on the backside of the iPhone. If a user is holding the iPhone in vertical orientation, the rear facing camera is on the back side of the upper right corner. The camera is built into the iPhone and cannot be physically distinguished1.
Location of rear facing camera lens on iPhone
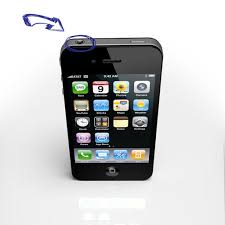
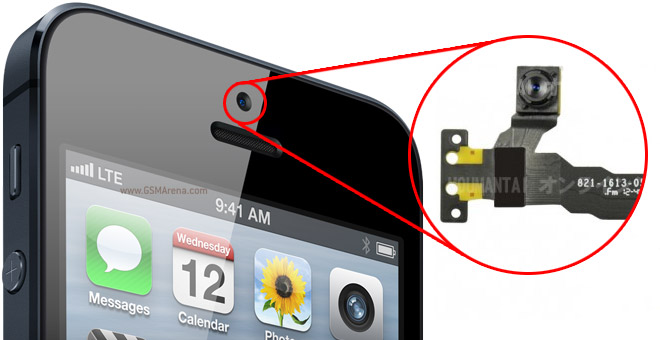
Front Facing Camera
The Front Facing Camera is utilized by several apps, most notably FaceTime. The front camera is small, circular and cannot be physically distinguished as it is built into the iPhone1.
If a user is holding the iPhone in vertical orientation, the front facing camera can be found in the middle of the screen just beneath the top edge.
Location of front facing camera lens on iPhone
iPad Mics
The location and number of Mics on an iPhone vary depending on the version of iPhone. Mics are physically indistinguishable, but if the iPhone is in a case, there is typically an opening for the mic.
iPhone 4 and earlier have a single mic. If a user is holding the iPhone in vertical orientation, the mic can be found on the bottom outside edge of the device, on the left side.
Location of microphone on iPhone 4 and earlier
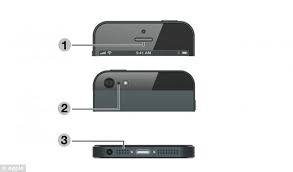
iPhone 5 and later have three mics. If the user is holding the iPhone in vertical orientation, there is a mike on the outside of the bottom edge on the left side between the dock connector port and the headphone jack. There is another mic on the screen, the middle just below the top edge. Finally, there is a third mic on the back side of the phone right next to the rear facing camera.
Location of microphones on iPhone 5 and later.
Location of microphones on iPhone 5 and later.
Turning On and Off the iPhone
The first thing you’ll need to learn about your iPhone is how to turn it on and off.
To turn on the iPhone, press and hold the Sleep and Wake button for 3 seconds3.
To turn off the iPhone, touch and hold the Sleep and Wake button for 4 seconds until the Power slider appears at top of screen3. For users not working in VoiceOver, simply touch and drag the red arrow to the right. For VoiceOver users, they’ll hear the system say, “Power off button, slide or double tap” and they can simply perform a one finger double tap to turn off the device.
Putting the iPhone to Sleep
Putting the iPhone to sleep is simple: users simply have to touch the Sleep and Wake button. To wake the iPhone up, users can do the same thing. Note that, depending on settings, the passcode will need to input again or users can use Touch ID to unlock their iPhone.
iPhone Care and Cleaning
“The best way to clean the iPhone is by using a dry, soft, lint-free cloth3.”
“There’s no need to scrub the screen very hard, as there is a protective coating on the screen’s surface3.”
Do not use glass cleaners! “According to the iPhone user’s guide, you should not use “window cleaners, household cleaners, aerosol sprays, solvents, alcohol, ammonia or abrasives” to clean the screen. Instead, to wipe off any smudges, first, turn off the iPhone — the dark screen makes smudges easier to see — and try using your luck with a microfiber cloth or even your sleeve3.”
JAWS is a screen reading program. Screen readers are software applications that will attempt to identify, interpret, and read the information being presented on the computer’s screen.
JAWS operates off of keyboard input like other screen readers such as VoiceOver for OS X, NVDA, Window-Eyes, and Dolphin.
Computer Basics
Starting up your computer
Turning on your computer isn’t always easy. Some manufacturers hide the ‘on’ button – for instance, on top of the case or flat on the front where you can’t see it. Typically, on laptops, the on button can be found just above the keyboard but below the screen.
Shutting down your computer
To turn off your computer using the Start menu, press the Windows button and then press the right arrow. In Windows 7, this should move focus to the Shutdown button. With focus on this button, you can press Enter to shutdown the computer or press the right arrow key again to open a menu with many options, including: switch user, log off, lock, restart, sleep, or hibernate. When you Shut down, your computer closes all open programs, along with Windows itself, and then completely turns off your computer and display.
Laptop care and handling
There are many dos and dont’s when it comes to caring for your laptop. These include things like not using your laptop on your bed, keeping your laptop clean, and not using your laptop as Frisbee, but the list goes on. For a comprehensive list, follow this link to wikiHow’s 33 steps to taking good care of your laptop computer.
The Windows Desktop
Microsoft Windows is a graphical operating system. There have been many versions of Windows created since 1981 including: Windows 1.0, Windows 2.0 and 2.1, Windows 3.0 and 3.1, Windows 95, Windows 98, Windows 2000, Windows ME, Windows NT, Windows XP, Windows Vista, Windows 7, Windows 8 and 8.1, and Windows 10. The vast majority of Windows users are now on Windows 7, Windows 8, or Windows 10.
Specialized versions of Windows have been developed for other devices. Windows CE (Embedded Compact) was developed to run on “minimalistic computers” like satellite navigation systems and mobile phones. Windows CE was the basis for Microsoft’s smart phone operating system used in Windows phones – the aptly named Windows Phone system. Microsoft also developed a special version of Windows to run on their video game console the Xbox titled Xbox OS.
The backdrop of Microsoft Windows is the Desktop – the computer space where you find programs and do work. The reason Microsoft named their operating system “Windows” is because it was one of the first graphical user interfaces. As well, the system is built around users opening and manipulating programs in little windows.
Important Windows Concepts
Icon
An icon is a pictogram displayed on a computer screen in order to help the user navigate a computer system. Icons are quickly comprehensible symbols of a software tool, function, or a data file, that are accessible on the system. An icon is more like a traffic sign than a detailed illustration of the actual entity it represents.
Tile
Similar to an icon, tiles in Windows 8 and 10 are also pictogram displayed on a computer screen in order to help the user navigate a computer system. However, tiles are usually linked to smaller programs or applications, typically referred to as “apps”.
Cursor
a movable indicator on a computer screen identifying the point that will be affected by input from the user, for example showing where typed text will be inserted.
Focus
The focus indicates the component of the graphical user interface which is selected to receive input.
Parts of the Windows Desktop
Desktop
The desktop is the main screen area that you see after you turn on your computer and log on to Windows. Like the top of an actual desk, it serves as a surface for your work. When you open programs or folders, they appear on the desktop.
Start Button and Start Menu
The Start menu is the main gateway to your computer’s programs, folders, and settings. It’s called a menu because it provides a list of choices, just as a restaurant menu does. And as “start” implies, it’s often the place that you’ll go to start or open things. The look of the Start Menu is different from earlier versions of Windows due to the Live tiles you’ll find the right of the Start Menu. This area allows you to quickly access programs and applications. You can customize this area to change what apps and programs appear here.
Ask Me Anything
A search box which will search both your computer and the internet. Results will be organized according to where they have been returned from (computer, web, specific applications).
Start Listening Button
Microsoft has a built-in virtual assistant named Cortana. Use this control speak questions to your computer. Note that if your computer does not have built-in microphone, you’ll need an external mic for this functionality to work.
Task View
Provides an overview of all open applications and virtual desktop features.
Taskbar
The taskbar is the long horizontal bar at the bottom of your screen. Unlike the desktop, which can get obscured by open windows, the taskbar is almost always visible. It has three main sections: the start button, the middle section, which shows you which programs and files you have open and allows you to quickly switch between them, and the notification area, which includes a clock and icons (small pictures) that communicate the status of certain programs and computer settings.
Notification Area
The notification area is a part of the taskbar that provides a temporary source for notifications and status. It can also be used to display icons for system and program features that are not on the desktop. The notification area was known historically as the system tray or status area. Depending on how many icons you have in the notification area, you might encounter the Notification Overflow area. This area holds the icons that could not fit in the notification area.
Windows Key Functionality
Opens the Quick Launch Toolbar with focus on the Ask Me Anything bar
Windows Button (Win)
Interrupt or cancel current process or running program, or close a pop-up window or menu
Escape Button (Esc)
Used to advance the focus to the next functional area or “tab stop”
Tabulator Key (Tab)
Finish an “entry” and begin the desired process, and is usually an alternative to pressing an OK button
Enter Key (Enter)
Along with the backspace key, the delete key is used to delete text. However, when dealing with text pressing the delete key deletes text to the right of the cursor and pressing the backspace key deletes text to the left (backwards) of the cursor. Delete key can also be used to delete files and folders.
Delete Key (Del)
The shift key is a modifier key on a keyboard, used to type capital letters and other alternate “upper” characters. There are typically two shift keys, on the left and right sides of the row below the home row. The shift key is also used to highlight text.
Shift Key (Shift)
A Control key is a modifier key which, when pressed in conjunction with another key, performs a special operation.
Control Key (Ctrl)
The Alt key is used to alternate the function of other pressed keys. For example, simply pressing “A” will type the letter a, but if you hold down either Alt key while pressing A, the computer will perform an Alt + A function, which varies from program to program.
Alternate Key (Alt)
Windows Shortcuts
Minimize all open applications and move focus to the desktop. You can press the key combination to restore the minimized applications.
Win + D
Put focus on the Windows Taskbar. Pressing the key combination again will allow you to cycle focus between open and pinned applications.
Win + T
When focus is on the desktop, pressing this key or key combination will cycle focus between the Start Menu, Desktop, Taskbar, and Notification Area.
Tab/ Shift + Tab
Opens Cortana in listening mode.
Win + C
Opens the Task Switcher menu to move between open applications. Hold Alt and move through applications by pressing tab or the arrow keys.
Alt + Tab
Opens the Task View Window displaying running applications list. Use the arrow keys to move between programs.
While ZoomText 10 is primarily a magnification program, it does include some screen reader functionality. Screen readers are software applications that will attempt to identify, interpret, and read the information being presented on the computer’s screen. You might have heard of screen reading programs such as JAWS, NVDA, Window-Eyes, and Dolphin.
Using the reading functionality in ZoomText, you can have the text on the screen read to you by a synthesized voice. Some examples of synthesized voices you might be familiar with include Apple’s Siri, Microsoft’s Cortana, Amazon’s Alexa, or possible good ol’ Microsoft Sam (the default text-to-speech voice from Windows 2000 and XP).
The ZoomText Reader Tab
The ZoomText Reader tab can be found in between the Magnifier and Tools tabs.
Using the Reader tab, users can change settings that control how the ZoomText speech sounds, when it talks, and how quickly it talks. The tab is also used to start the various reader functionalities. The tab has three sections: Speech, Echo, and Reading.
Speech
Speech
Activating the speech button will open a drop-down menu which allows users to disable or enable speech, change the speaker from a list of recently used voice profiles, and launch the Speech menu.
Keyboard shortcut to turn speech on and off: Alt + Shift + S
ZoomText Keyboard key to turn speech on and off: F12
Rate
Use the up and down arrow buttons to increase or decrease the speech rate.
Keyboard shortcut to increase speech rate: Ctrl + Numpad Plus
Keyboard shortcut to decrease speech rate: Ctrl + Numpad Minus
ZoomText Keyboard key to increase speech rate: F8
ZoomText Keyboard key to decrease speech rate: F7
The Speech Menu
The Speech Menu allows users to adjust a range of settings relating to the reader output of ZoomText including changing the voice profile and synthesizer, how the program should process text, and what extra information about formatting and the document the reader identify. The Speech menu has three tabs: Synthesizer, Text Processing, and Hints.
Synthesizer Tab
This tab allows users to enable/ disable speech output, select a synthesizer and voice profile, adjust synthesizer settings for speech rate, pitch, and volume, and test out your synthesizer settings with text to speech sampler.
Text Processing
This tab has three sections: Text, Numbers, and Punctuation. In the Text section, users can select whether or not they want the speaker to speak mixed case as separate words and whether or not they want the speaker to filter out repeated word after a customizable amount of repeats. In the Numbers section, users can choose the manner in which the reader deals with numbers. Finally, in the Punctuation section, users can choose how the reader deals with punctuation.
Hints
The Hints tab lets users choose settings about whether or not the reader will give indication of changes in capitalization, the presence of hyperlinks, and the beginning and end of a document.
Echo
This section of the interface allows user to change echo settings. “Echo” refers to the reader speaking the input the program is receiving from the user via the keyboard (typing characters and words) and the mouse (what is clicked on or hovered over).
Typing
The Typing button will allow you to choose what the reader echoes back from the keyboard input. Users can have the reader repeat every character, every word, both keys and words, or turn keyboard echo off.
Selecting settings will open the Echo Settings menu in the Typing tab. This menu can also be used to choose the typing mode. If the user selects for the reader to echo keys or keys and words, this menu will allow them to choose whether to enable or disable echo on different types of keys.
Keyboard shortcut to change Typing Echo Mode: Alt + Shift + T
Mouse
The Mouse button will open a drop-down menu that lets users select the mouse echo mode. Users can turn mouse echo completely off or have the reader echo whatever the pointer is moved over instantaneously or only after the mouse has hovered over an item for a specific amount of time.
Selecting Settings from the drop-down menu with launch the Echo Settings menu in the Mouse tab. In this menu, users can set how long of a hover will trigger an echo and the extent of reading that will occur.
Keyboard shortcut to change Mouse Echo Mode: Alt + Shift + M
Verbos.
The Verbos. (verbosity) button lets users choose settings related to how much the reader speaks. Users can choose between three verbosity mode: Beginner where the reader will speak text and detailed descriptions, Intermediate where the reader will speak text and brief descriptions, and Advanced where the speaker will simply speak the text on the screen.
Selecting Settings will open the Echo Settings menu in the Verbosity tab. In this menu, users can select their desired Verbosity mode. As well, under verbosity settings, there is an extensive list of verbosity options which can be toggled on and off.
Keyboard shortcut to change Verbosity Level: Alt + Shift + V
Echo Settings: Program
You might notice that there is fourth tab in the Echo Settings menu: the Program tab. This tab allows user to change settings related whether or not items are echoed when they become active (ex. Text cursor, alerts, menus), and what will be echoed as users move to a new line of text (the first word or the entire new line).
Reading
AppRdr
The AppRdr button will launch the AppReader which is a functionality that allows users to have large amounts of text read to them. When the AppReader is activated, the underlying application (where the text to be read is) will become active. The pointer will change from simply being an arrow to and arrow with a little page icon to the lower right. Simply click on text in the application and the AppReader will read the page from that point to the end of the document.
You’ll notice that when AppReader mode is enabled, your mouse pointer no longer functions normally. Left clicking will start the AppReader, and right clicking will take you back of AppReader mode. You can still move the pointer around in the screen in this mode.
Use the Ctrl button to pause the AppReader. When paused, press Enter to restart the reader from the current position or click elsewhere in the document to start the reader from a different position. Press Esc at any time to leave AppReader mode.
While the AppReader is reading, you can follow along as the focus moves from word to word. You’ll also notice that while the AppReader is reading you will be unable to do anything else with the computer. Your pointer disappears and the program follows the text to the bottom of the document.
From the ZoomText user interface, if you go to Reader and then select AppReader… from the drop-down menu, the Reading menu will open in the AppReader tab. In this menu, users can choose settings related to the AppReader. Users can choose whether or not they want to track and highlight words while the AppReader is running. They can also choose whether or not they want the AppReader to turn off automatically at the end of the document. Finally, users can use this menu to customize the appearance of the AppReader highlight.
Keyboard shortcut to start the AppReader: Alt + Shift + A
ZoomText Keyboard key to start the AppReader: F9
DocRdr
The DocRdr button will launch the DocReader which is a mode that is great for reading documents. The DocReader will open up a window that has pulled all the text from the underlying document and presented as plain text. Along the top of this window is a menu bar with options. The first option, Play will start the reader. As the reader moves through the document, the current word will be highlighted.
After the play button, users will find Rate and Power buttons. The Rate button will increase the speech rate of the reader. The power button will increase the font size of the DocReader font.
The next two options are Ticker and Prompter. These two buttons refer to the different modes the DocReader can be in. In Ticker mode, the DocReader window takes up approximately 1/3 of the screen is on top of actual document which occupies the remaining screen space below. The DocReader text is still visible but only a single line at a time can be displayed in this mode. When you start the reader, you’ll see both the DocReader Text and the actual text, and highlighting will follow along in both windows. In Prompter mode, the DocReader window occupies the entirety of the screen and multiple lines of the DocReader text are visible.
The Settings button will open up the Reader menu in the DocReader tab. Here users can change the appearance of the DocReader text, including font, style, text and background colors highlight shape, highlight thickness, highlight transparency, and highlight color.
The Speech button will launch the Speech menu in the Synthesizer tab (see above).
The Exit button will close the DocReader.
Keyboard shortcut to start the DocReader: Alt + Shift + D
ZoomText Keyboard key to start the DocReader: F10
SpeakIt
Since the SpeakIt tool and Zones have related functionality, we’re going to discuss the SpeakIt tool first because it’s simpler. The SpeakIt tool lets user highlight a section of the screen to have ZoomText read it.
When you activate the SpeakIt tool, your pointer will change (similar to when we activated the AppReader). This time, our pointer gets a small speech bubble added to the lower right. Like we saw when using the AppReader, when the SpeakIt tool is activated, we lose some functionality in our mouse pointer.
In SpeakIt mode, you’ll simply left click and drag to highlight a section of the screen. Whatever if beneath your highlight, if it’s readable by ZoomText, it will be read. You’ll notice this doesn’t only work on text, but program controls, icons, images, and more.
Keyboard shortcut to start the SpeakIt Tool: Alt + Shift + I
Zones
Zones is a feature where you basically setup a SpeakIt Window on some part of the screen and ZoomText reads it. The difference is that zones will remain in that area of the screen and read whatever is underneath them. So, if I set up a zone in the middle of my screen in Word and trigger that zone to be read, it will read what is there in word. If I then switch to Excel and trigger the same zone, it will read what is there in Excel.
Zones are definitely an advanced feature in ZoomText. One possible application of this feature might be putting a zone over a calculated field in Word or Excel. As you change the data in other parts of the file, your calculated field may change. You can trigger the zoom window anytime you’d like it read.
Reading Zones Hotkeys
Edit reading zones
Enters a mode where you can edit reading zones for the current application
Alt + Ctrl + E
List reading zones
Displays a list of reading zones for the current application
Alt + Ctrl + L
Navigate reading zones
Enters a mode where you can navigate through the reading zones for the current application
Alt + Ctrl + V
New reading zone
Enters a mode where you can create reading zones for the current application
Alt + Ctrl + Z
Next reading zone
Triggers the next reading zone for the current application
Alt + Ctrl + N
Previous reading zone
Triggers the previous reading zone for the current application
Alt + Ctrl + P
Trigger zone 1
Triggers reading zone 1 for the current application
Alt + Ctrl + 1
Trigger zone 2
Triggers reading zone 2 for the current application
Alt + Ctrl + 2
Trigger zone 3
Triggers reading zone 3 for the current application
Alt + Ctrl + 3
Trigger zone 4
Triggers reading zone 4 for the current application
Alt + Ctrl + 4
Trigger zone 5
Triggers reading zone 5 for the current application
Alt + Ctrl + 5
Trigger zone 6
Triggers reading zone 6 for the current application
Alt + Ctrl + 6
Trigger zone 7
Triggers reading zone 7 for the current application
Alt + Ctrl + 7
Trigger zone 8
Triggers reading zone 8 for the current application
Alt + Ctrl + 8
Trigger zone 9
Triggers reading zone 9 for the current application
Alt + Ctrl + 9
Trigger zone 10
Triggers reading zone 10 for the current application
The exercise below is based on the Reading and Writing with JAWS lesson. Please feel free to refer to the lesson or any other resource while completing this assignment.
In this lesson, we’re going to start learning how to use JAWS to navigate, read, and edit an electronic document. What is an electronic document? Think of Microsoft Word files (.docx), Adobe Reader files (.pdf), email messages (.msg), and text files (.txt, .rtf, and .html).
We’ll be practicing using a Microsoft Word document. We’ll learn some specifics of using Word later. You can download the document below:
When you open a new document in most document editor programs, your cursor will be at the beginning of the document. The page is ready to take your input from the keyboard.
Exercise: Go to your desktop and open Microsoft Word. Type out the line, “Hello World! I am writing in Word with JAWS!”
When you’re done, move the cursor over to the left so that it is positioned right behind the exclamation point after, “Hello World”. You can move the cursor by pressing the left arrow button. What does JAWS do when we move through our writing with the arrow buttons?
As we move through a line or word or paragraph with the left and right arrow keys, JAWS will read out the character we just moved past. For example, if my cursor is at the end of the word “cat” and I press left arrow 3 times, I will hear JAWS say “t”, “a”, “c”.
With the cursor in position, press the delete button 24 times. What does JAWS do when we delete characters? What is this similar to doing?
As we delete characters, JAWS will read the character we are about to delete. For example, if my cursor is at the beginning of the sentence, “I love cats”, and I press delete 11 times, I will hear “space”, “l”, “o”, “v”, “e”, space,”c”, “a”, “t”, “s”. If you hear JAWS say “blank”, it means you’ve reached the end of your content. Deleting characters is similar to using the right arrow button.
Now press the Backspace button 12 times. In this instance, what does JAWS do? What is this similar to doing?
The Backspace button will delete characters to the left of the cursor. It is similar to moving through the line with the left arrow key.
Moving Through a Document
In our example document from above, see what happens when you use the up and down arrow keys. How does this differ from what JAWS did with the left and right arrow keys?
As you can see, the arrow keys move vertically between lines. As the cursor arrives on a new line, JAWS will read the entire line. This is different from left and right as those controls moved the cursor horizontally along and read characters.
What happens to the cursor and what does JAWS do when you press the Page Up button? How about when we press the Page Down button? What is this similar to?
The Page Up and Page Down buttons will move the cursor vertically through a document with half page jumps with each press. Continue pressing page up and you’ll arrive at the top of the document. Continue to press page down and you’ll arrive at the button. With each jump, JAWS will read the line.
The up and down keys and page up and page down are all great ways to move through a document.
Reading
Read Characters
Read Previous Character
Numpad 4 (left arrow)
Read Current Character
Numpad 5
Read Next Character
Numpad 6 (right arrow)
Read Words
Read Previous Word
Insert + Numpad 4 (left arrow)
Read Current Word
Insert + Numpad 5
Read Next Word
Insert + Numpad 6 (right arrow)
Read Lines
Read Previous Line
Numpad 8 (up arrow)
Read Current Line
Insert + Numpad 8
Read Next Line
Numpad 2 (down arrow)
Read Sentences
Read Previous Sentence
Alt + Numpad 8 (up arrow)
Read Current Sentence
Alt + Numpad 5
Read Next Sentence
Alt + Numpad 2 (down arrow)
Read Paragraphs
Read Previous Paragraph
Ctrl + Numpad 8 (up arrow)
Read Current Paragraph
Ctrl + Numpad 5
Read Next Paragraph
Ctrl + Numpad 2 (down arrow)
Read To End
Read from cursor to end of document
Insert + Numpad 2 (down arrow)
Changing the Speech Rate
JAWS gives you two different ways to change the speech rate. You can change the speech temporarily or permanently. Temporary changes are great for the purpose of editing, etc. Temporary changes are only retained while the active program where the change took place remains active. In other words, if you do a temporary change in Microsoft Word and then switch to Internet Explorer and back, you’ll find your speech rate has been reset to your permanent setting.
Temporarily Increase Reading Rate
Ctrl + Alt + Page Up
Temporarily Decrease Reading Rate
Ctrl + Alt + Page Down
Permanently Increase Reading Rate
Win + Ctrl + Alt + Page Up
Permanently Decrease Reading Rate
Win + Ctrl + Alt +Page Down
Selecting Text
Being able to select text is critical to working in a document. To highlight text hold shift and move the cursor.
Holding shift pressing the left or right arrow keys will highlight text one character at a time. Notice that you can only highlight in one direction at a time.
Since all the key commands we just learned for reading previous and next words, lines, and paragraphs also move the cursor, we can use them to highlight text.
Holding shift and pressing Page Up and Page Down will select items by the half page.
Use the Windows hotkey Ctrl + A to select all the text in a document.
Using Selected Text
Now that you know how to select text, what to do? Well, there are a lot of things. You can read, copy, cut, delete, and replace it.
Read
Shirt + Insert + Numpad 2 (down arrow)
Copy
Ctrl + C
Cut
Ctrl + X
Delete
When text is selected, press Delete or Backspace to remove it.
Replace
If you hit any character key while text is selected, the selected text will be replaced with the new input.
Text that is copied or cut is placed on the “clipboard”. The clipboard is an invisible space on your computer that temporarily stores data. Every time you use the clipboard, the old data is dumped for the new data.
JAWS is a screen reading program. Screen readers are software applications that will attempt to identify, interpret, and read the information being presented on the computer’s screen.
JAWS operates off of keyboard input like other screen readers such as VoiceOver for OS X, NVDA, Window-Eyes, and Dolphin.
Computer Basics
Starting up your computer
Turning on your computer isn’t always easy. Some manufacturers hide the ‘on’ button – for instance, on top of the case or flat on the front where you can’t see it. Typically, on laptops, the on button can be found just above the keyboard but below the screen.
Shutting down your computer
To turn off your computer using the Start menu, press the Windows button and then press the right arrow. In Windows 7, this should move focus to the Shutdown button. With focus on this button, you can press Enter to shutdown the computer or press the right arrow key again to open a menu with many options, including: switch user, log off, lock, restart, sleep, or hibernate. When you Shut down, your computer closes all open programs, along with Windows itself, and then completely turns off your computer and display.
Laptop care and handling
There are many dos and dont’s when it comes to caring for your laptop. These include things like not using your laptop on your bed, keeping your laptop clean, and not using your laptop as Frisbee, but the list goes on. For a comprehensive list, follow this link to wikiHow’s 33 steps to taking good care of your laptop computer.
The Windows Desktop
Microsoft Windows is a graphical operating system. There have been many versions of Windows created since 1981 including: Windows 1.0, Windows 2.0 and 2.1, Windows 3.0 and 3.1, Windows 95, Windows 98, Windows 2000, Windows ME, Windows NT, Windows XP, Windows Vista, Windows 7, Windows 8 and 8.1, and Windows 10. The vast majority of Windows users are now on Windows 7, Windows 8, or Windows 10.
Specialized versions of Windows have been developed for other devices. Windows CE (Embedded Compact) was developed to run on “minimalistic computers” like satellite navigation systems and mobile phones. Windows CE was the basis for Microsoft’s smart phone operating system used in Windows phones – the aptly named Windows Phone system. Microsoft also developed a special version of Windows to run on their video game console the Xbox titled Xbox OS.
The backdrop of Microsoft Windows is the Desktop – the computer space where you find programs and do work. The reason Microsoft named their operating system “Windows” is because it was one of the first graphical user interfaces. As well, the system is built around users opening and manipulating programs in little windows.
Important Windows Concepts
Icon
An icon is a pictogram displayed on a computer screen in order to help the user navigate a computer system. Icons are quickly comprehensible symbols of a software tool, function, or a data file, that are accessible on the system. An icon is more like a traffic sign than a detailed illustration of the actual entity it represents.
Cursor
a movable indicator on a computer screen identifying the point that will be affected by input from the user, for example showing where typed text will be inserted.
Focus
The focus indicates the component of the graphical user interface which is selected to receive input.
Parts of the Windows Desktop
Desktop
The desktop is the main screen area that you see after you turn on your computer and log on to Windows. Like the top of an actual desk, it serves as a surface for your work. When you open programs or folders, they appear on the desktop.
Start Button and Start Menu
The Start menu is the main gateway to your computer’s programs, folders, and settings. It’s called a menu because it provides a list of choices, just as a restaurant menu does. And as “start” implies, it’s often the place that you’ll go to start or open things.
Taskbar
The taskbar is the long horizontal bar at the bottom of your screen. Unlike the desktop, which can get obscured by open windows, the taskbar is almost always visible. It has three main sections: the start button, the middle section, which shows you which programs and files you have open and allows you to quickly switch between them, and the notification area, which includes a clock and icons (small pictures) that communicate the status of certain programs and computer settings.
Notification Area
The notification area is a part of the taskbar that provides a temporary source for notifications and status. It can also be used to display icons for system and program features that are not on the desktop. The notification area was known historically as the system tray or status area. Depending on how many icons you have in the notification area, you might encounter the Notification Overflow area. This area holds the icons that could not fit in the notification area.
Windows Key Functionality
Opens the Quick Launch Toolbar with focus on the Windows Search bar
Windows Button (Win)
Interrupt or cancel current process or running program, or close a pop-up window or menu
Escape Button (Esc)
Used to advance the focus to the next functional area or “tab stop”
Tabulator Key (Tab)
Finish an “entry” and begin the desired process, and is usually an alternative to pressing an OK button
Enter Key (Enter)
Along with the backspace key, the delete key is used to delete text. However, when dealing with text pressing the delete key deletes text to the right of the cursor and pressing the backspace key deletes text to the left (backwards) of the cursor. Delete key can also be used to delete files and folders.
Delete Key (Del)
The shift key is a modifier key on a keyboard, used to type capital letters and other alternate “upper” characters. There are typically two shift keys, on the left and right sides of the row below the home row. The shift key is also used to highlight text.
Shift Key (Shift)
A Control key is a modifier key which, when pressed in conjunction with another key, performs a special operation.
Control Key (Ctrl)
The Alt key is used to alternate the function of other pressed keys. For example, simply pressing “A” will type the letter a, but if you hold down either Alt key while pressing A, the computer will perform an Alt + A function, which varies from program to program.
Alternate Key (Alt)
Windows Shortcuts
Minimize all open applications and move focus to the desktop. You can press the key combination to restore the minimized applications.
Win + D
Put focus on the Windows Taskbar. Pressing the key combination again will allow you to cycle focus between open and pinned applications.
Win + T
When focus is on the desktop, pressing this key or key combination will cycle focus between the Start Menu, Desktop, Taskbar, and Notification Area.
Tab/ Shift + Tab
Opens the Task Switcher menu to move between open applications. Hold Alt and move through applications by pressing tab or the arrow keys.
The exercise below is based on the Windows Desktop & Starting JAWS lesson. Please feel free to refer to the lesson or any other resource while completing this assignment.
1. What version of JAWS do you have?
2. What is your JAWS serial number?
3. Please list all the icons you have on your desktop.
4. Please list all the items on your task bar (including open applications).
5. How many items are in your notification area? Give me an example of four such items.
6. Open Microsoft Word from the desktop, and use the keyboard shortcut to open the program’s system menu. Write down all the options in this menu.
7. Open Computer from the Start Menu and write down the name of your Hard Disk Drive.
8. Open up the Task Switcher menu and write down all the options you see.
9. What does JAWS say when you use the command to read the title bar when JAWS is the active application?
10. How do you close a program?
11. How do you close JAWS when it isn’t the active program?
Please record your answers to the questions below and send them to me via email at james.allen@vermont.gov prior to our next training.